Acceptance Test Specifications
This document is the acceptance test specification for the Medulla solution.
- Table of Contents
- Getting Started with the Solution
- Actions
- Quick Actions
- Machine groups
- Packages
- Deployments
- User interactions
- Kiosk
- Updates (WSUS)
- Recipe Summary
Table of Contents
Table of Contents
Table of Contents
Medulla Acceptance Test Specifications
- Getting Started with the Solution
- Actions
- Quick Actions
- Machine Groups
- Packages
- Deployments
- User Interactions
- Kiosk
- Updates (WSUS)
- Summary Acceptance
Getting Started with the Solution
The first step is to verify the basic functionality of the solution. To do this, we will first look at the basic scenarios:
Logging in to the Medulla page, creating static and dynamic machine groups, quick actions, getting started.
Login Test:
The first test is logging in on the Medulla homepage:
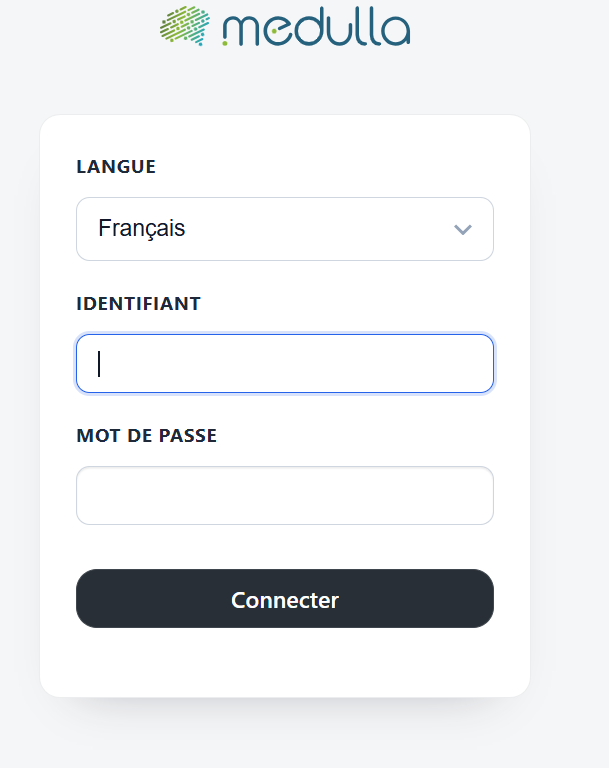
Enter your username and password, then click "Log In." If the test is successful, the page should open on the Medulla homepage.
Static Group Creation Test:
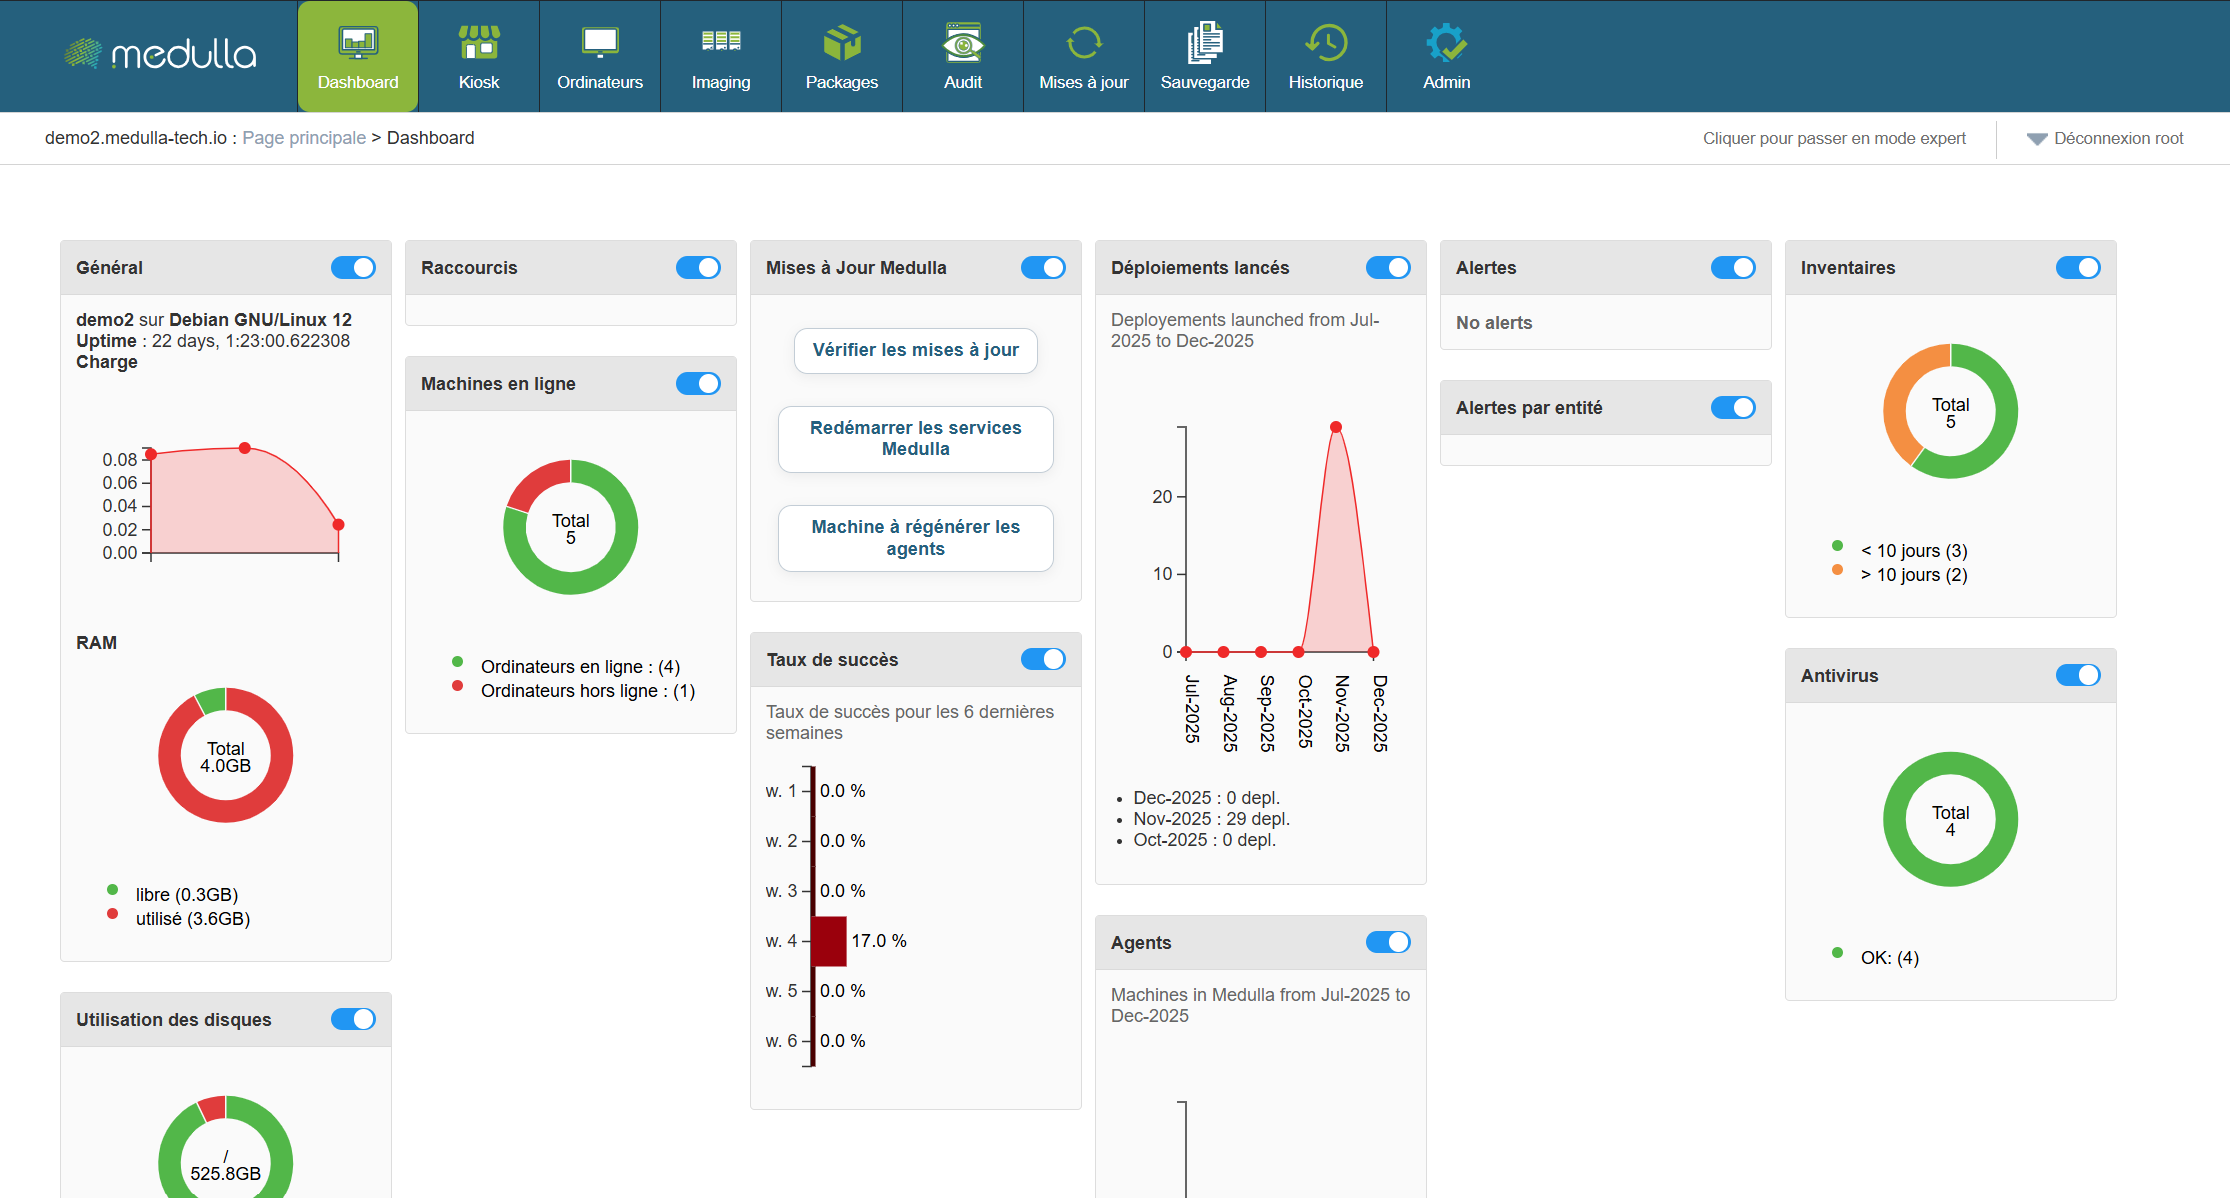
On this page, you can click on the widgets to create static groups.
Click on the pie charts in the widgets to create a group. The result should be:
The group creation test has passed.
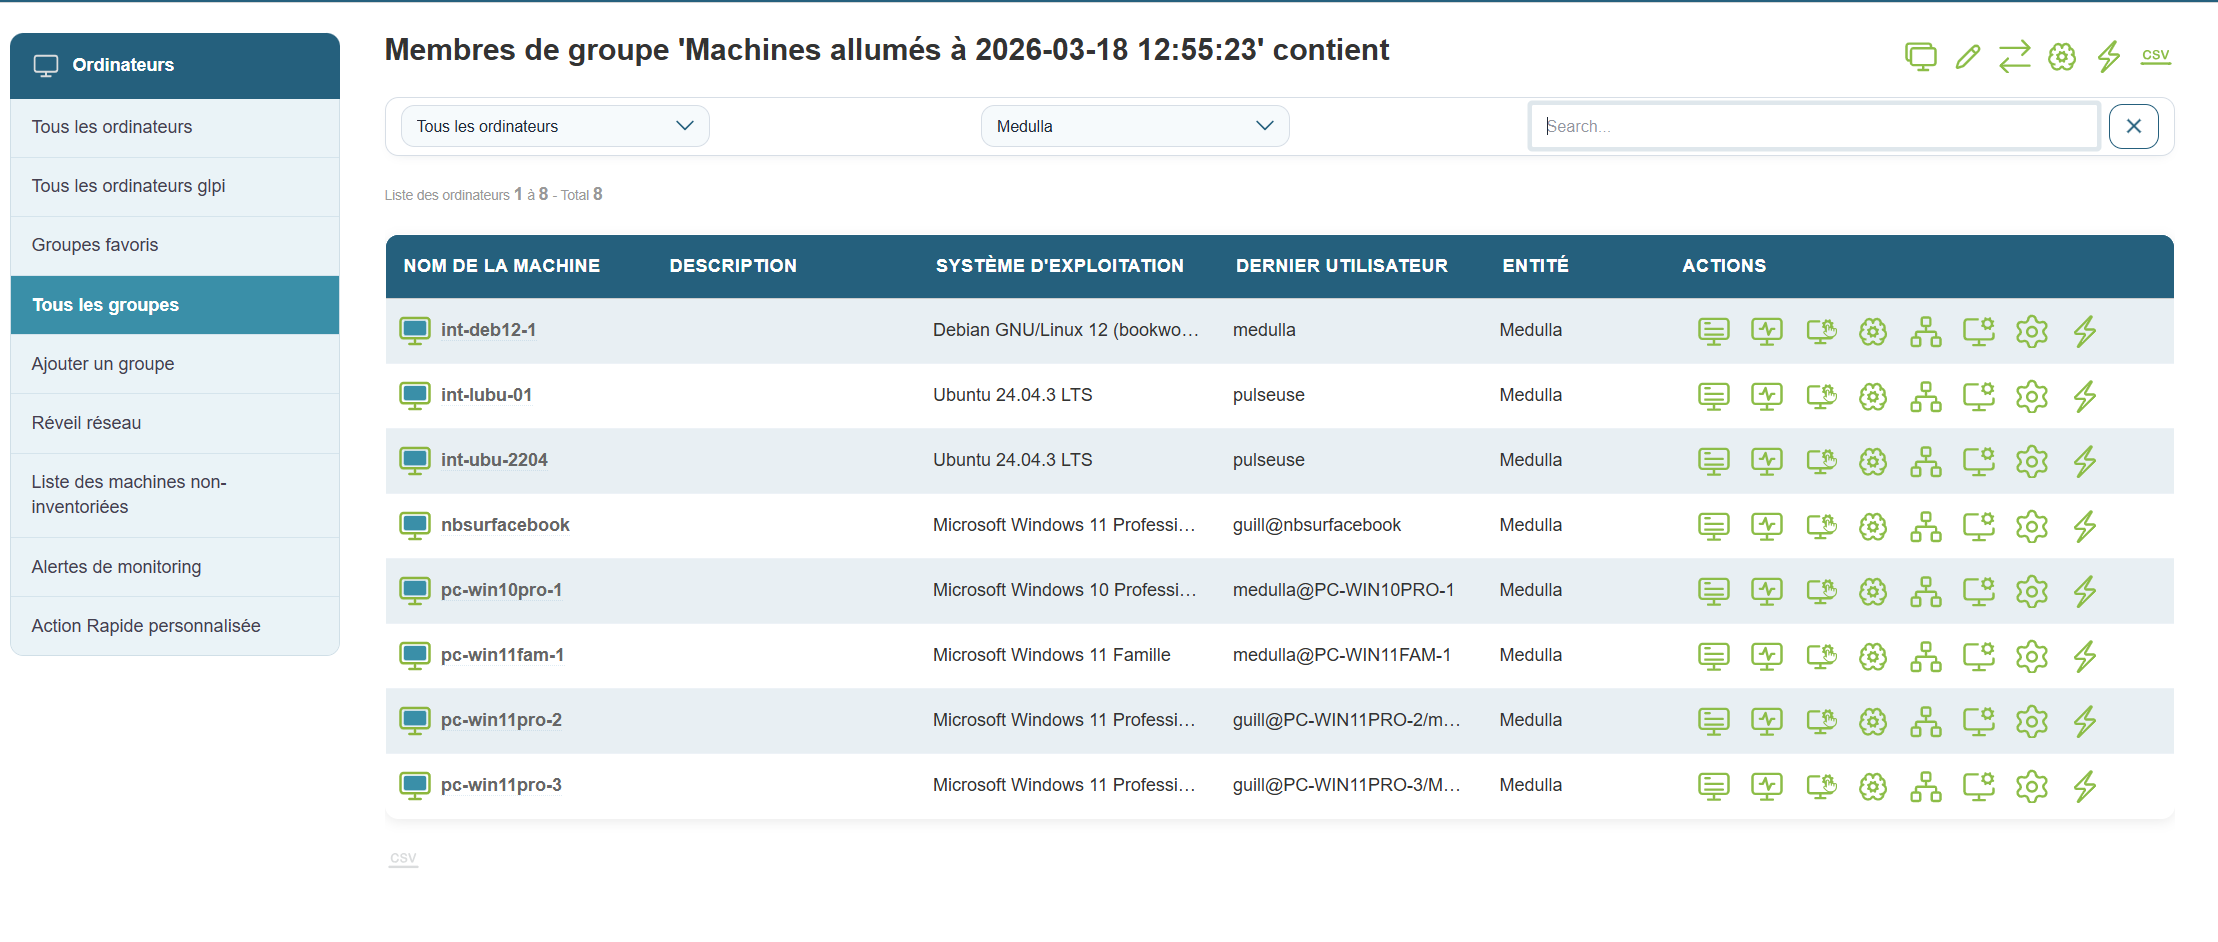
Next, click the " Computers " button in the top navigation bar.
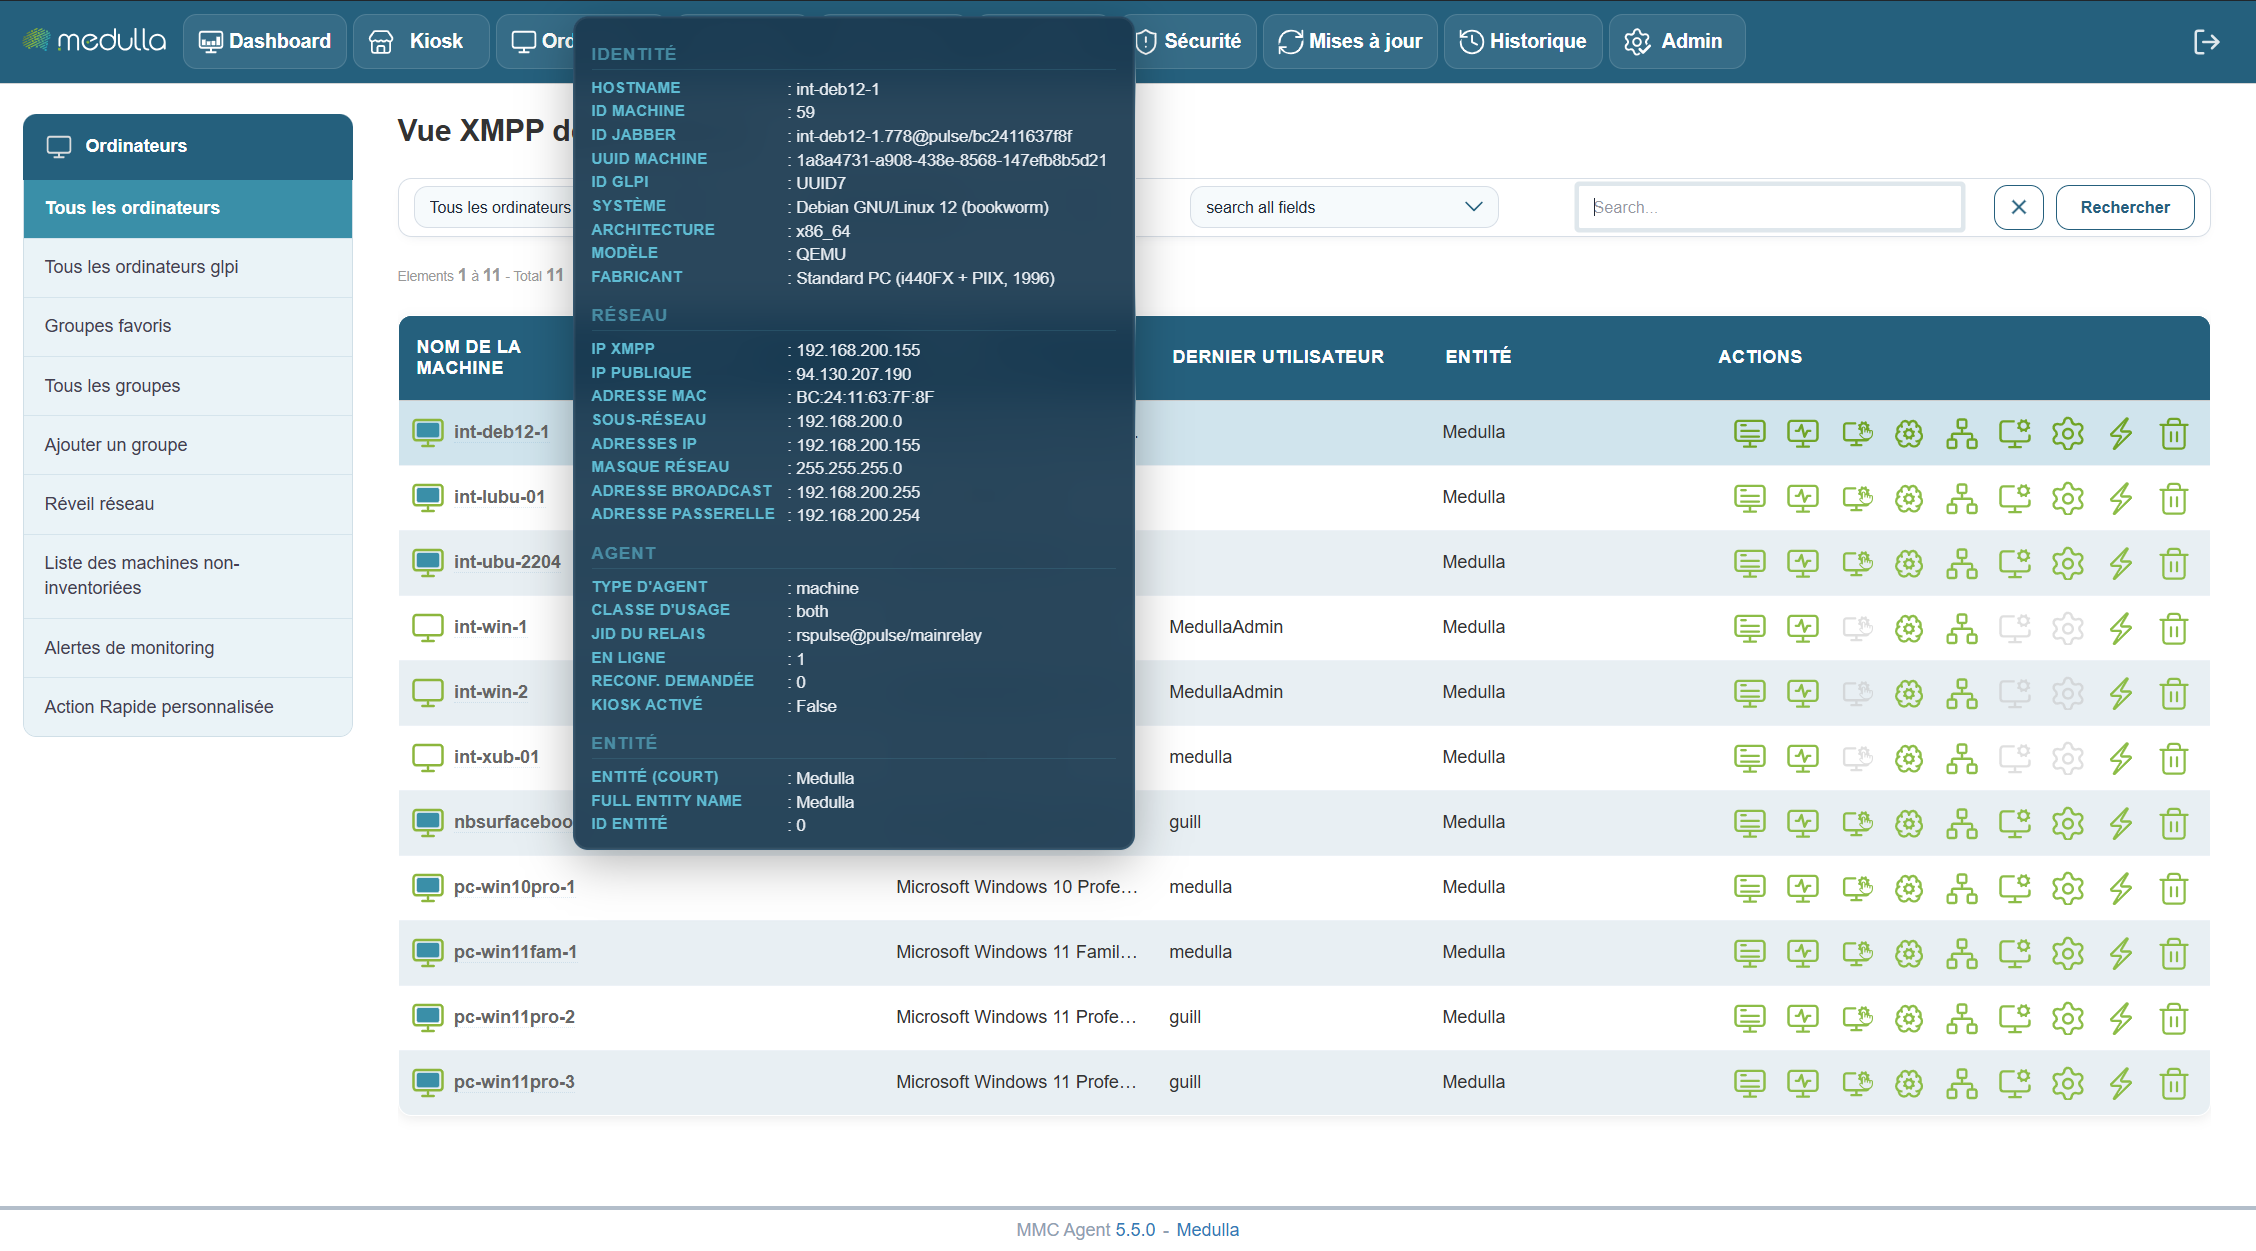
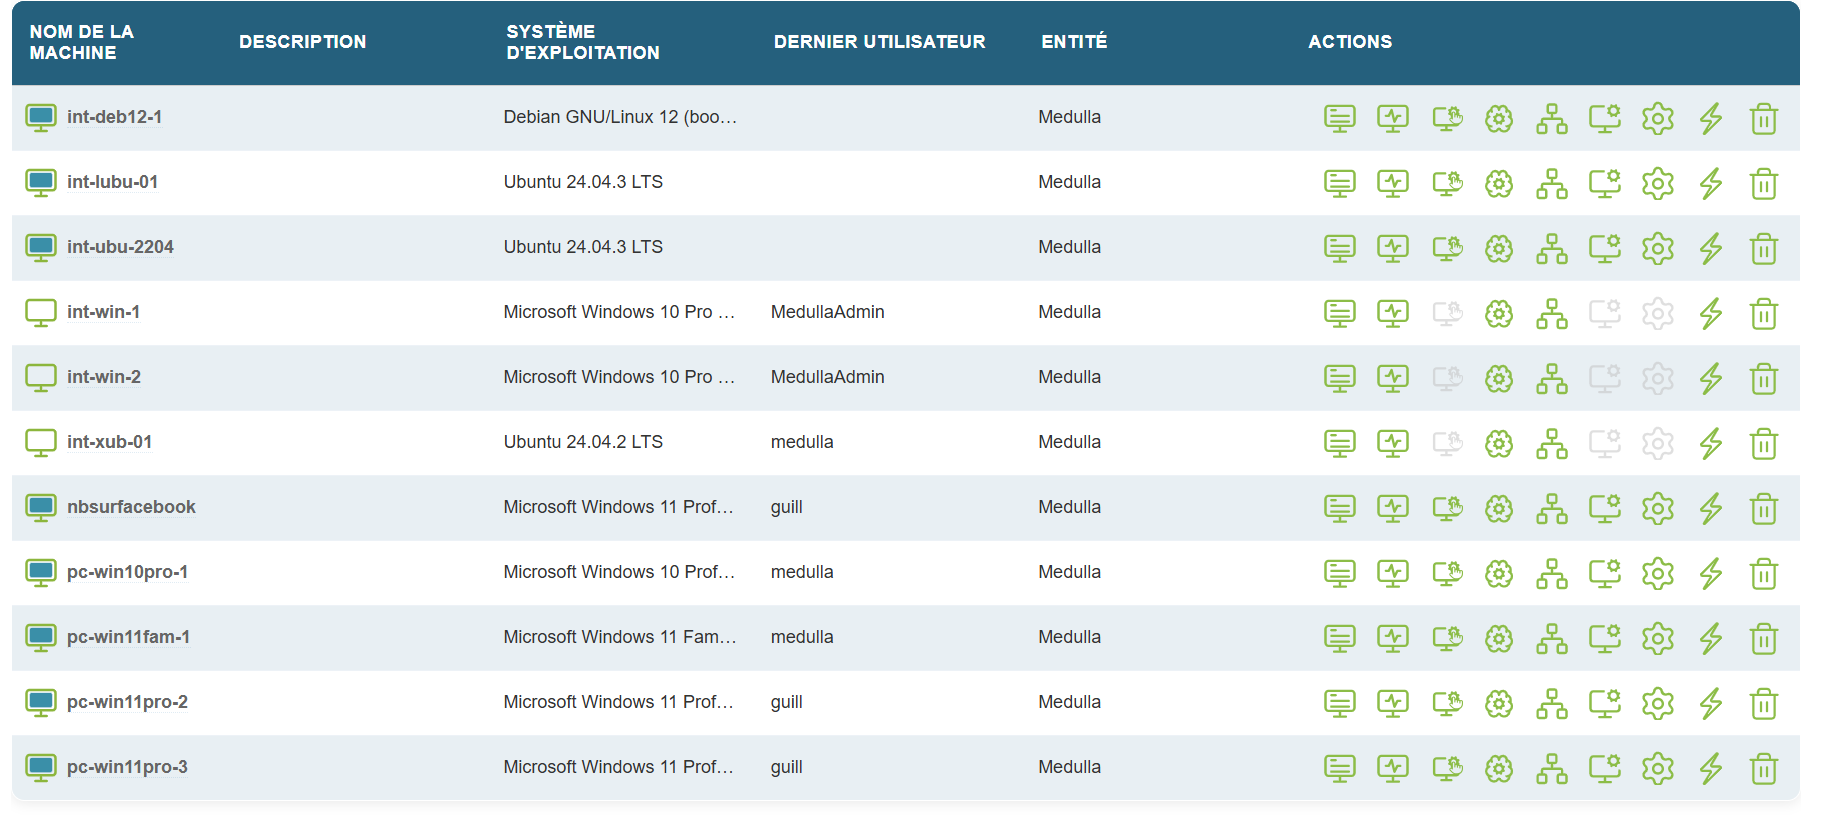
Machine presence test:
Information window appears when hovering over a machine.
Actions
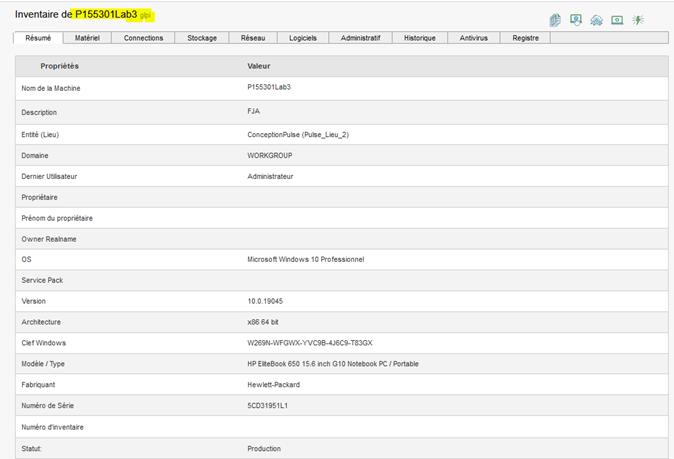
Machine inventory (GLPI or ITSMNG):
Click the Inventory button on the right in the actions menu, and verify the information displayed.
Remote access.
Click the Remote Control button; a pop-up will open showing the different types of remote control available:
Click the Remote Control button; a pop-up will open showing the different types of remote control available:

Click one of the buttons to open a tab with the remote control session.
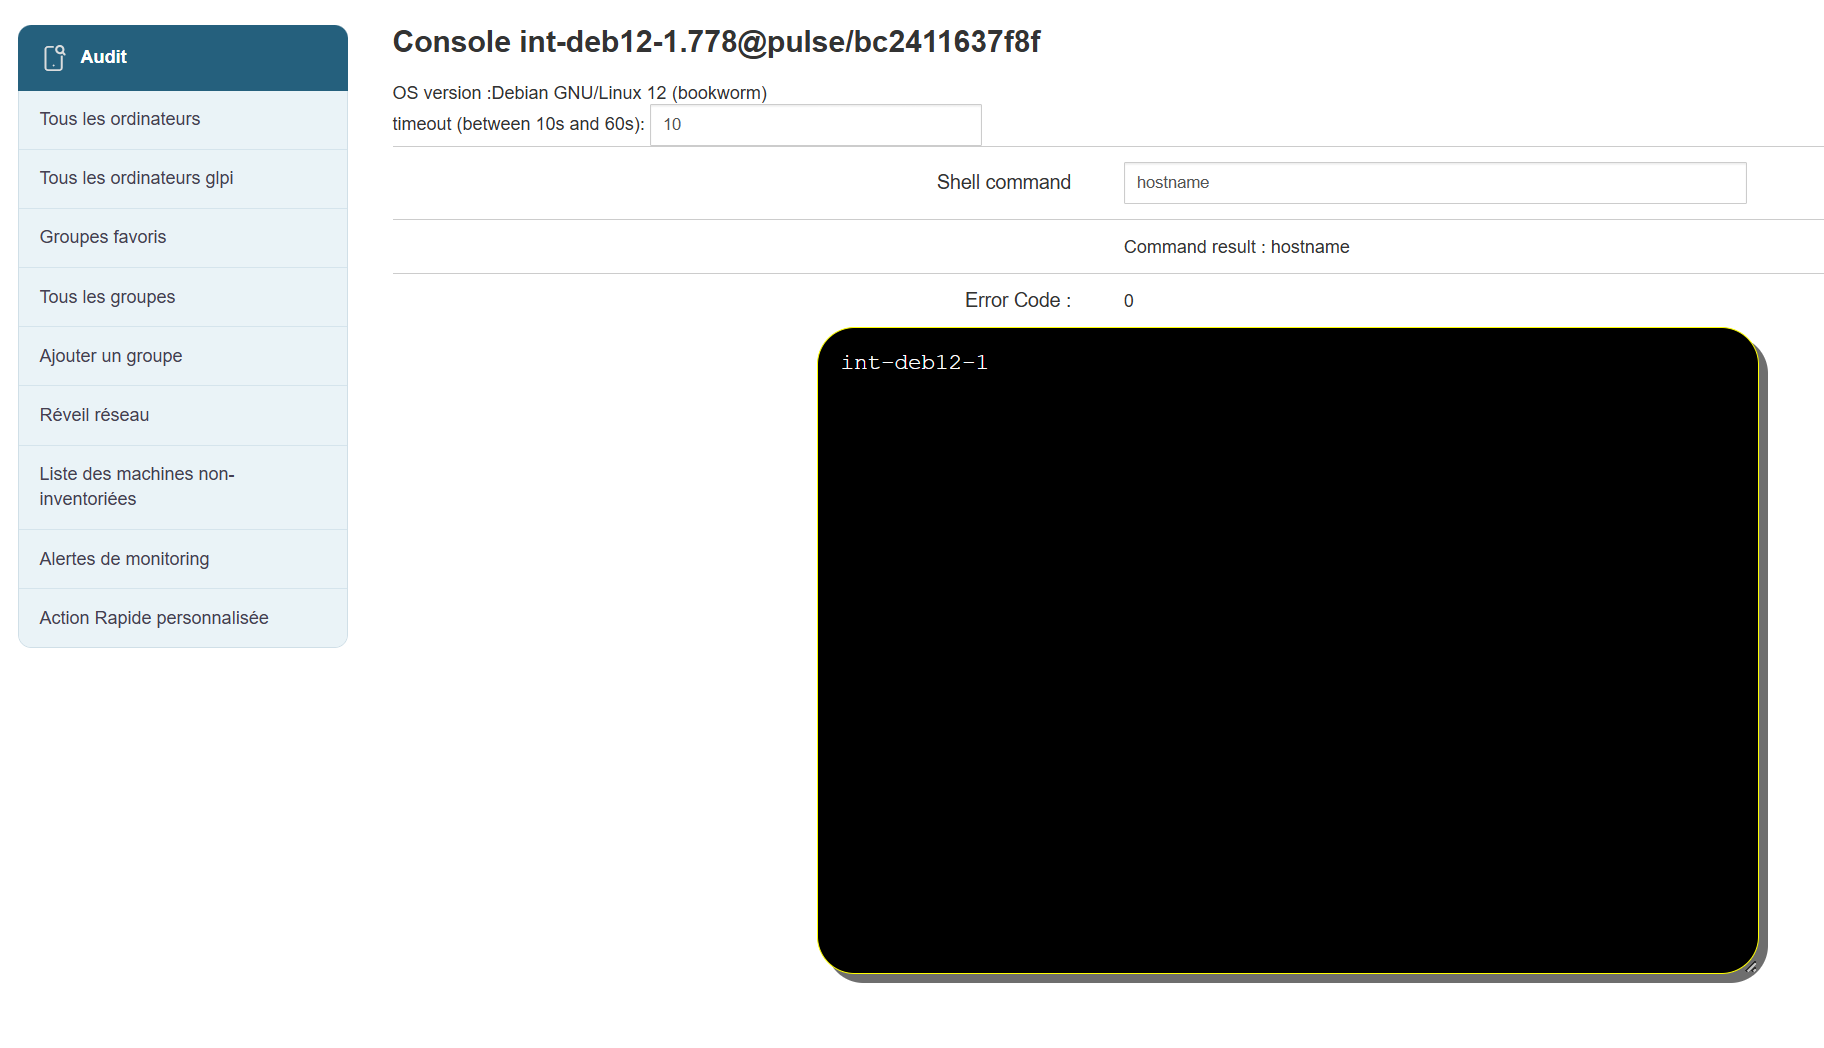
XMPP Console:
Click the XMPP Console button on the right in the quick actions.
Run a command in the console and check the result.
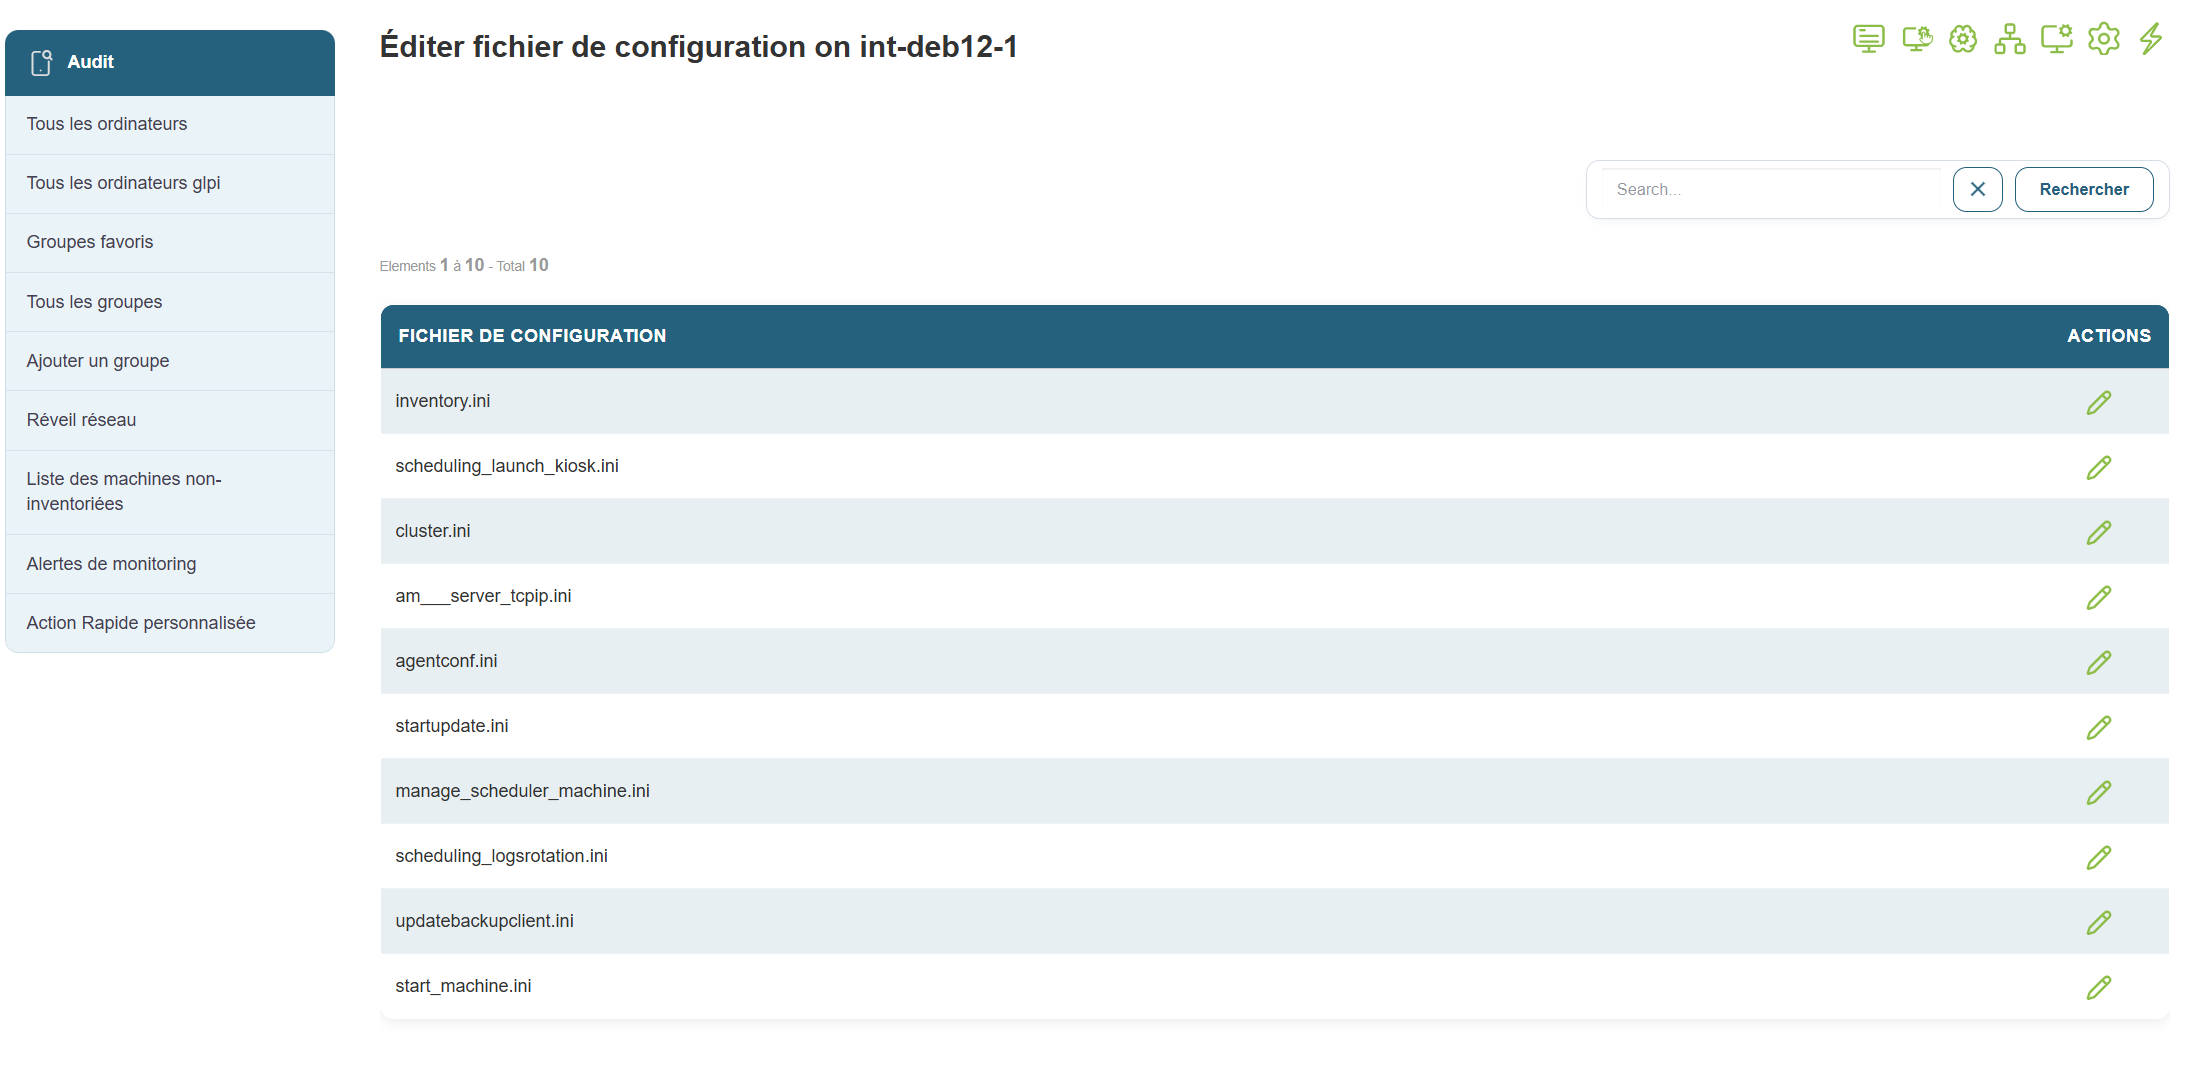
Edit Configuration Files
Click the Edit Configuration Files button on the right in the quick actions; you should be able to modify the configuration files.
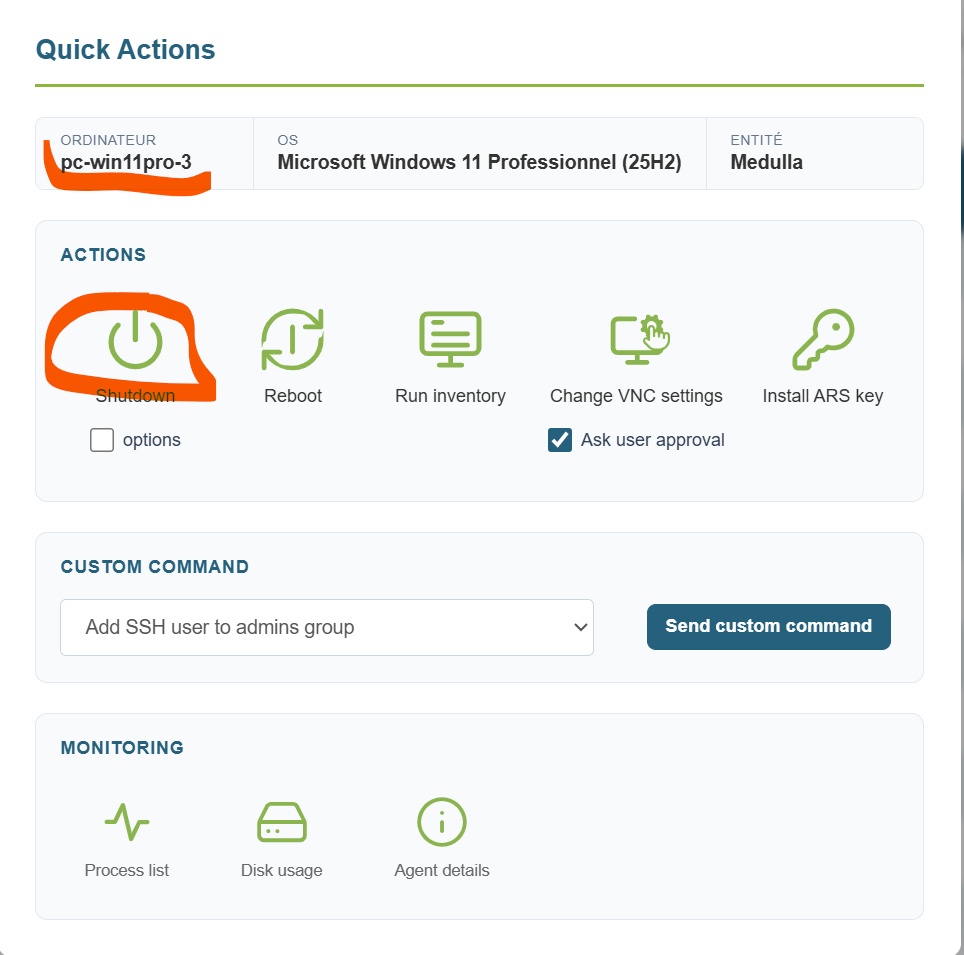
Quick Actions
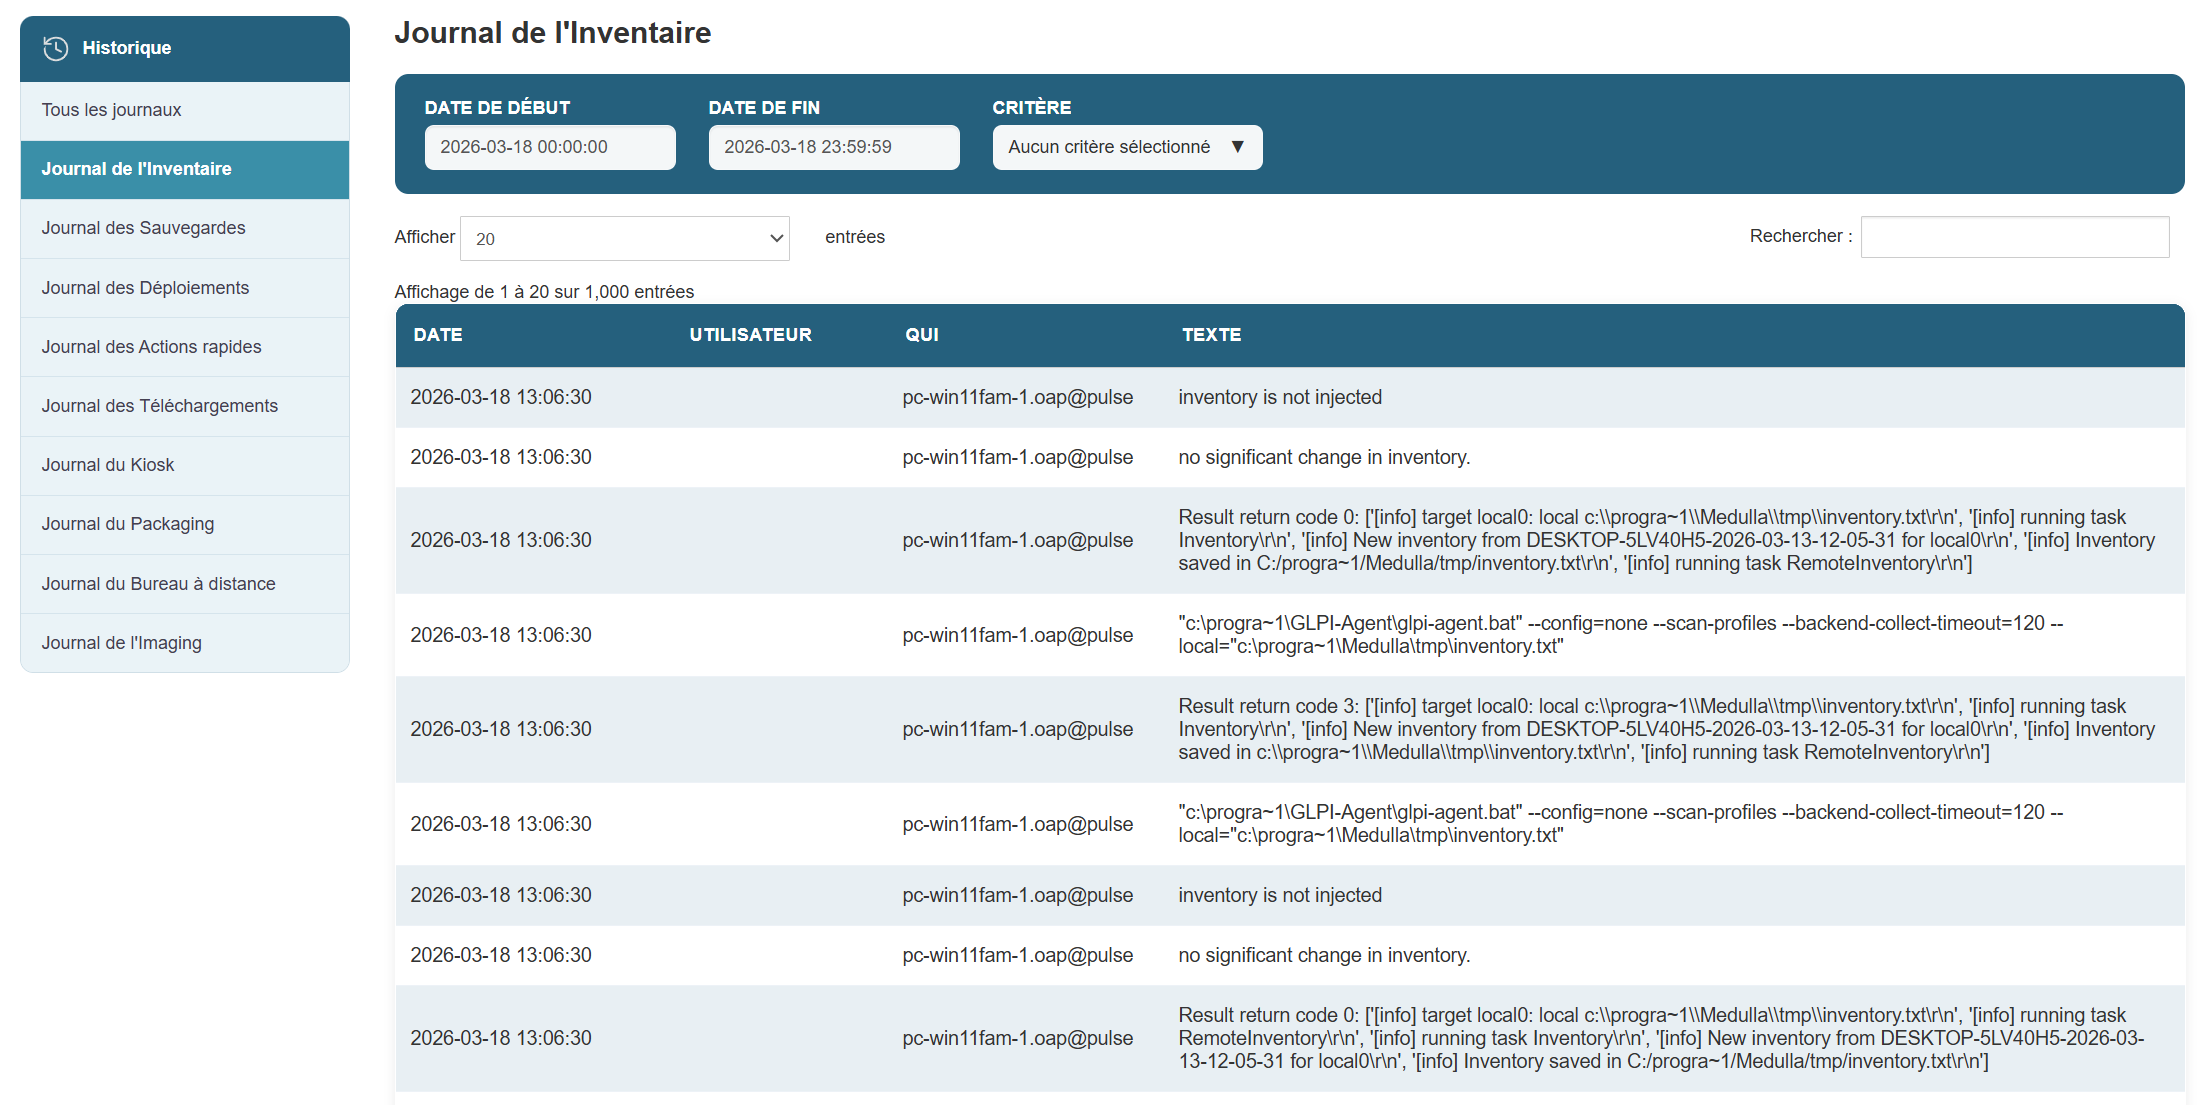
Inventory:
Launch an inventory

You should see a line in the History view that refers to the inventory request you launched earlier.
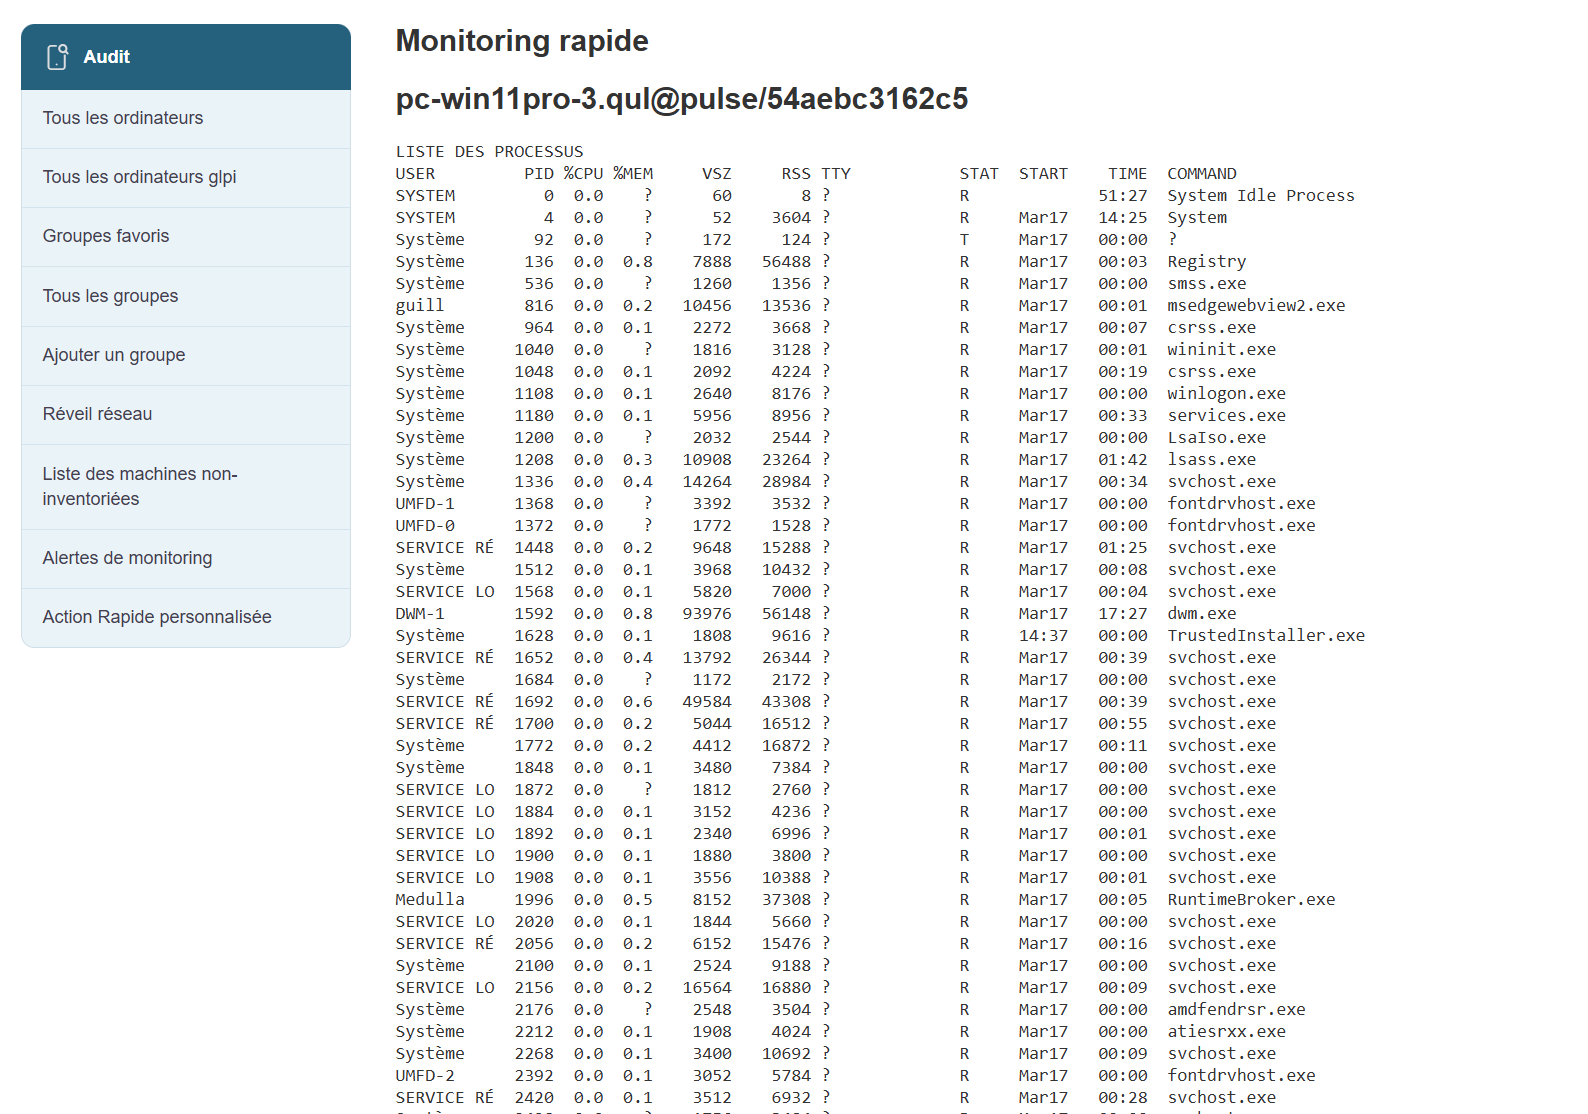
Show Process List:
View the list of processes associated with the machine by clicking the "Show Process List" button in the popup.
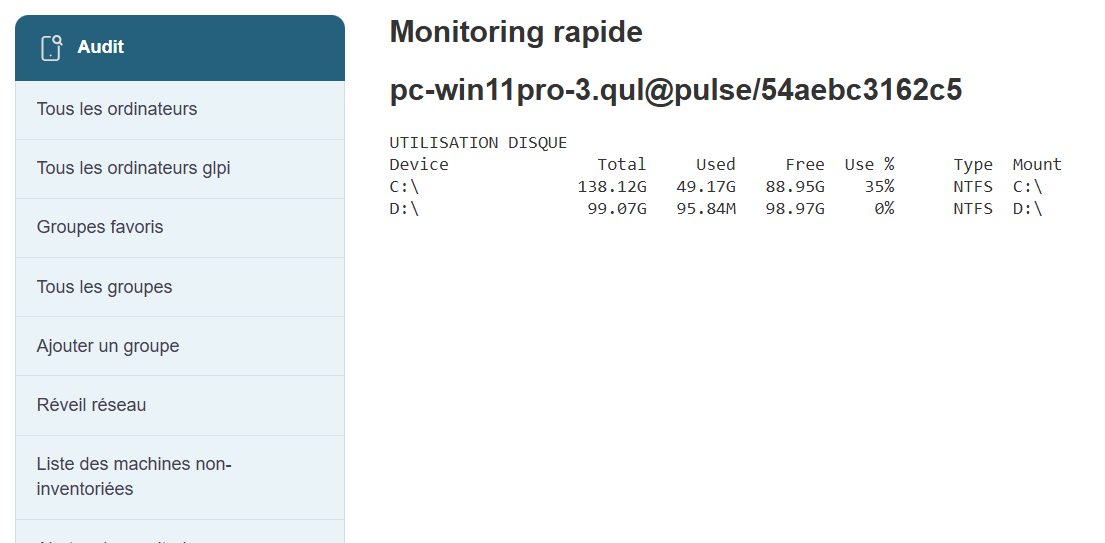
Disk usage:
View accurate information regarding the machine’s hard drive usage.
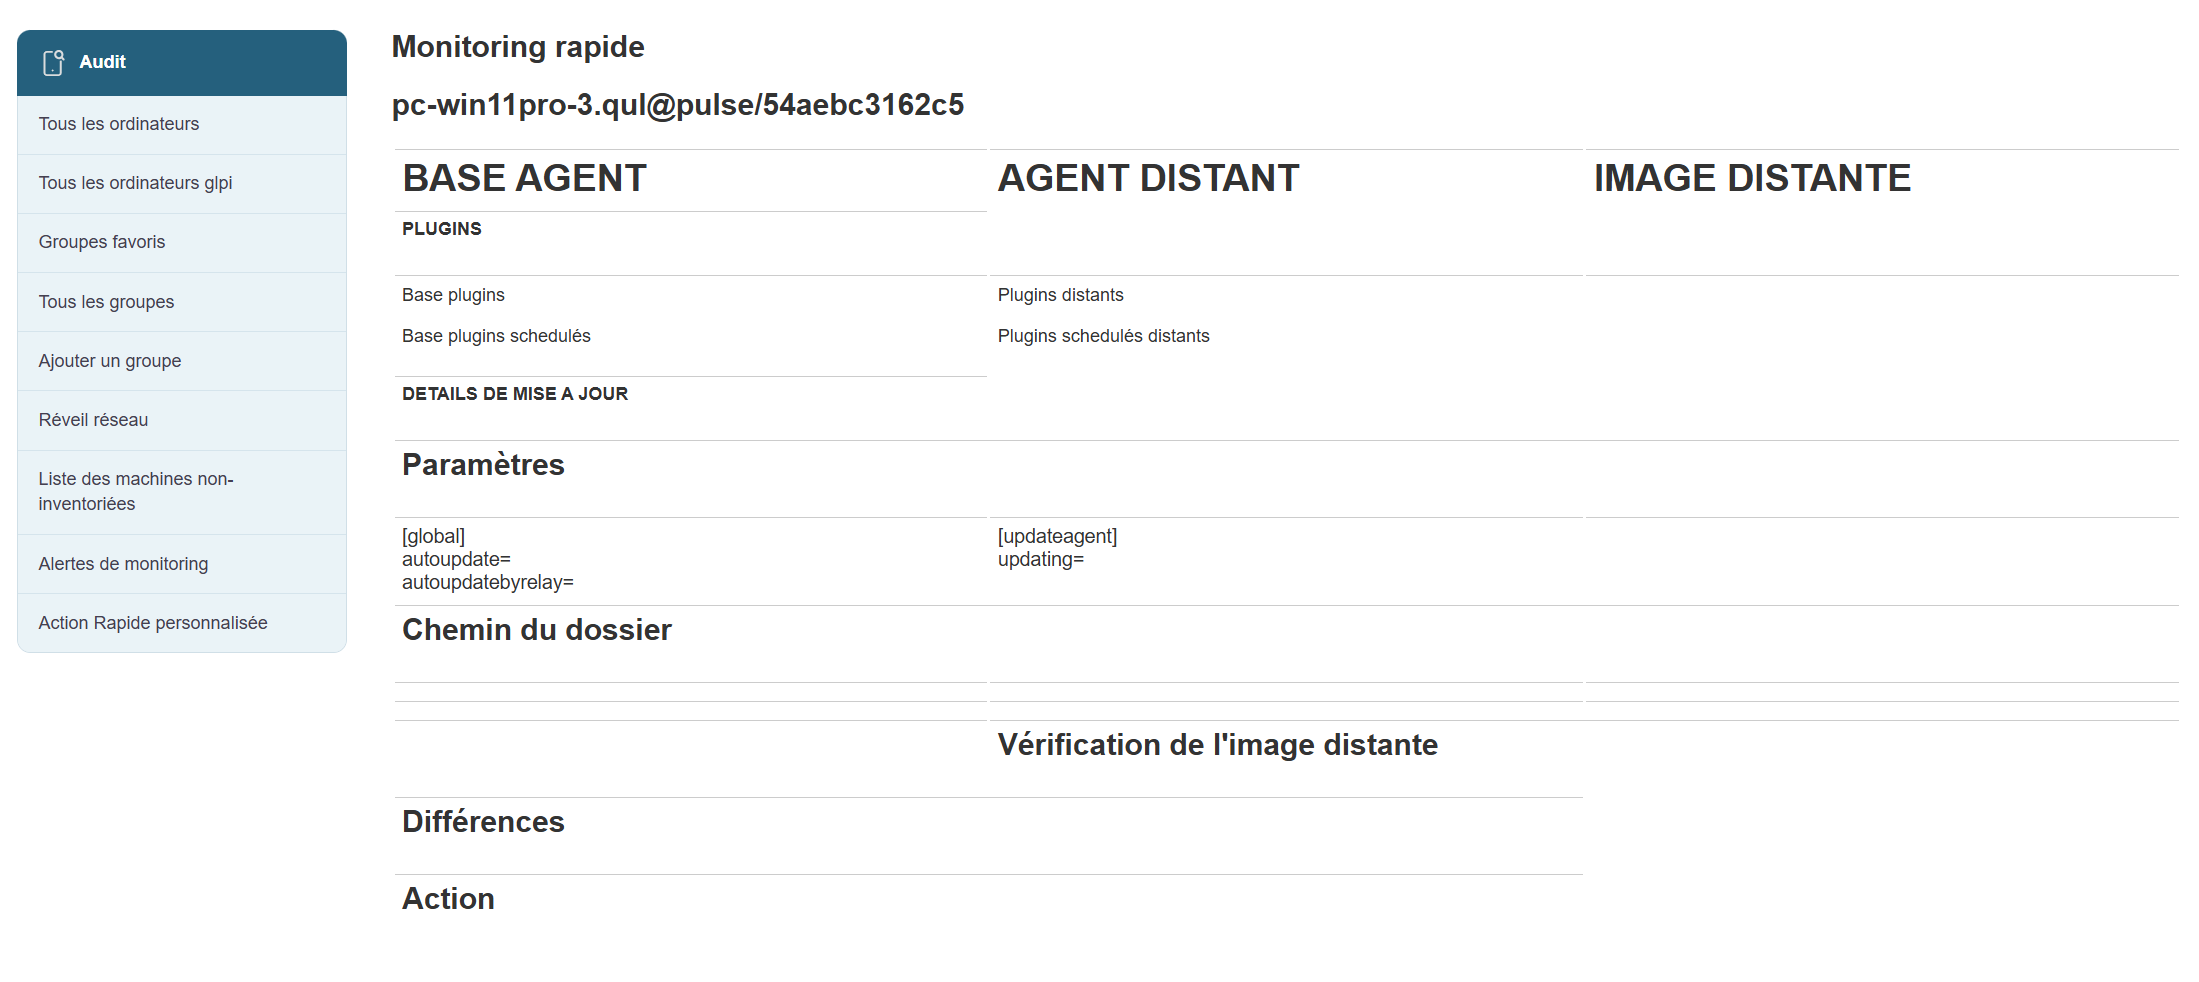
Agent Details:
View information about the agent associated with the machine.
Reboot:
Click the Reboot button and wait about 3 minutes, then verify that the machine has restarted.
Shutdown:
Click the Shutdown button and wait about 3 minutes.
WOL:
A WOL can be initiated from the quick actions.
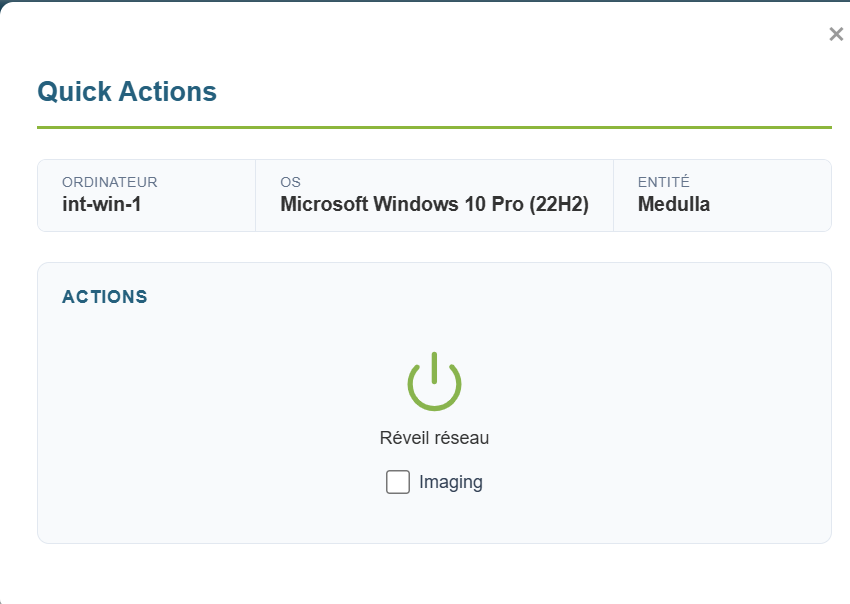
Make sure the machine wakes up; this may take about 5 minutes.
Fixed WOL:
A WOL can be initiated from the "Network Wake-up" button on the left side of the Computer view.
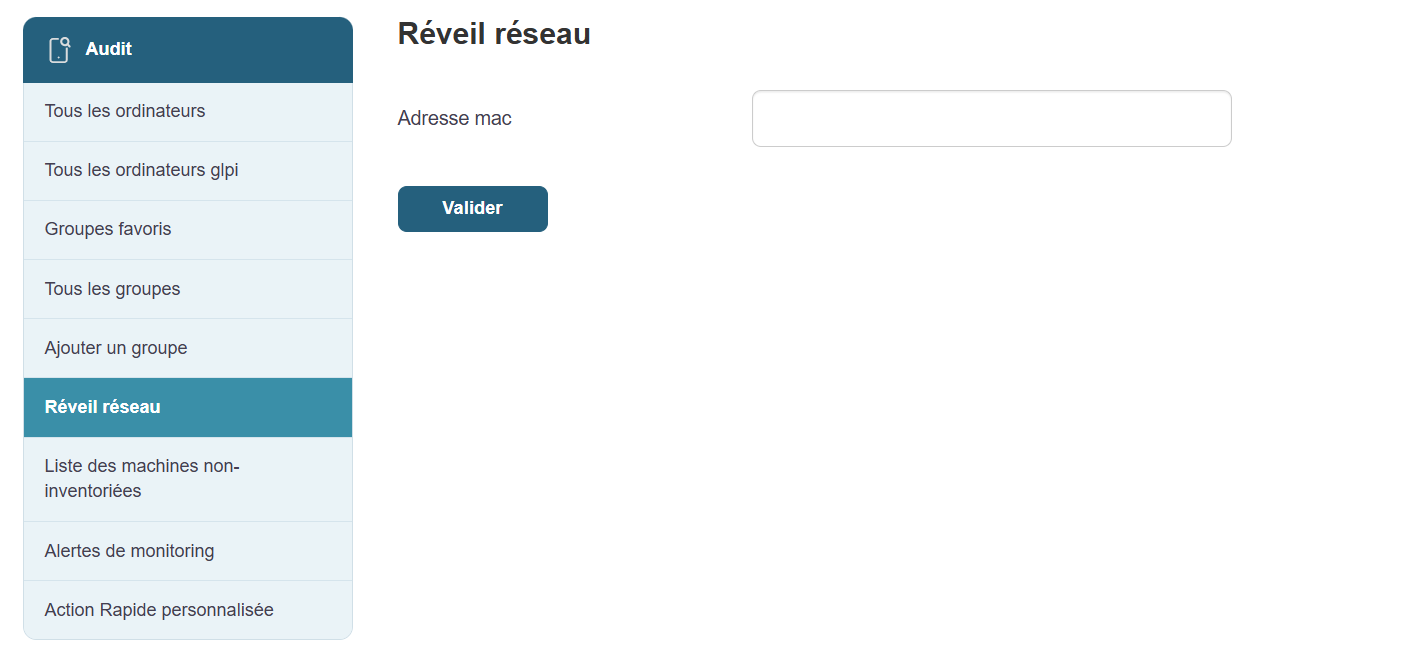
Make sure the machine wakes up; this may take about 5 minutes.
WOL Deployment:
A WOL is initiated via a deployment on a powered-off machine.
Check for the lines "First, Second, and Third WOL sent to machine," then verify that the WOL executed successfully.

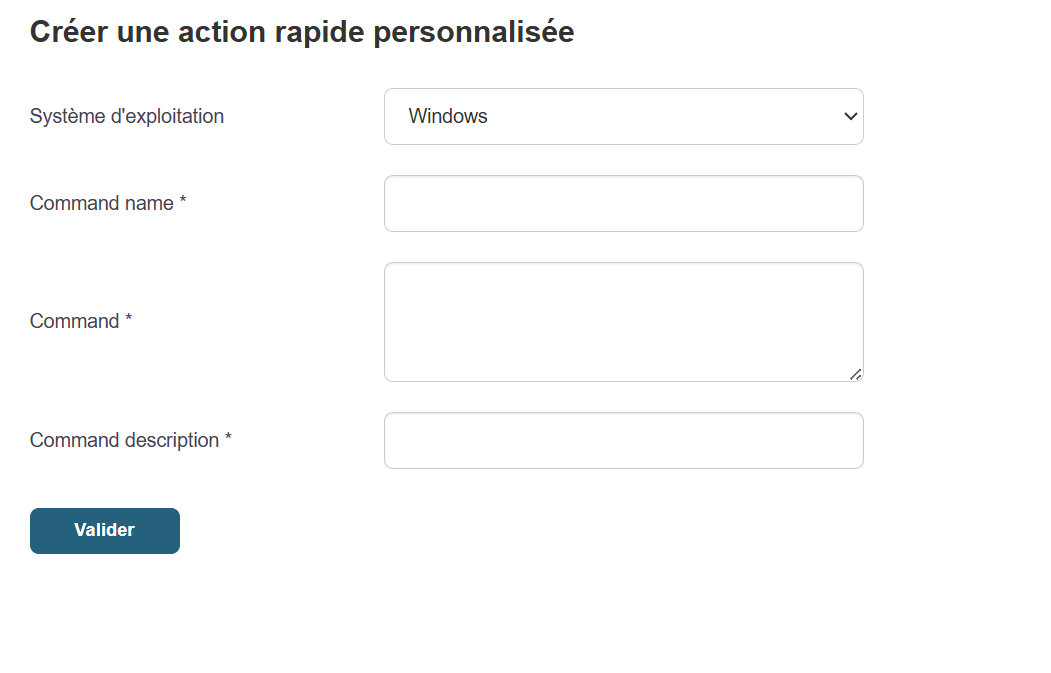
Adding a quick action:
Click the button in the left submenu (at the very bottom)

Then click on:
![]()
Fill in the information, then click Submit.
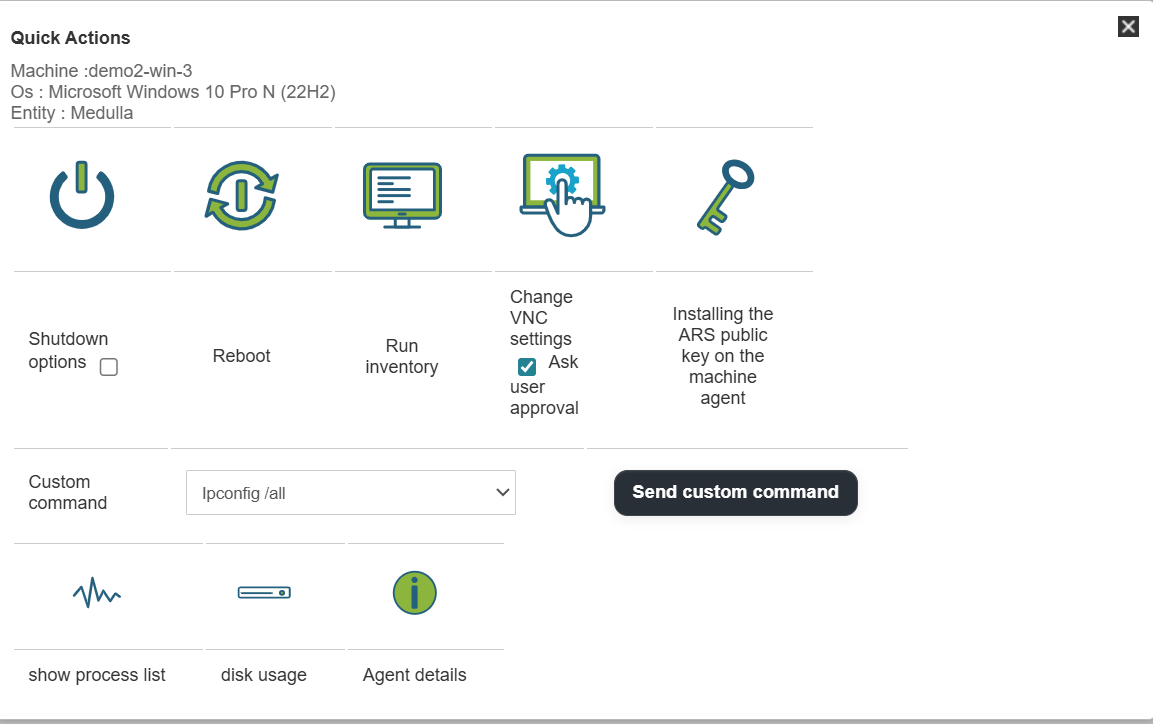
Next, click the quick action button on a machine; in the drop-down list, locate your command, then run it.
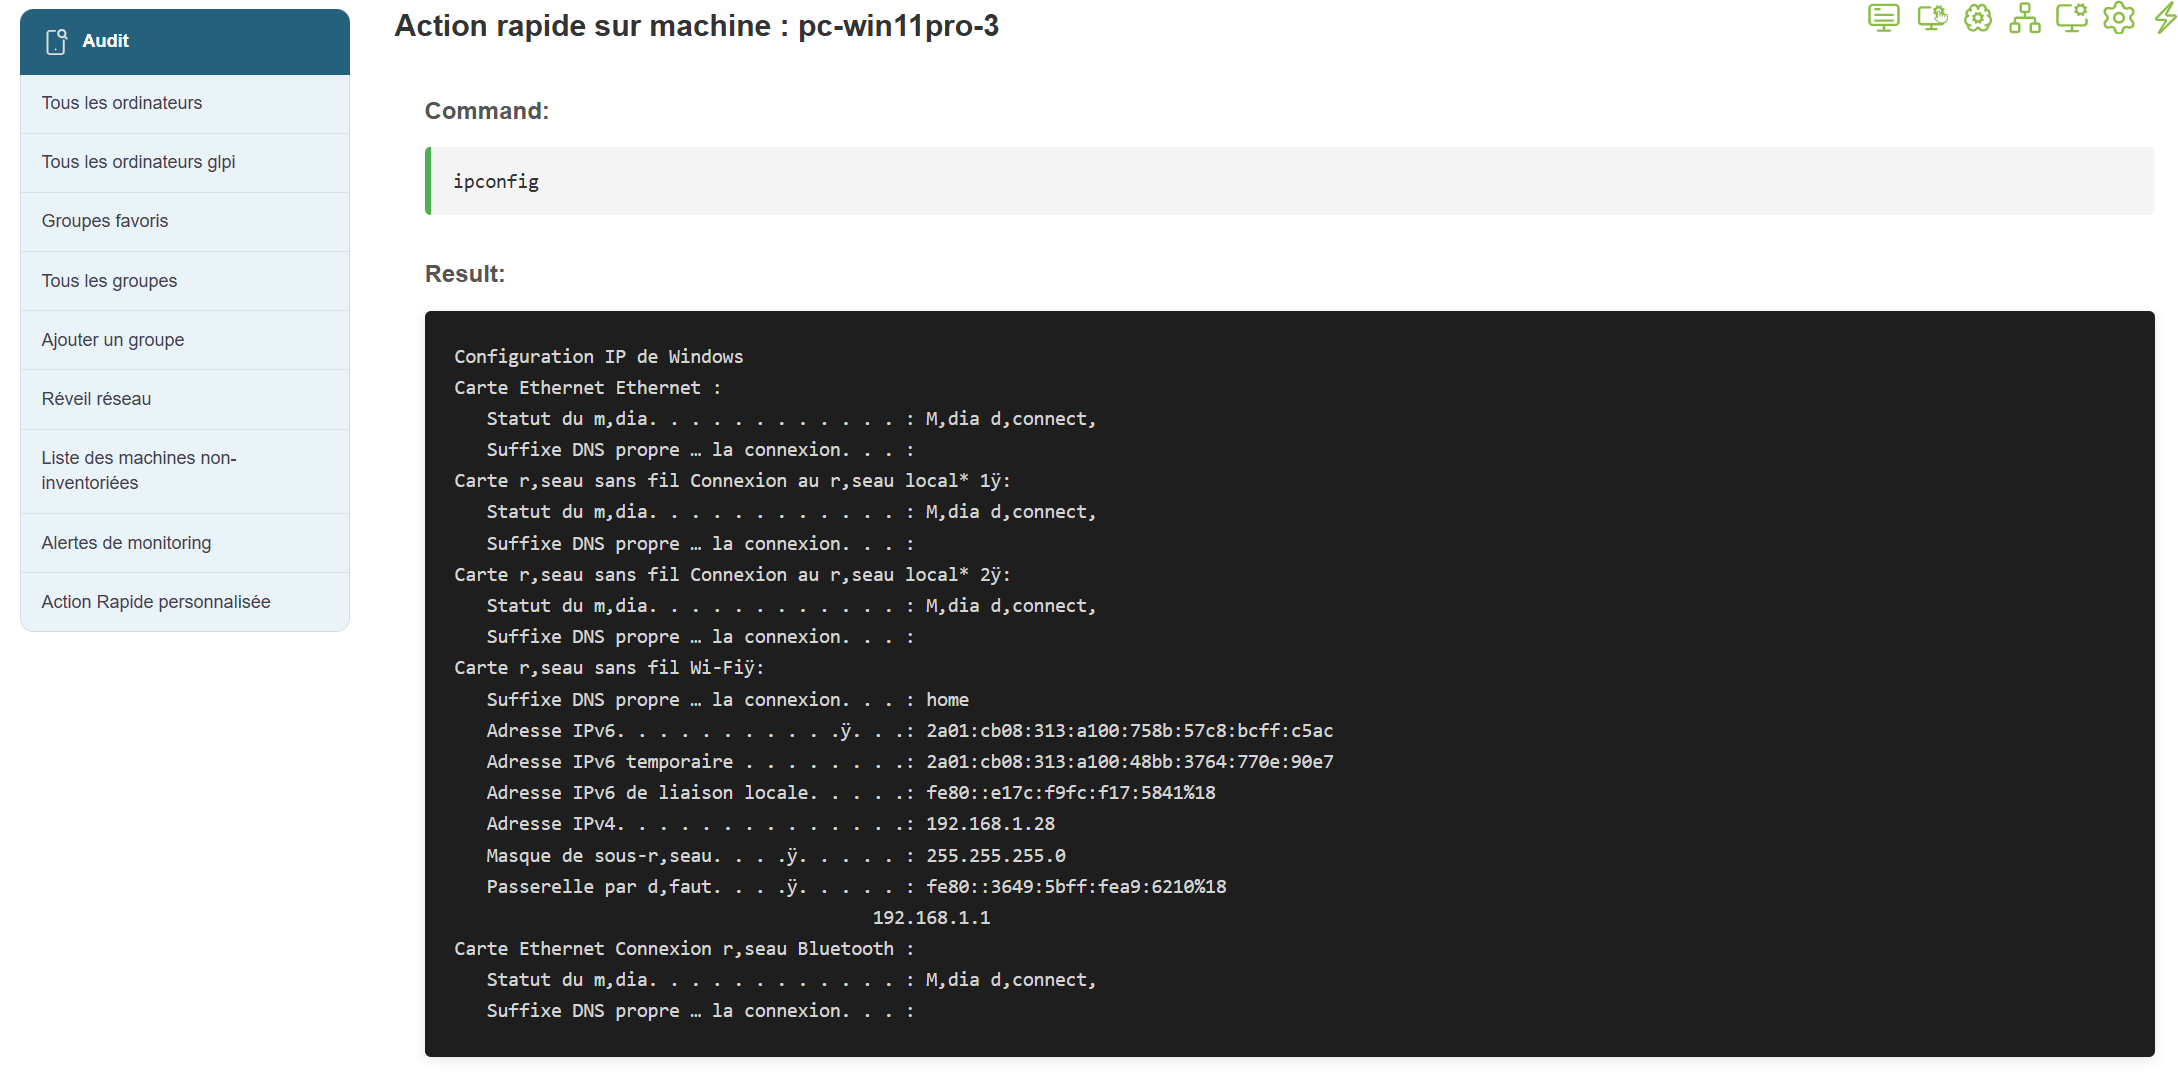
The command results will appear in a few seconds:
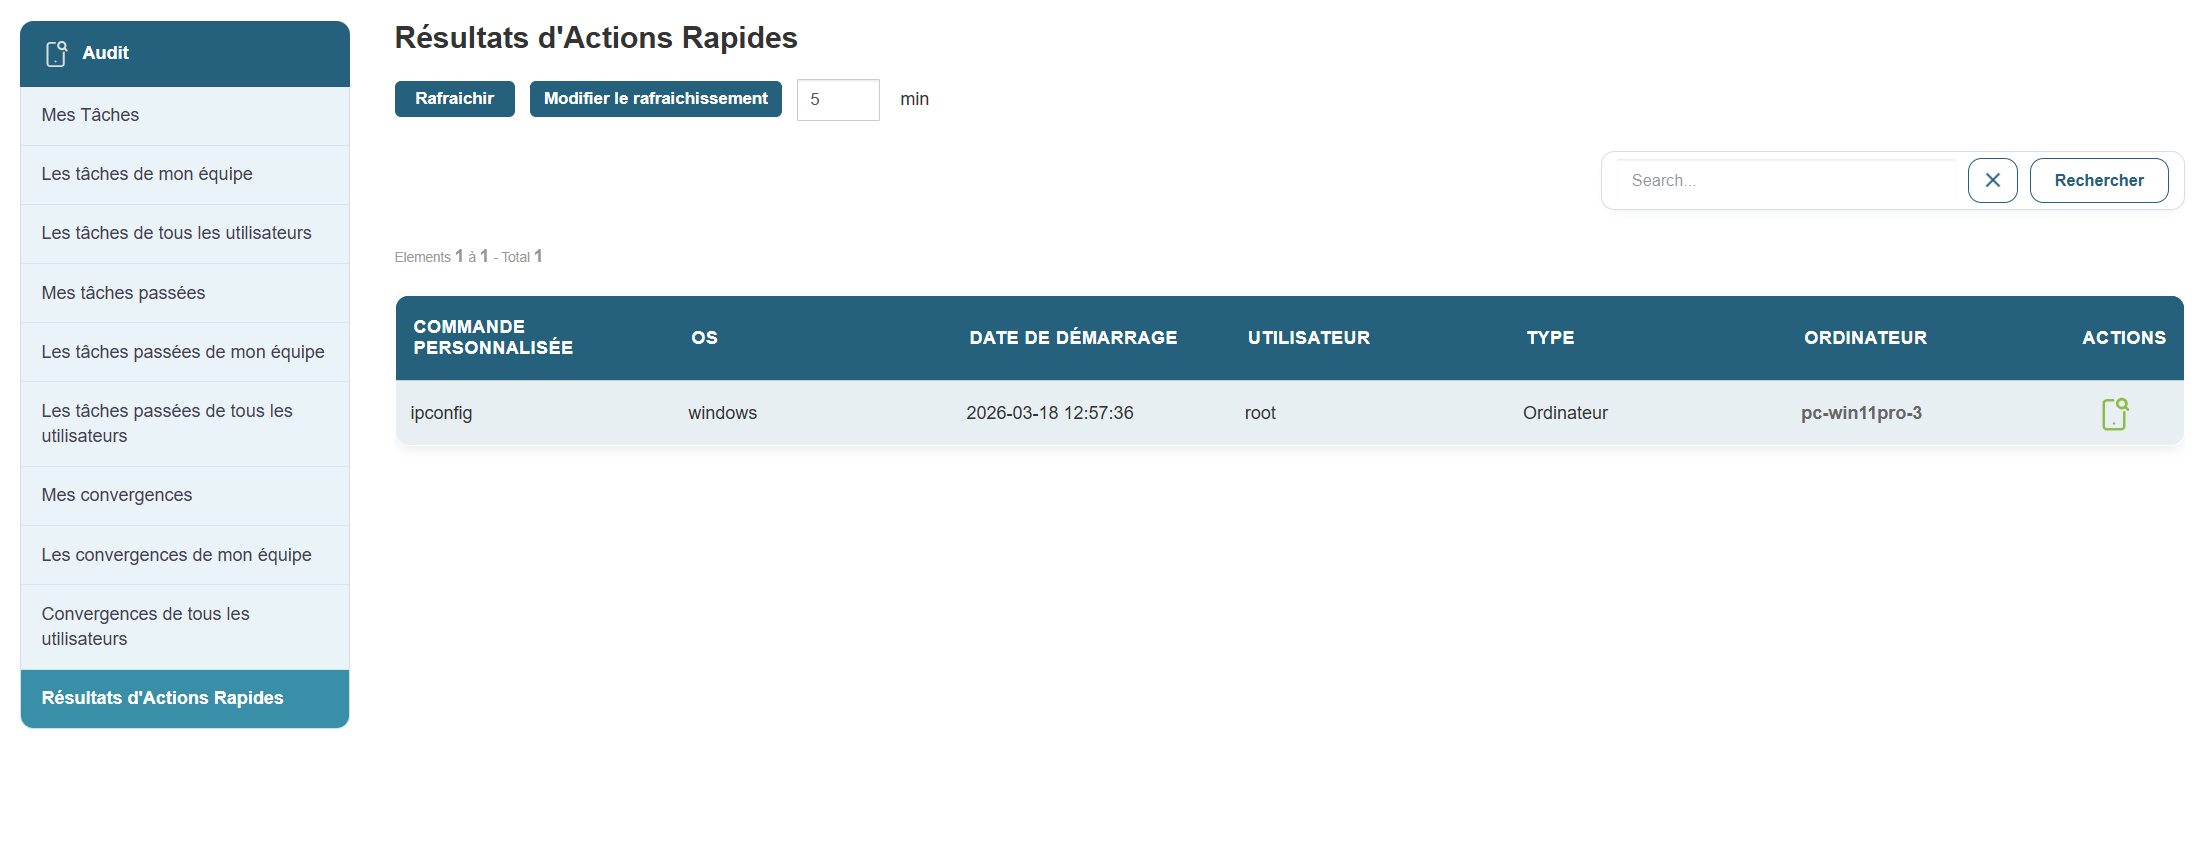
Click the icon on the right in the action bar to view the result of the selected command.
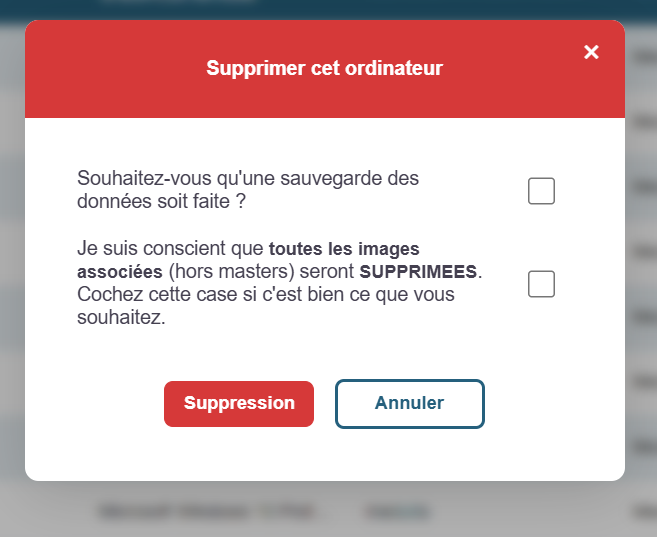
Verifying the Deletion of a Machine:
Request deletion via the icon (trash can icon on a computer’s action bar)
Verify the removal of this machine from the list of computers.
Machine groups
Dynamic:
Create a dynamic group using GLPI criteria, then verify the presence of machines in that group.
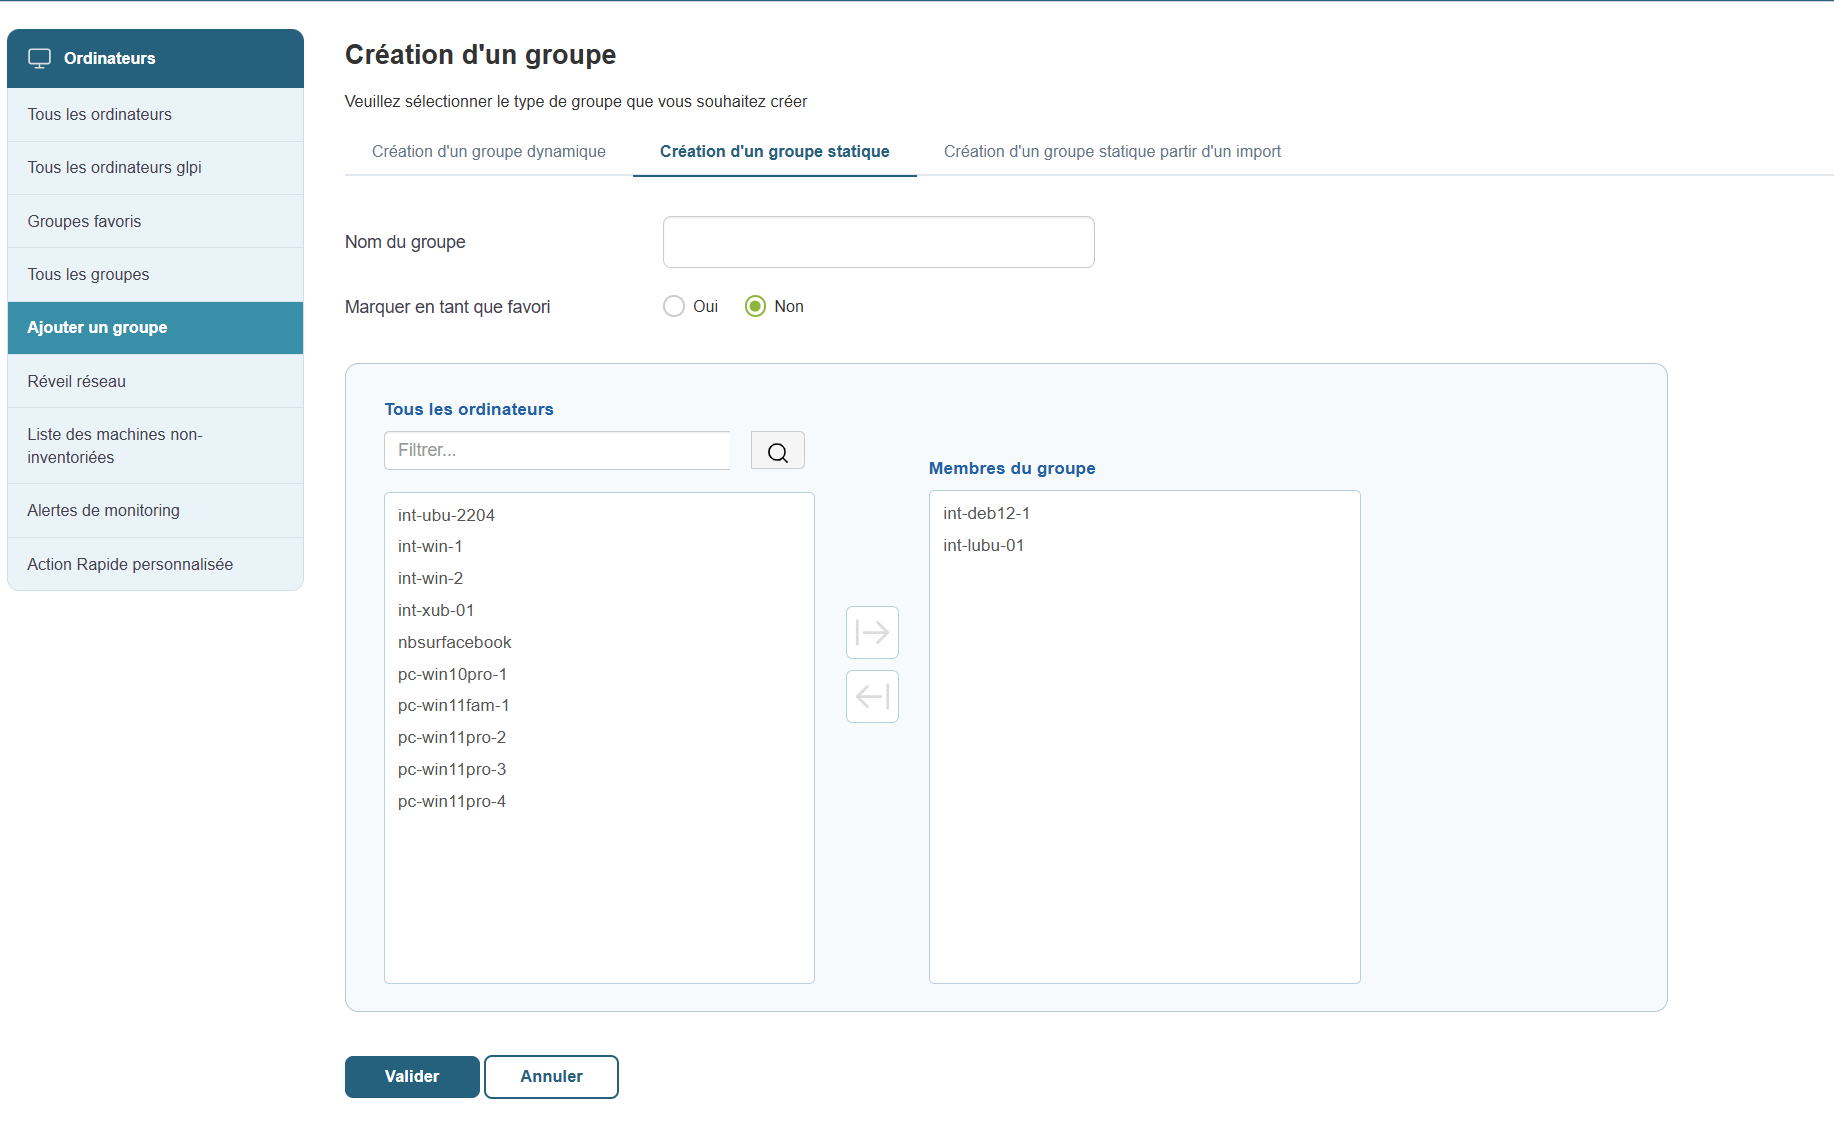
Static:
Create a static group using the machines present in Medulla, and verify the presence of the machines in this group.
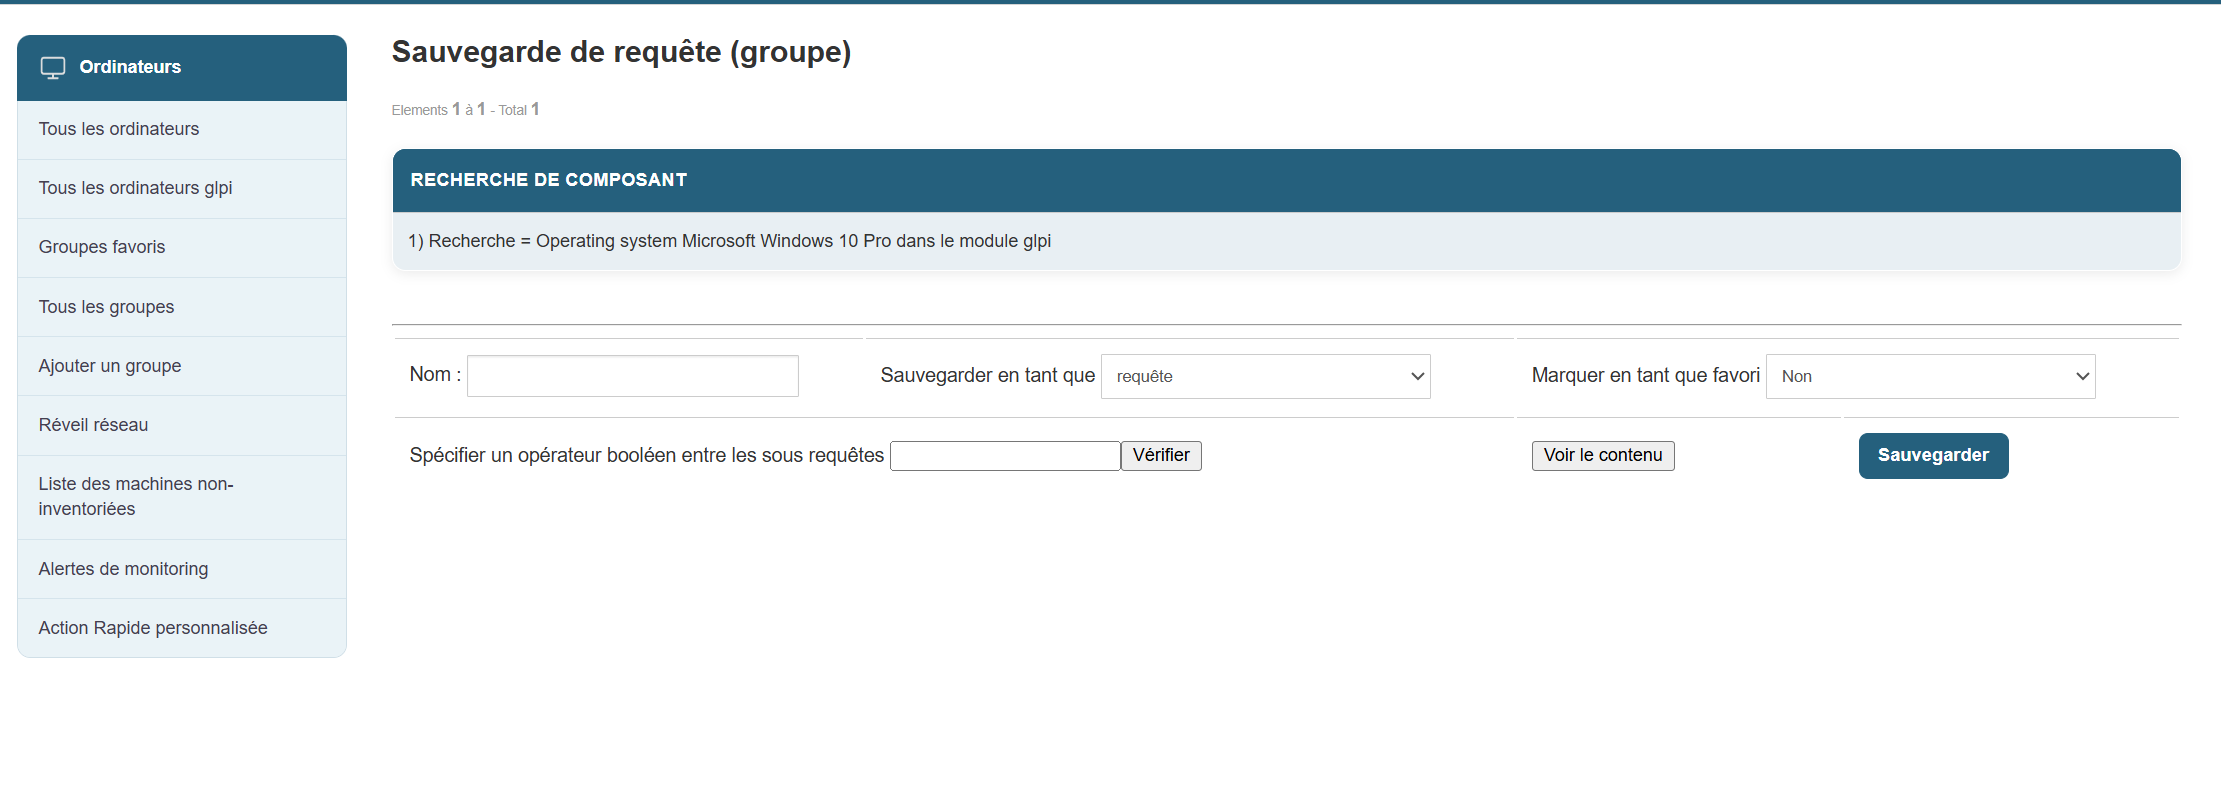
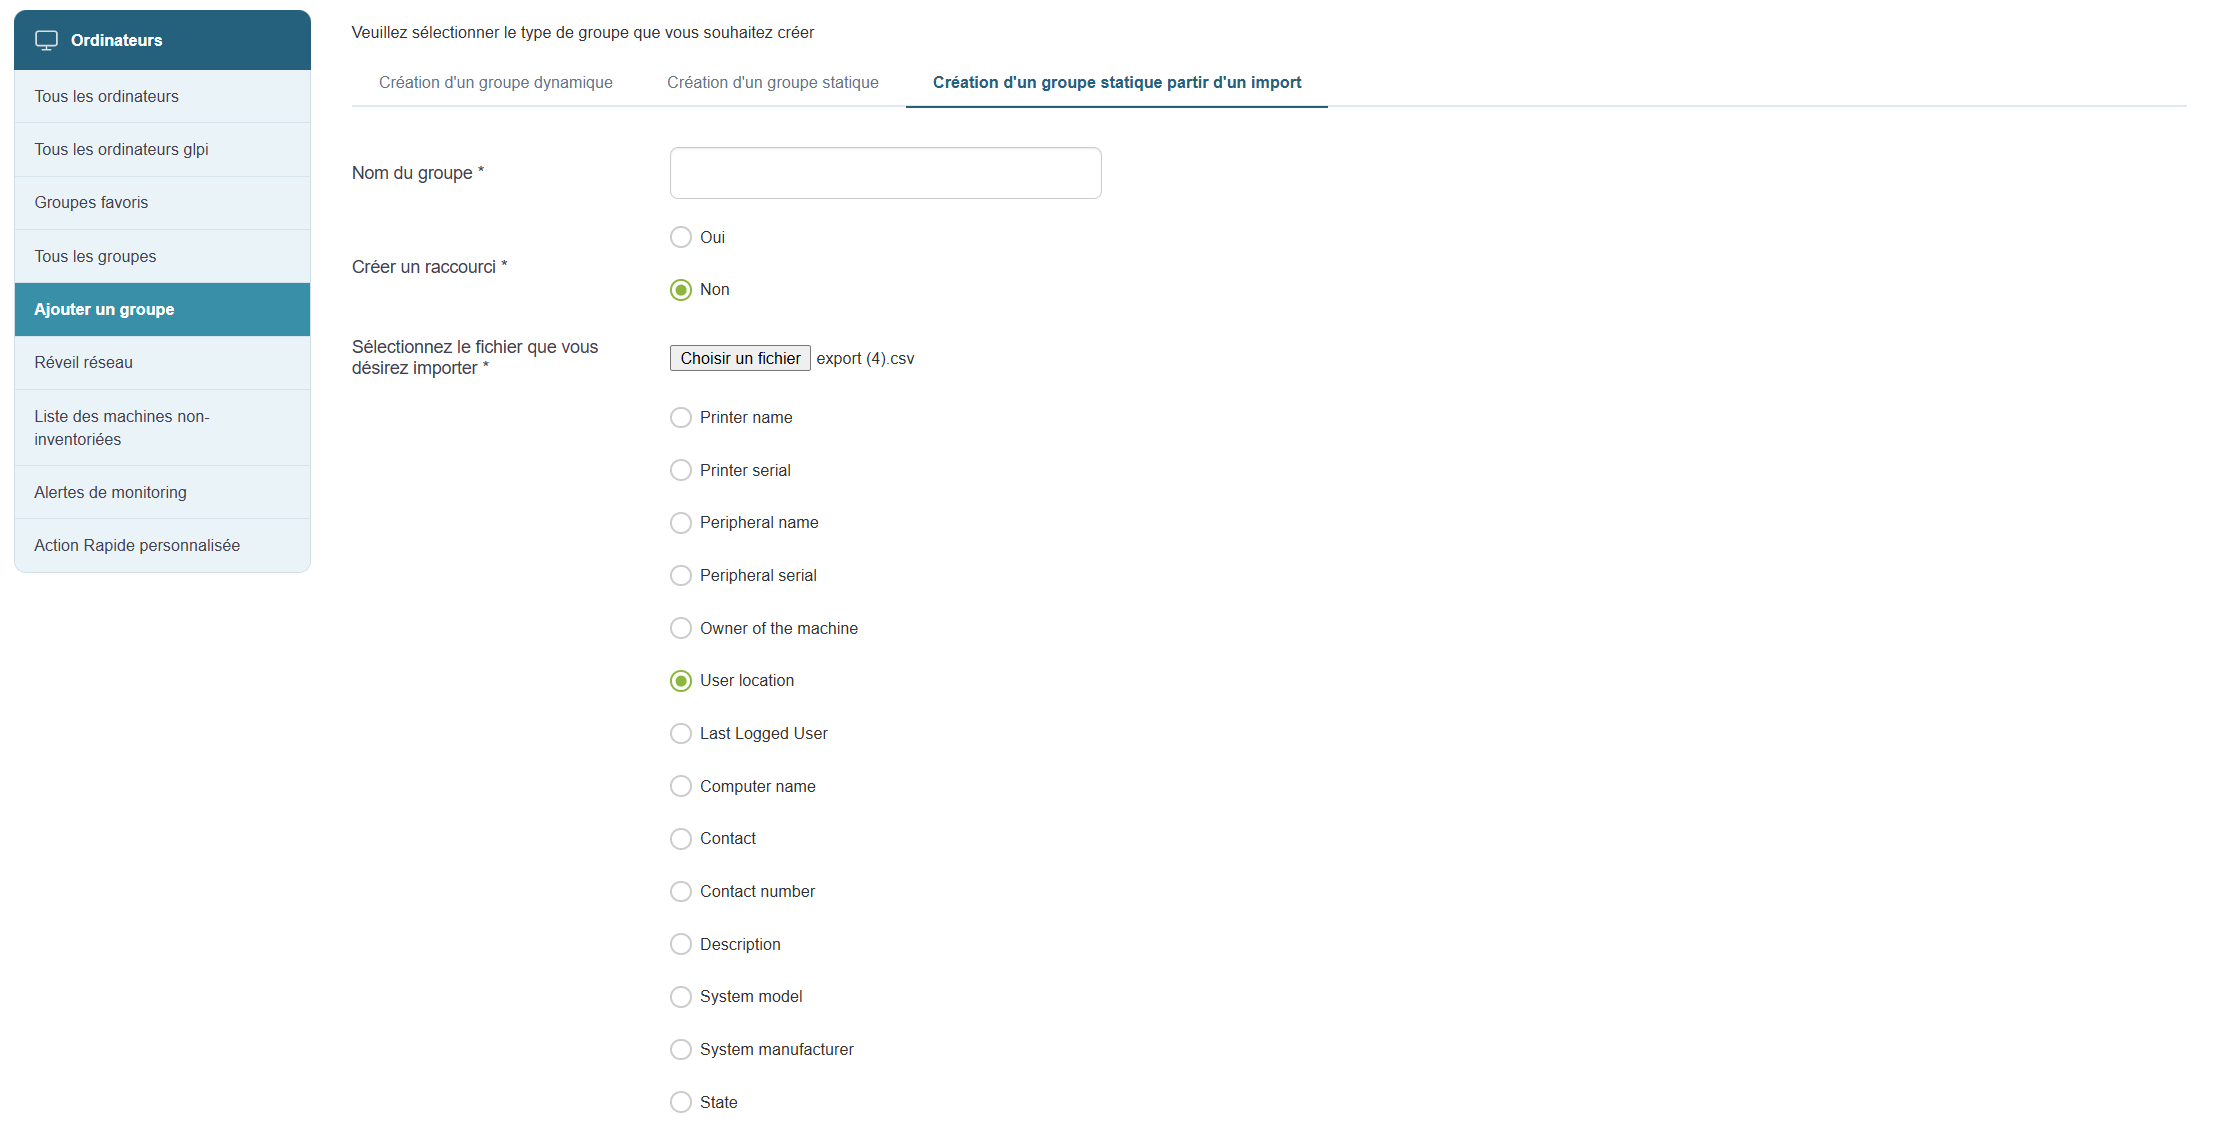
Import
Create a group by importing a CSV file, then verify that the machines are present in this group.
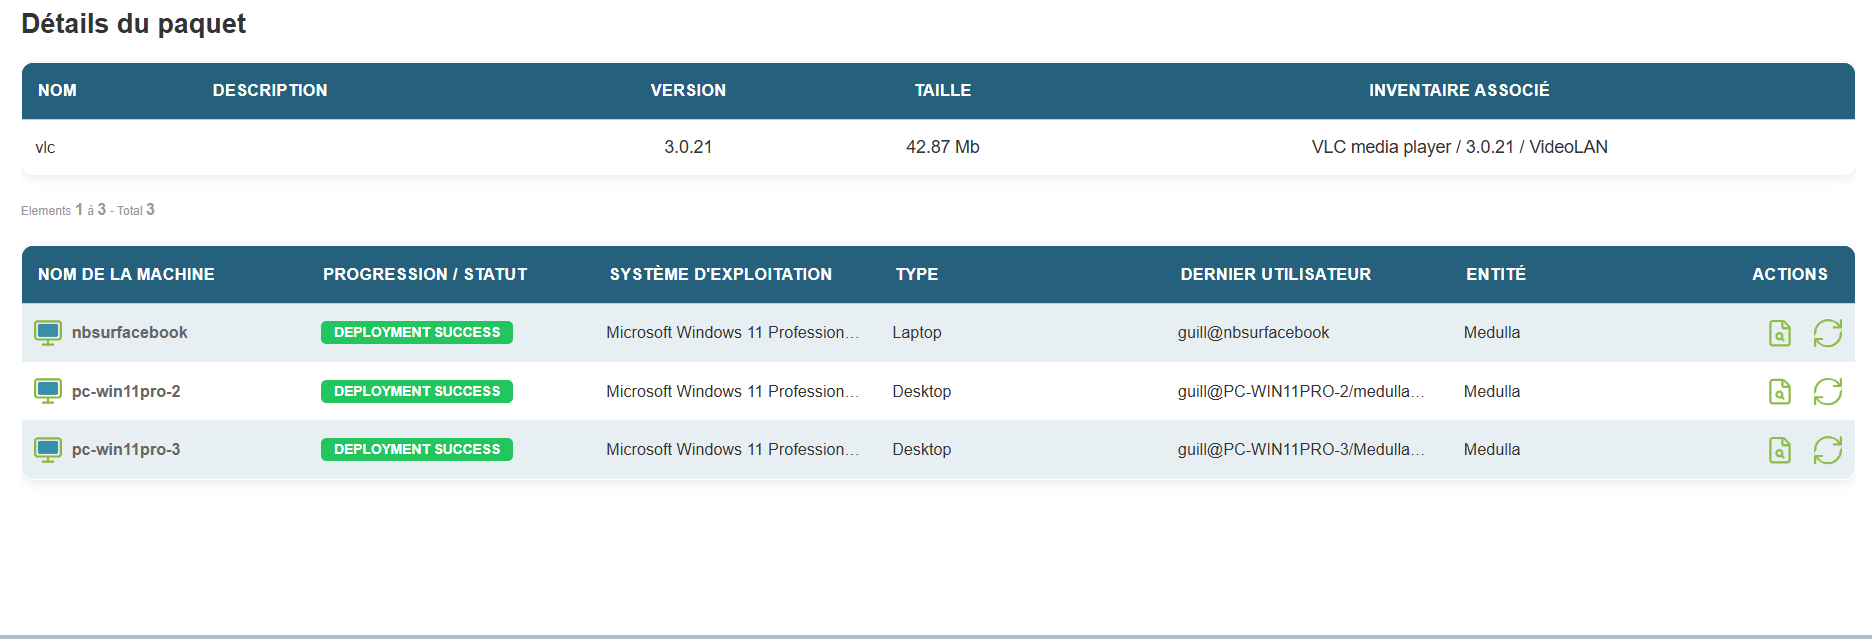
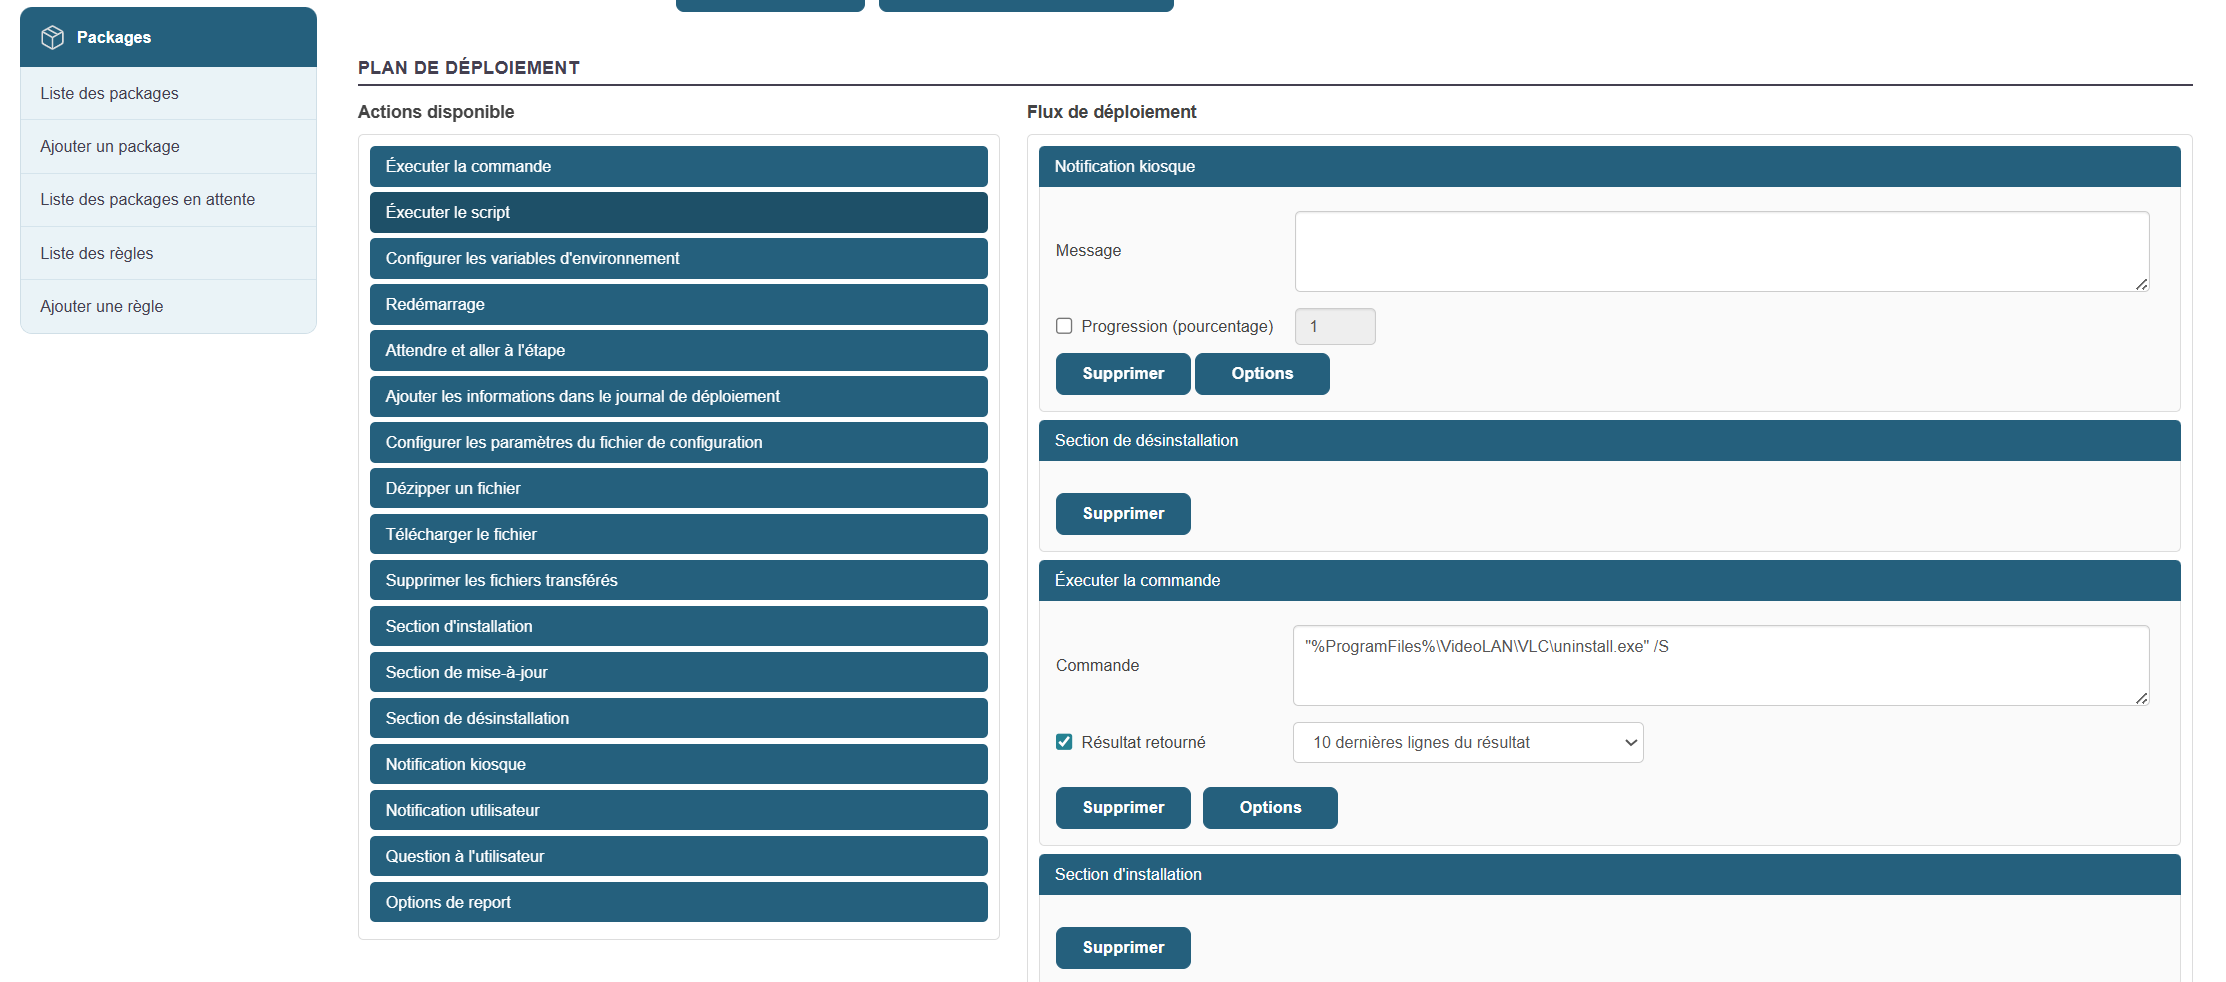
Packages
Add a package:
To add a package, go to the "Package" tab and click "Add a package":
Upload your binary and fill in the fields.
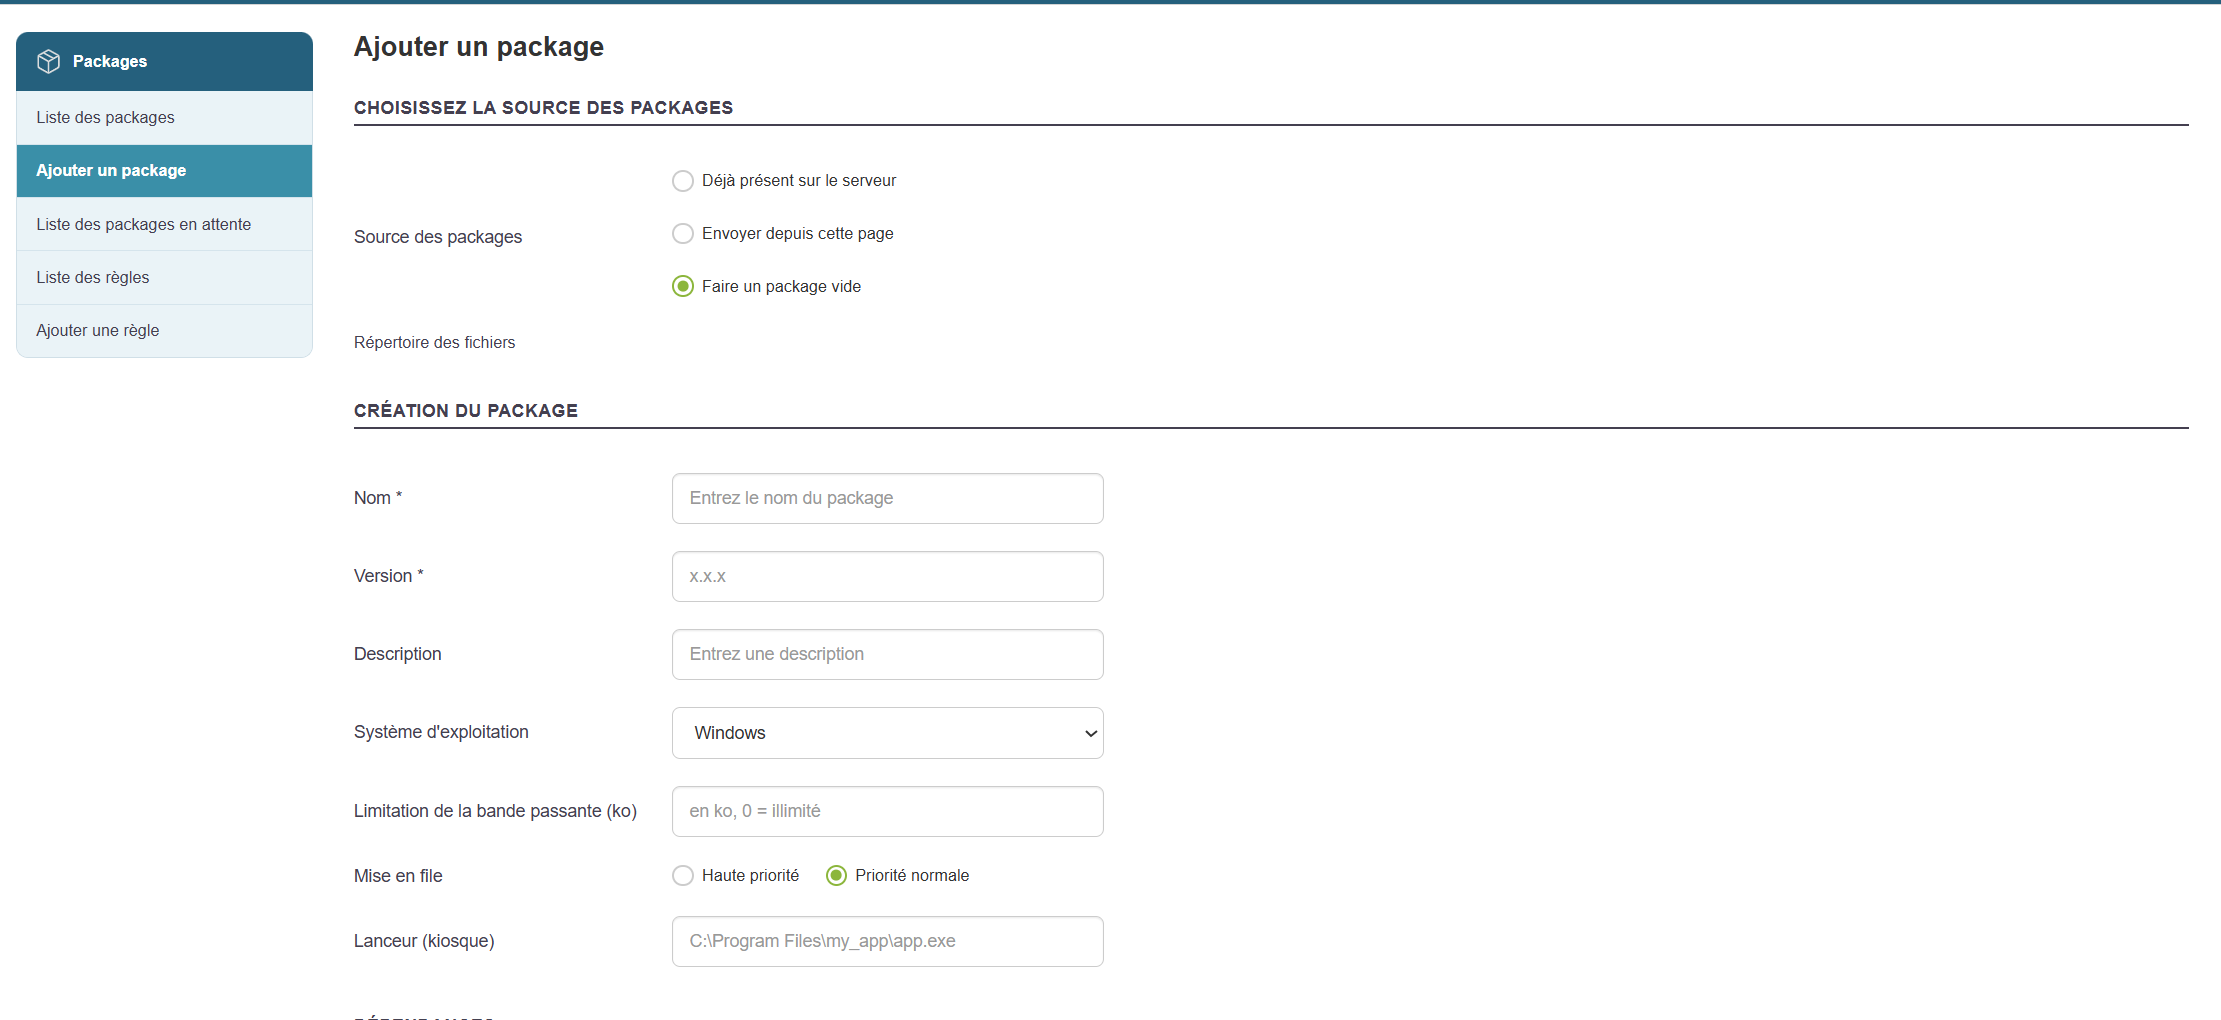
Then click "Validate"
You will be redirected to the package list page, where you should see your newly created package.

Updating a package:
Edit the title.
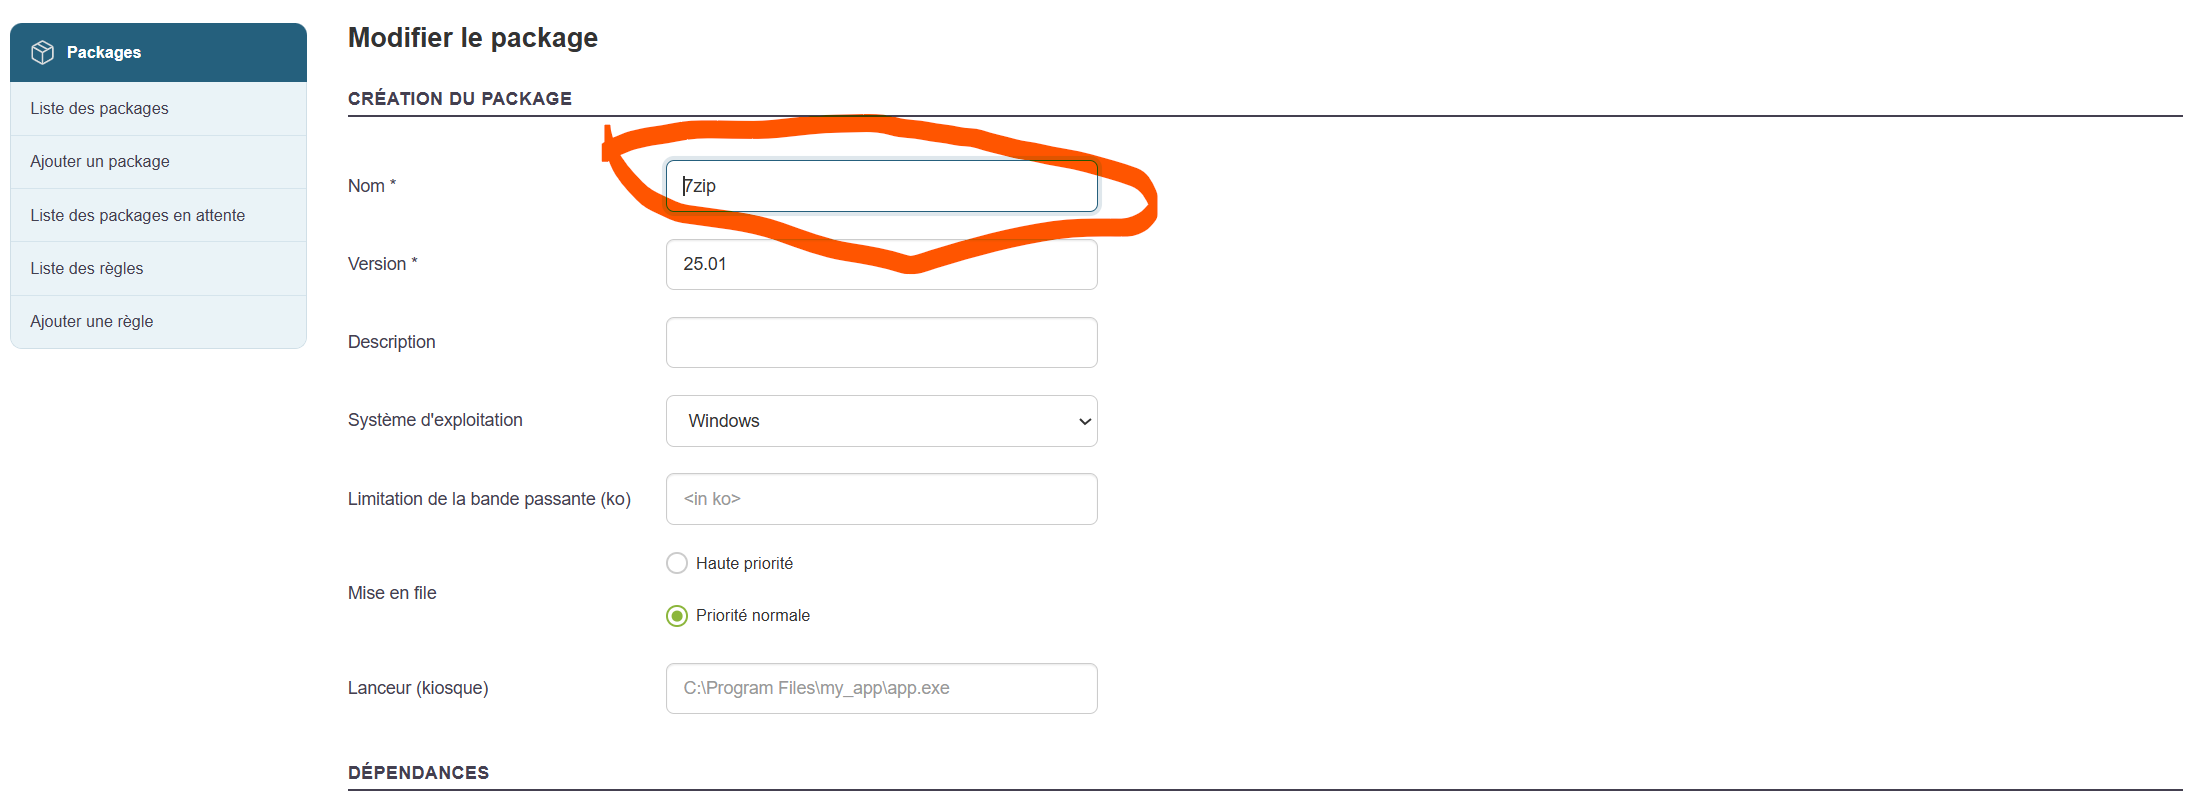
Add a file to the package.
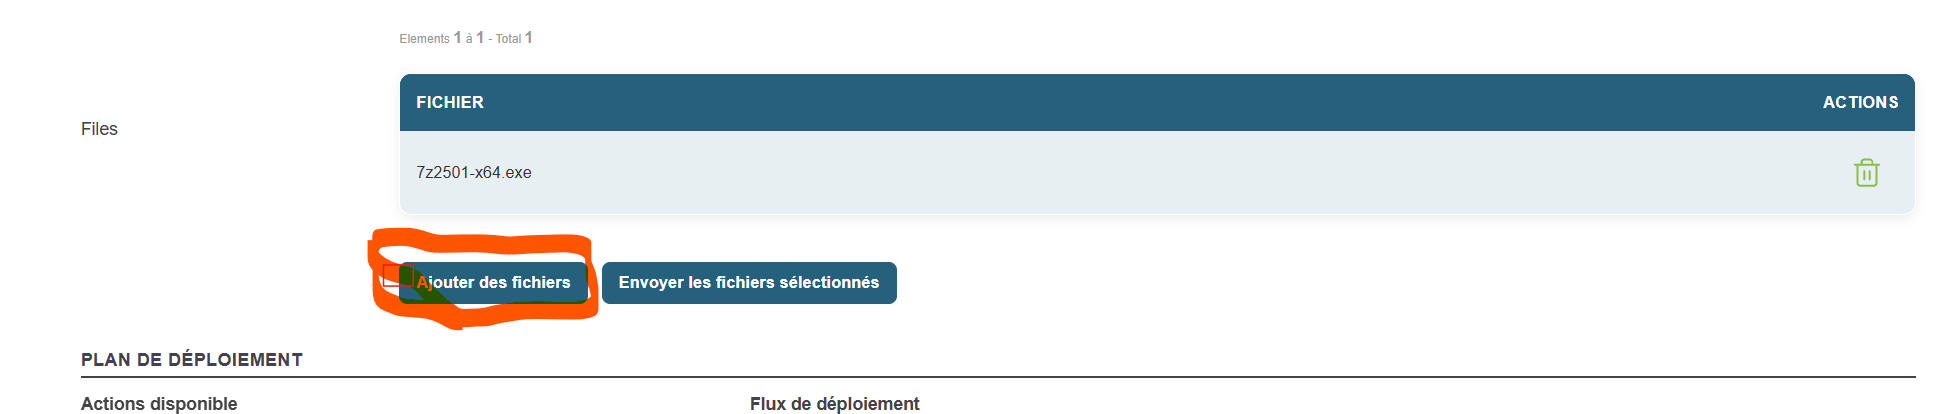
Click "Upload selected files."

Click the "Validate" button.

Check the package contents again to view the changes.
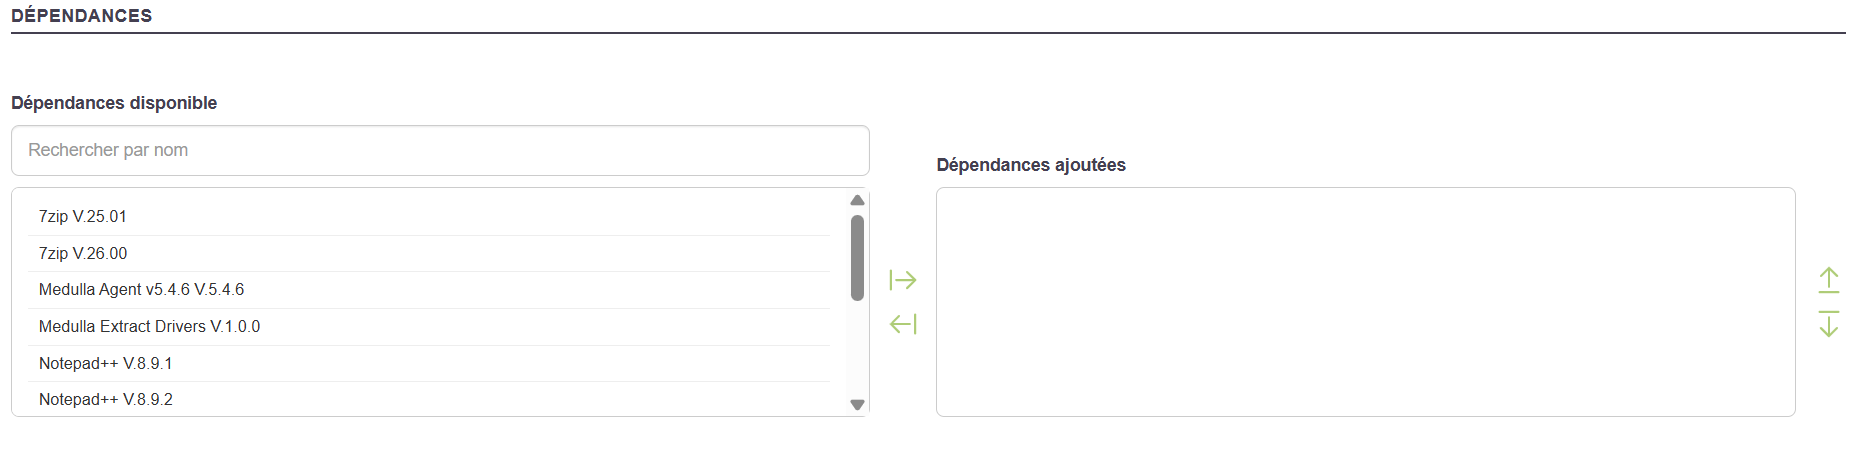
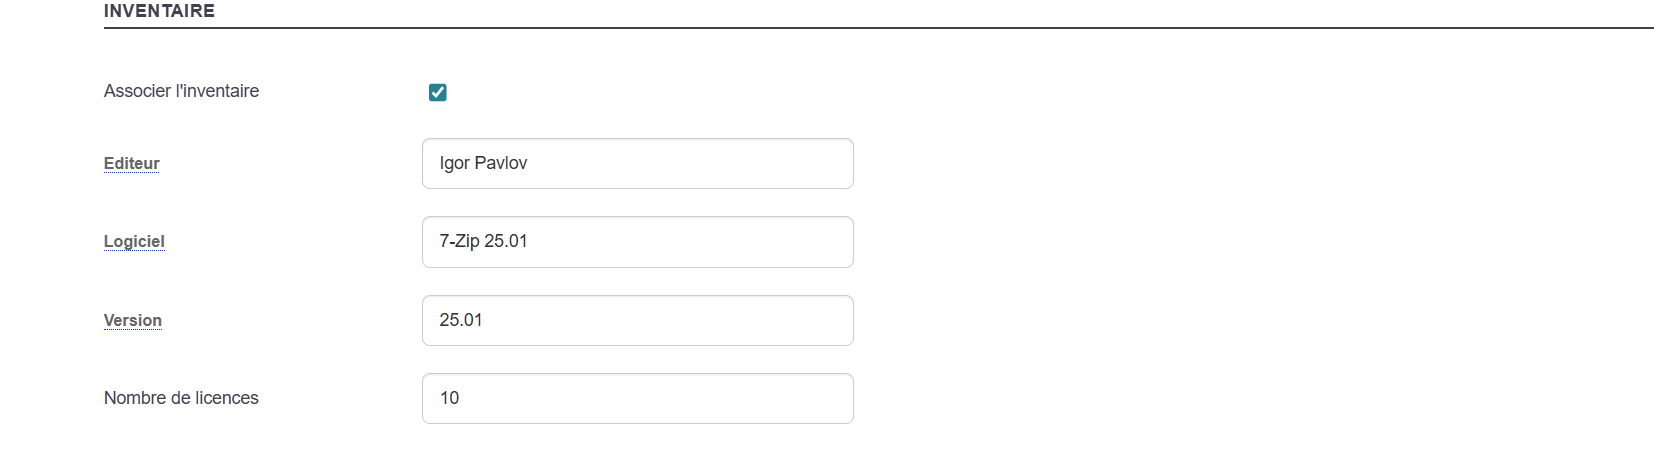
Packages for convergence or kiosk:
The package you want to make available to the Kiosk must be associated with its inventory report.
This information will determine its behavior (installation/removal)
Create a package by associating it with an inventory.
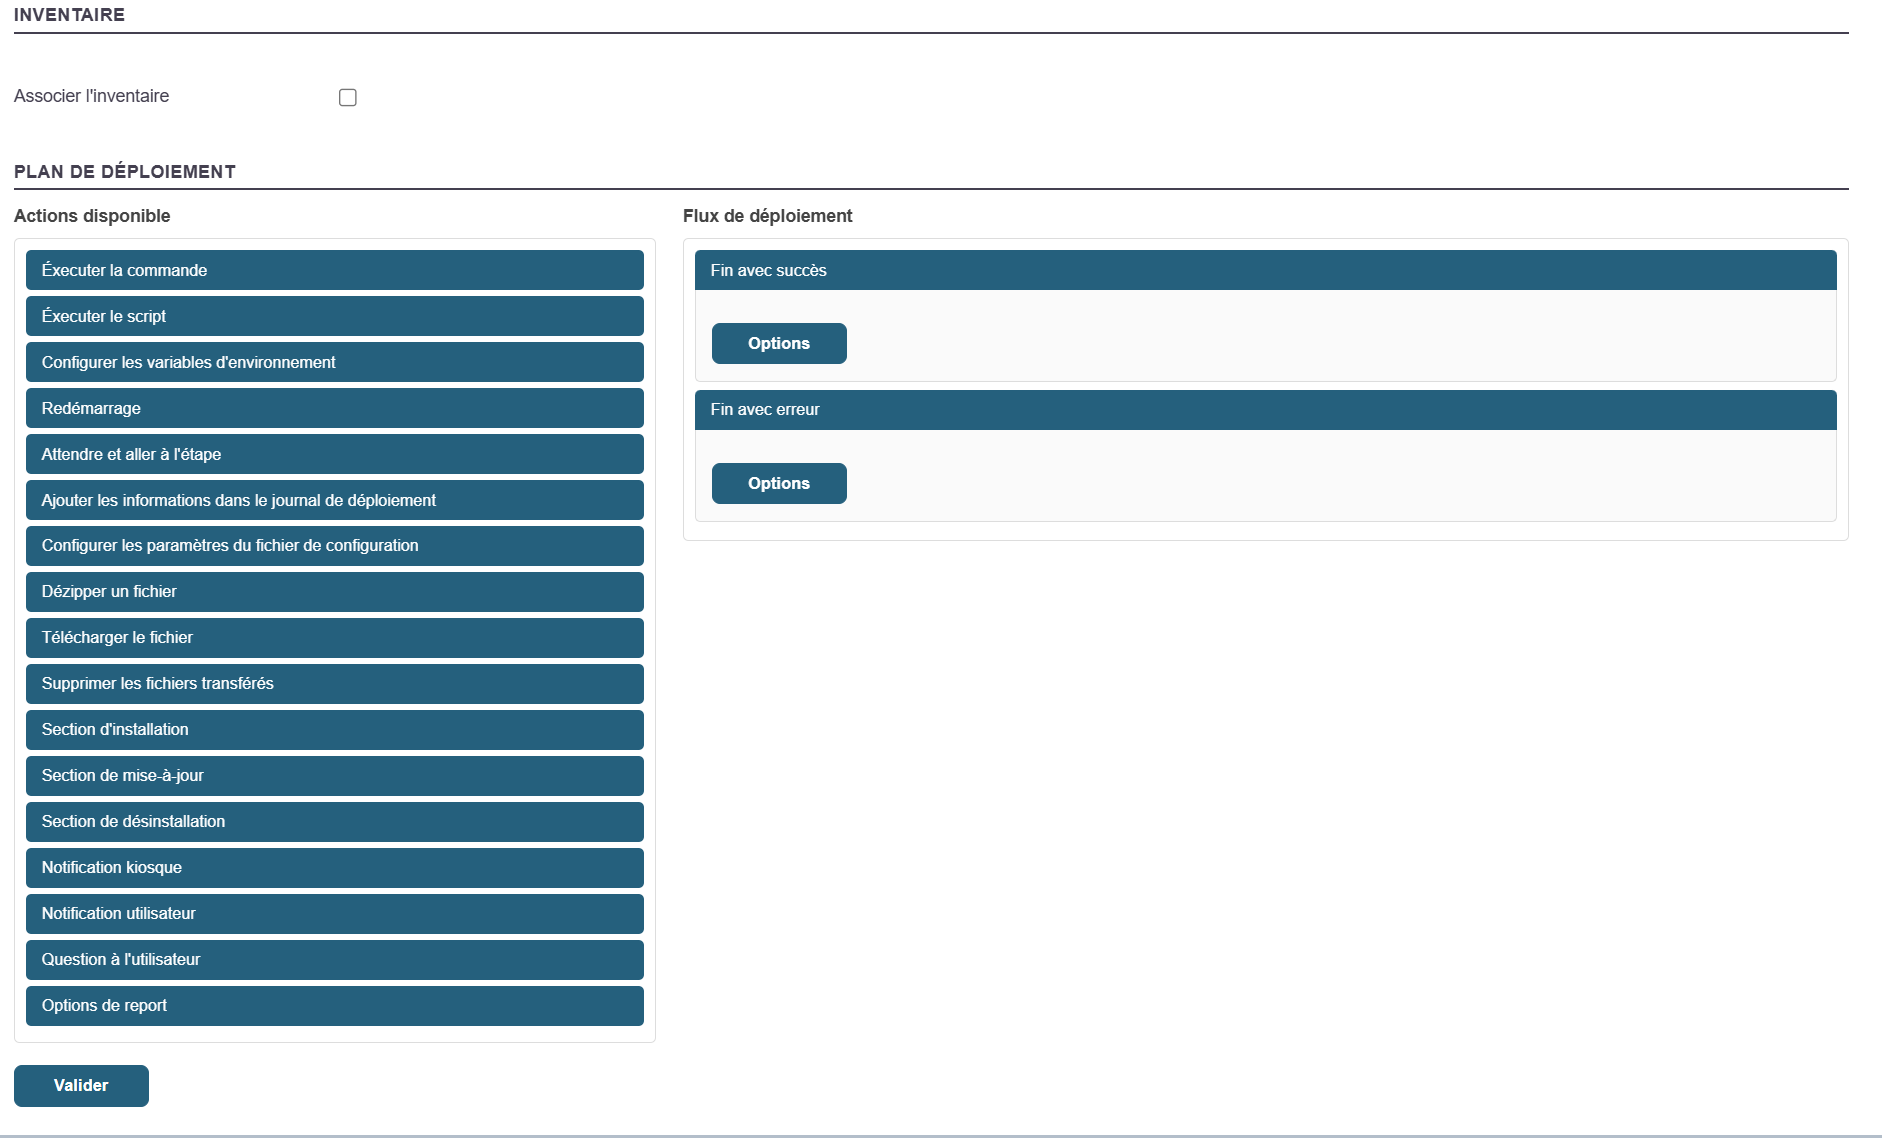
Deployments
In Medulla, there are several types of deployments as well as convergence
In this chapter, we will validate the operation of the various types of deployments:
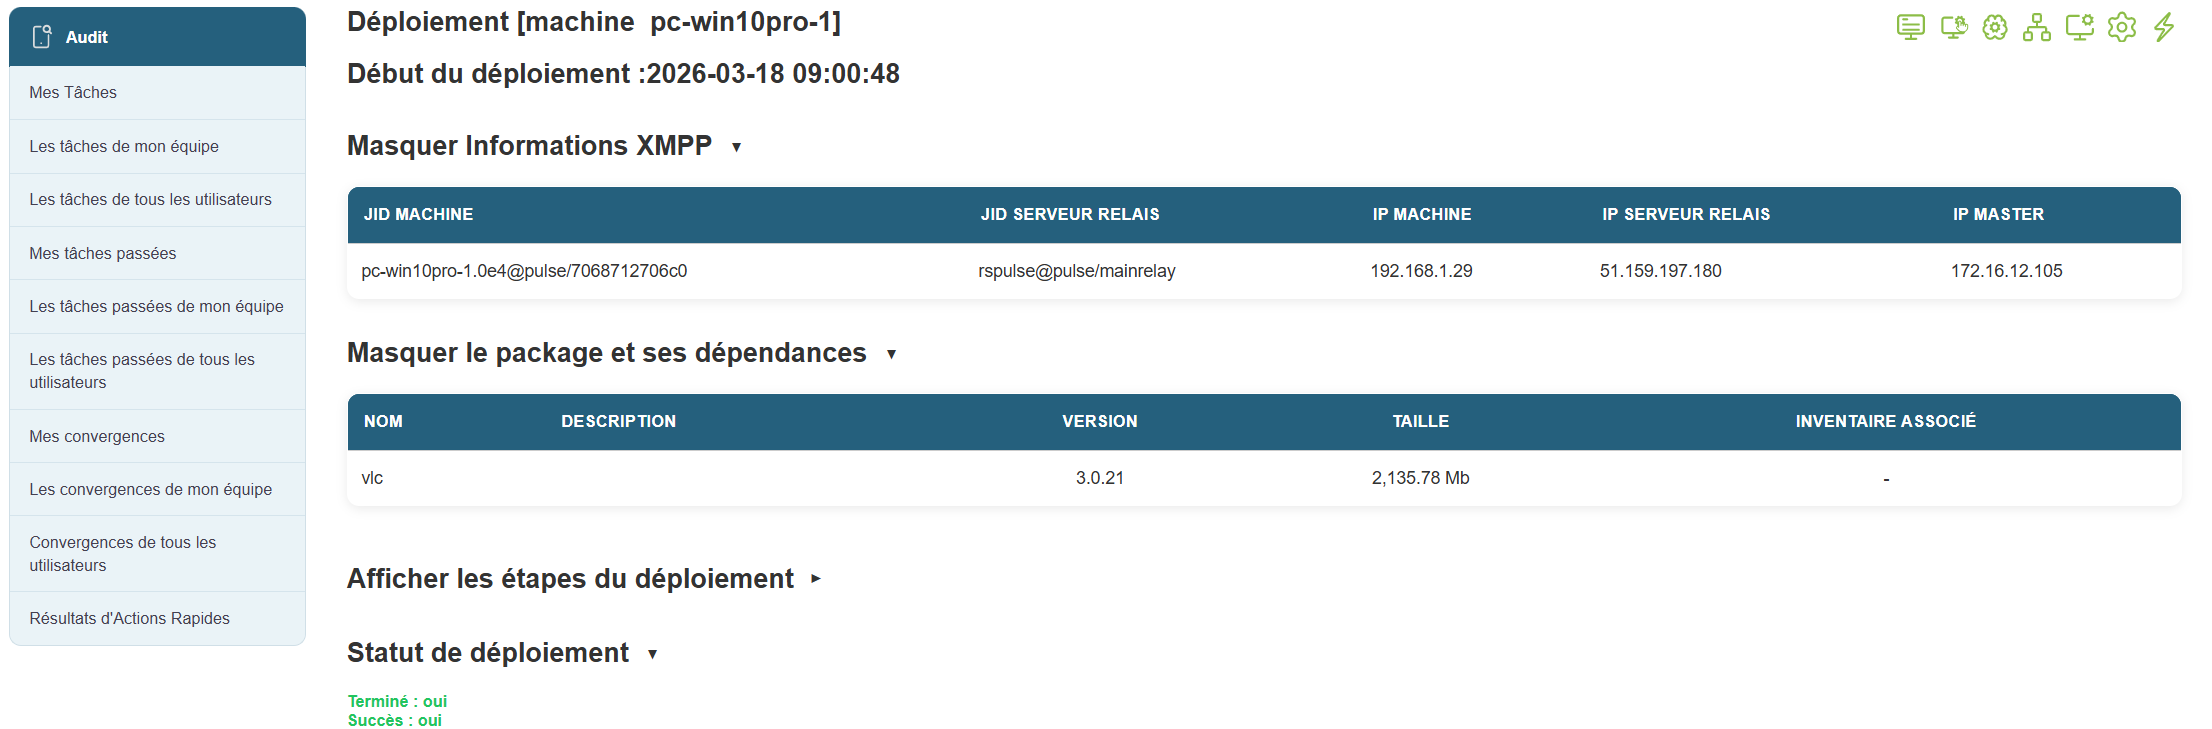
Checking the Interactive Deployment:
Launch a deployment using the "Deployment" button on a computer’s action bar.

Verify that its status is "Deployment successful."
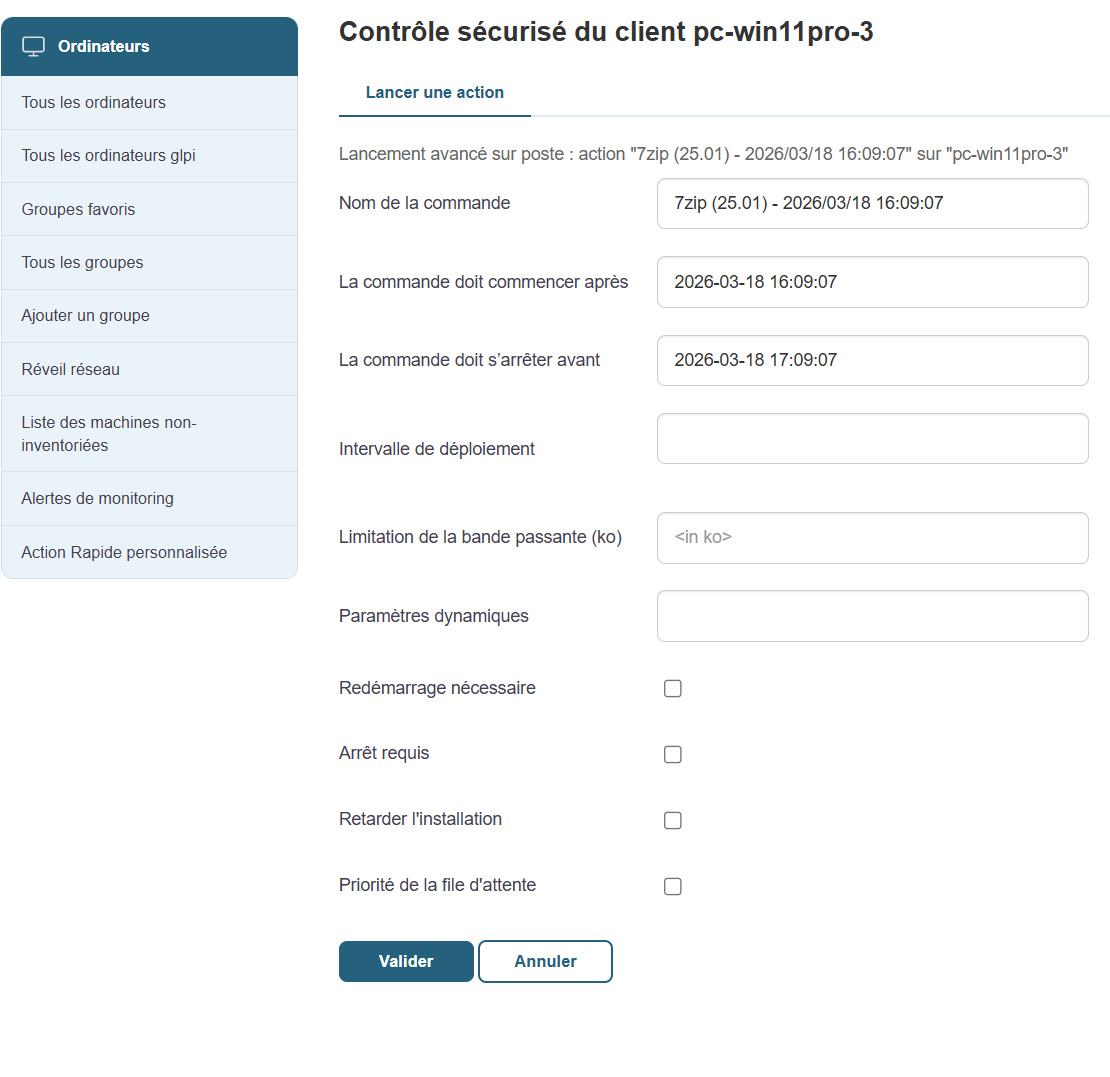
Checking Scheduled Deployment:
Specify a start and end time for a deployment (later than the current launch time to verify that it launches at the correct time).
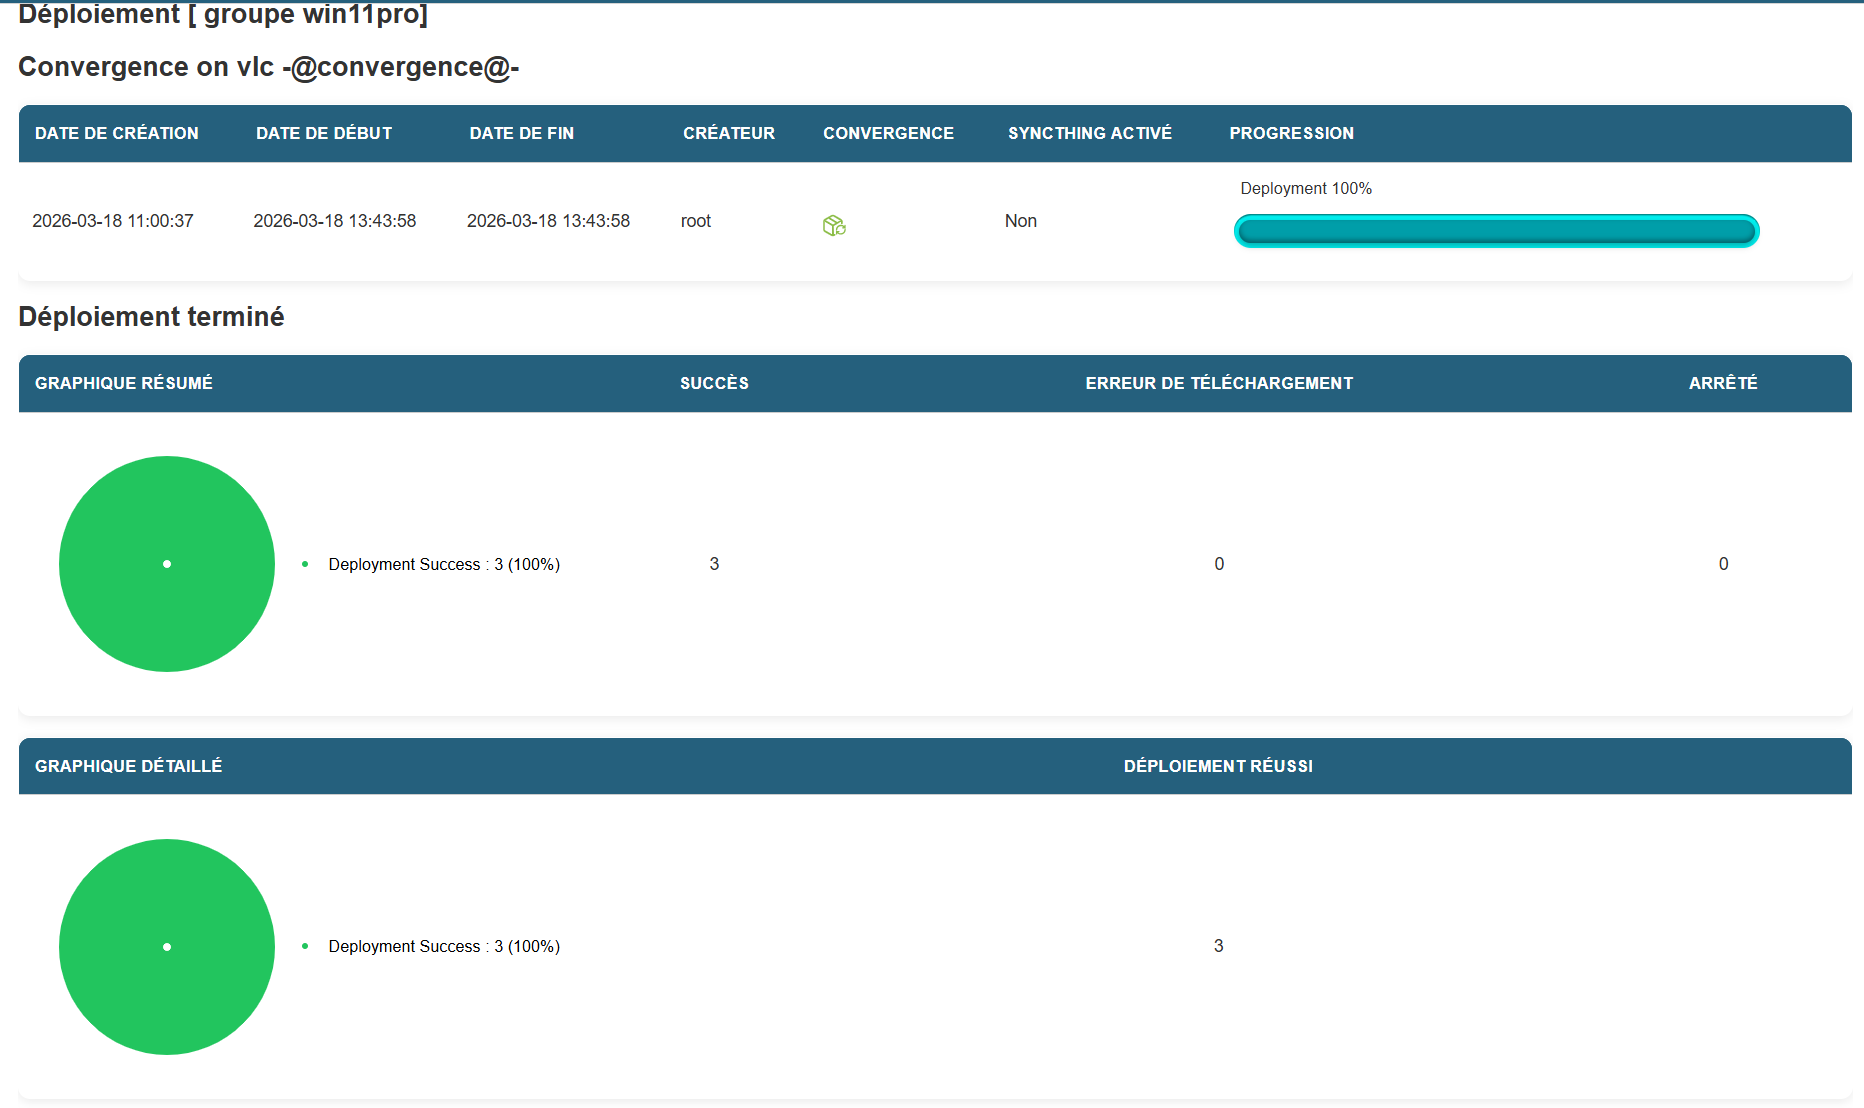
Convergence
Launch a convergence from a group. Verify the machines that received this convergence.
Delayed Deployment Control:
When launching a deployment, check the "Delay Installation" box and select a specific time.
The deployment must start, pause, and resume at the desired time you selected in the "Delay Installation" section when launching the deployment.
User interactions
Notification:
Notify the user
Drag the "User notification" action into the deployment workflow on the right
· Enter the Title
· Enter the desired message
· Specify the display duration in seconds

User question:
Drag the "User Question " action into the deployment workflow on the right
The user can interact with the deployment, depending on the selected options
In this action, depending on the user’s response, the following actions are possible:
1. If “True” go to step: If the user answers the question in the affirmative
2. If “False” go to step: If the user answers the question in the negative
3. If “No User” go to step: If no user is logged in to the machine
4. If “Timeout” go to step: If the user does not respond within the allotted time (in the example above: 300 seconds) 5 min
To define the “GO TO STEP”steps, additional actions are required in the“Deployment Flow.”

The actions placed behind the Yes and No buttons must be executed correctly.
Responses to questions must be displayed in the deployment logs
The timeout value must be observed.
User Postpone Option:
This action allows the window to be displayed multiple times if the "False" button is selected.
The user is asked whether to proceed with the deployment, and additional actions are required in the "Deployment Flow" section.
Here, there are two additional options corresponding to the number of times the user can postpone the deployment (accessible by clicking the Options button), as well as an option specifying the action to take if the maximum number of postponements is reached: “If ‘Max Postponements Reached’ go to step.”
Drag the “User Postpone Option” action into the deployment workflow on the right
· Enter the Title
· Enter the desired message
· Specify the display time in seconds:
o e.g., 300 sec, 5 min
· The number of possible reminders
o e.g., 3
· The time interval between each refresh:
o e.g., 900 sec, 15 min
· The actions defined for each choice

The actions associated with the Yes and No buttons must be executed correctly.
The specified time between each retry of the questions must be observed
Responses to the questions must be displayed in the deployment logs
The timeout value must be observed.
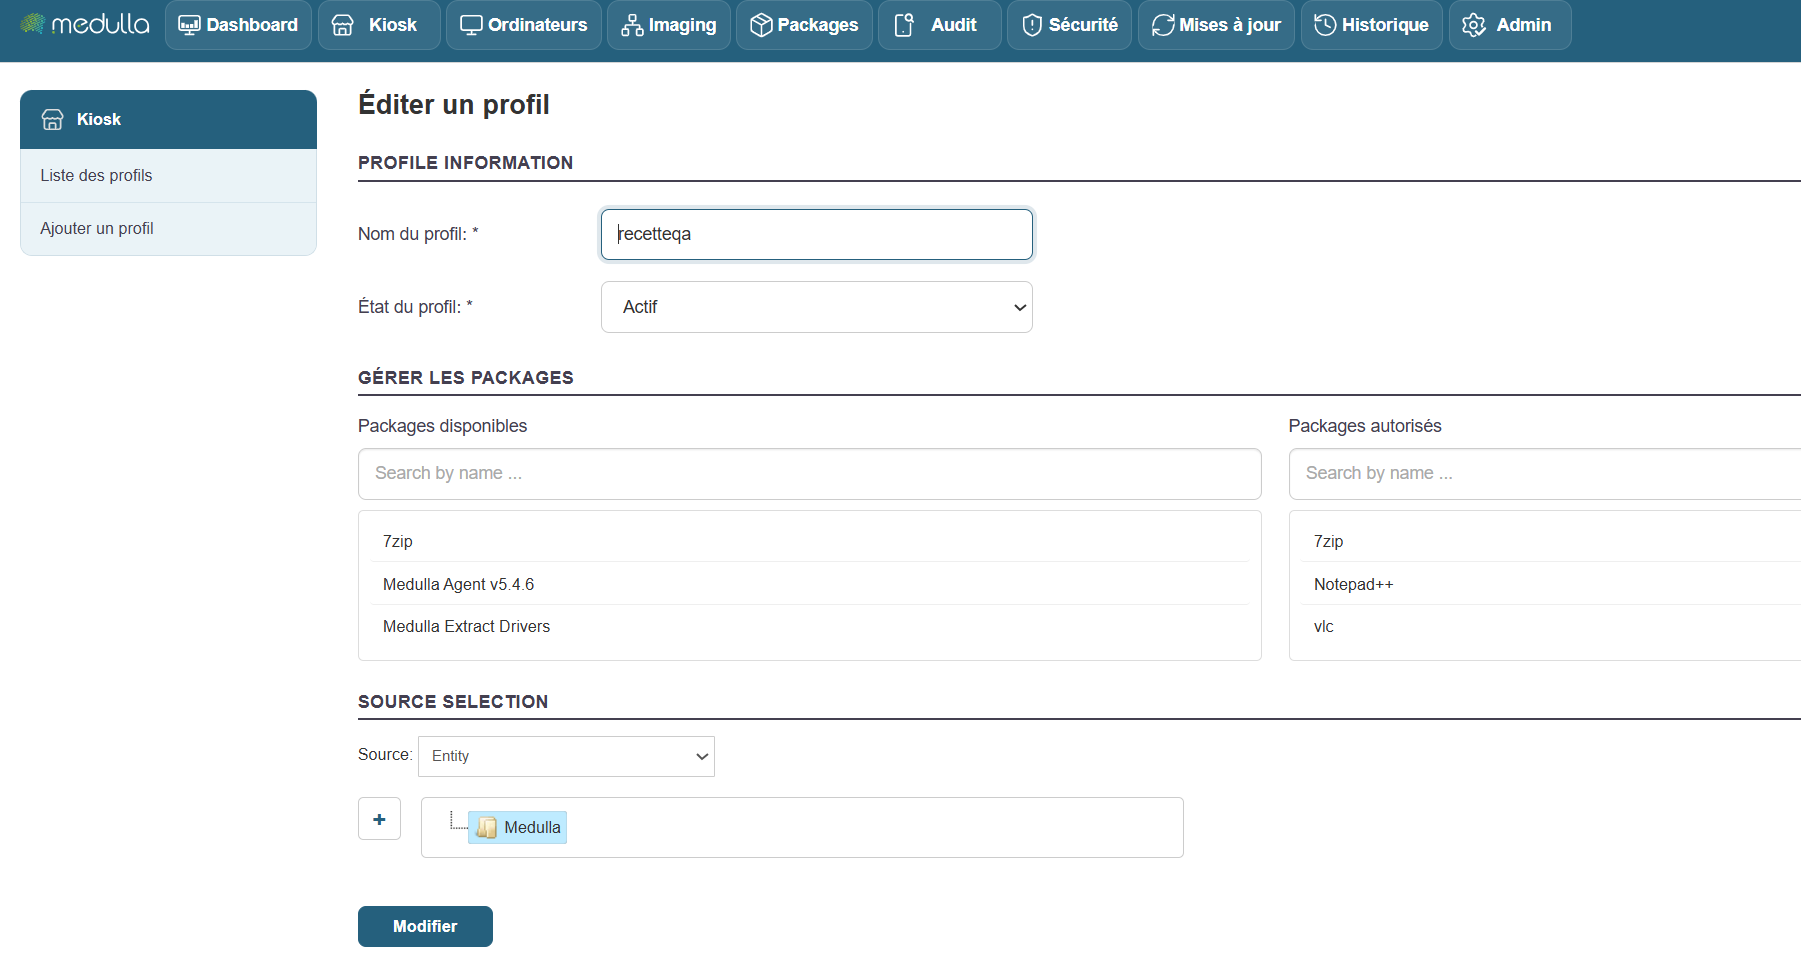
Kiosk
Go to the Kiosk page.
Add or edit a profile.
Drag the package(s) from the left pane to the right pane to add it to the Kiosk profile.
Set permissions on the entities, OUs, and groups as desired.
Installing the package from the Kiosk:
Open the Kiosk by clicking the "Medulla Kiosk" button in the Windows taskbar, then "Open."

Click the "Install" button for the package.


In the Medulla Audit view, find the installation audit under “Deployment for All Users”
Look for the audit line labeled "@kiosk [...]"

Kiosk Notification:
In a package’s workflow, add a “Kiosk Notification” action.
Updates (WSUS)
Select the types of updates you want:
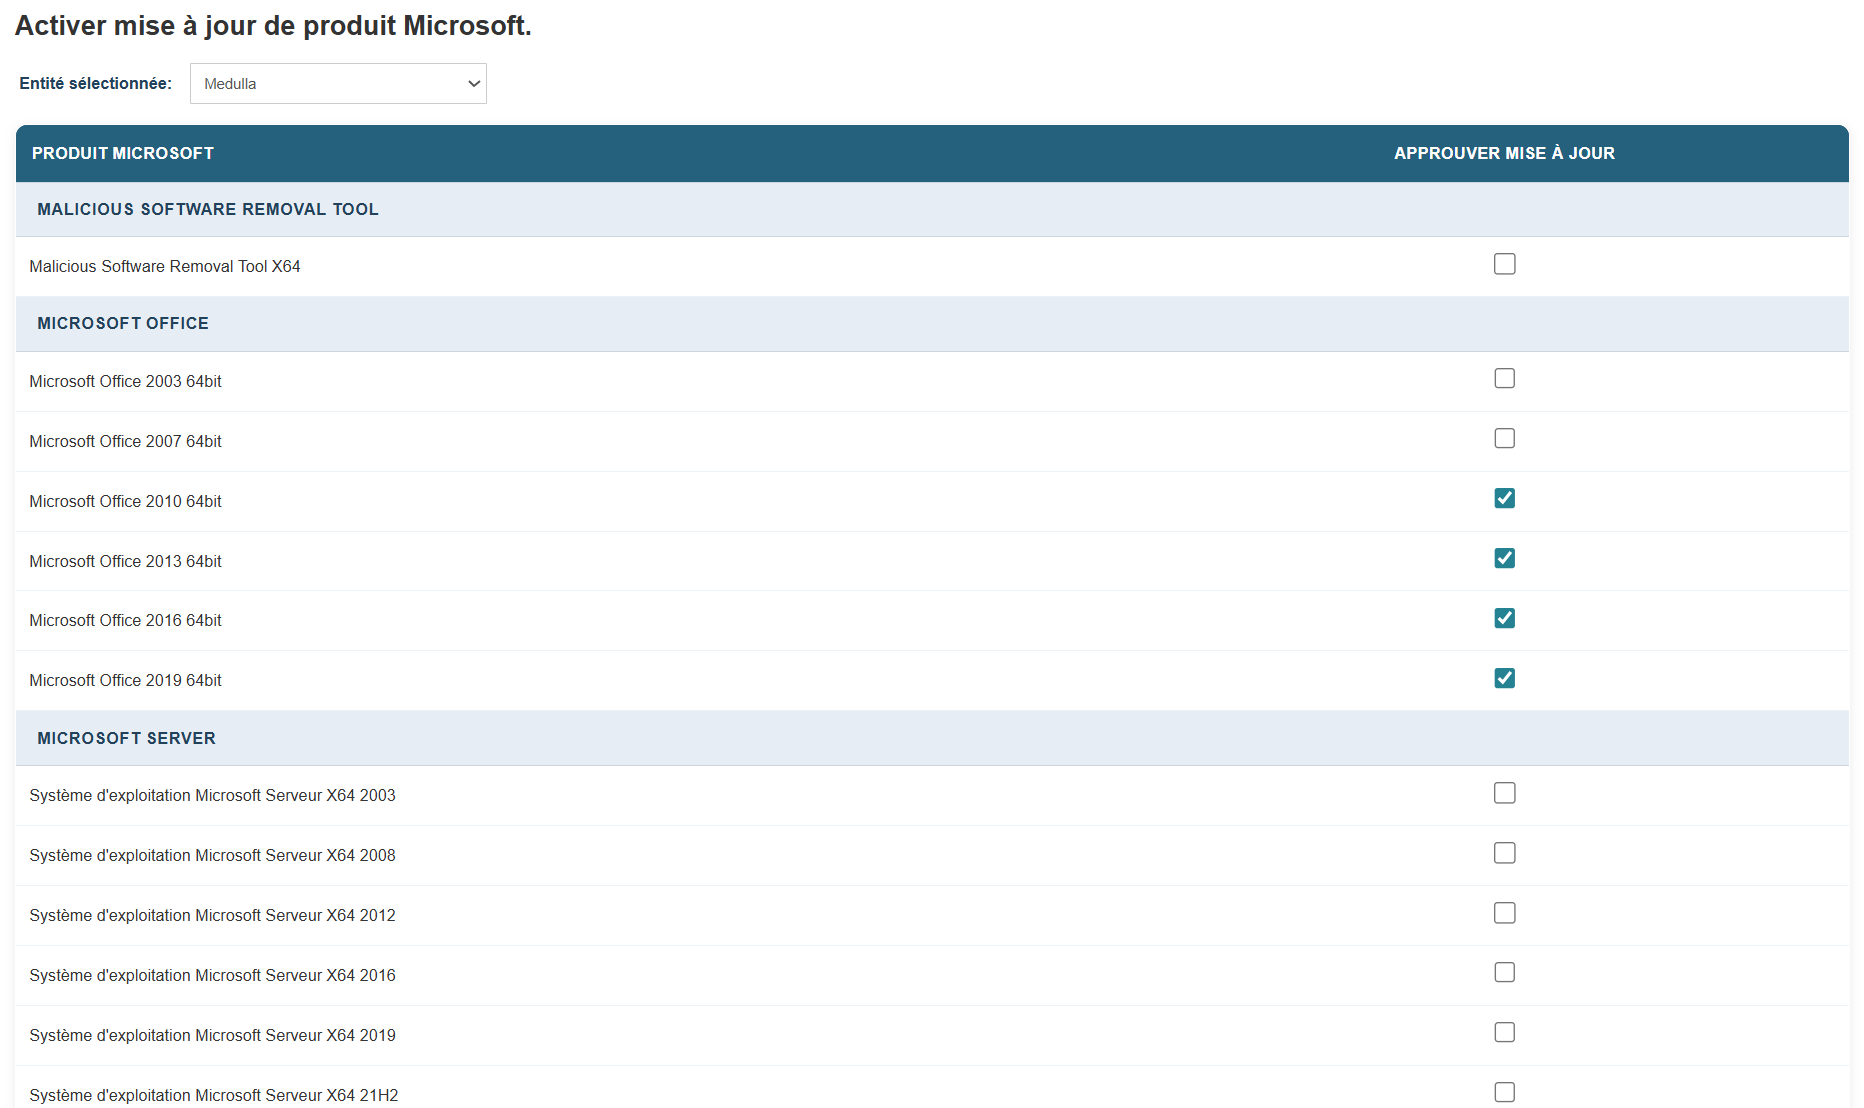
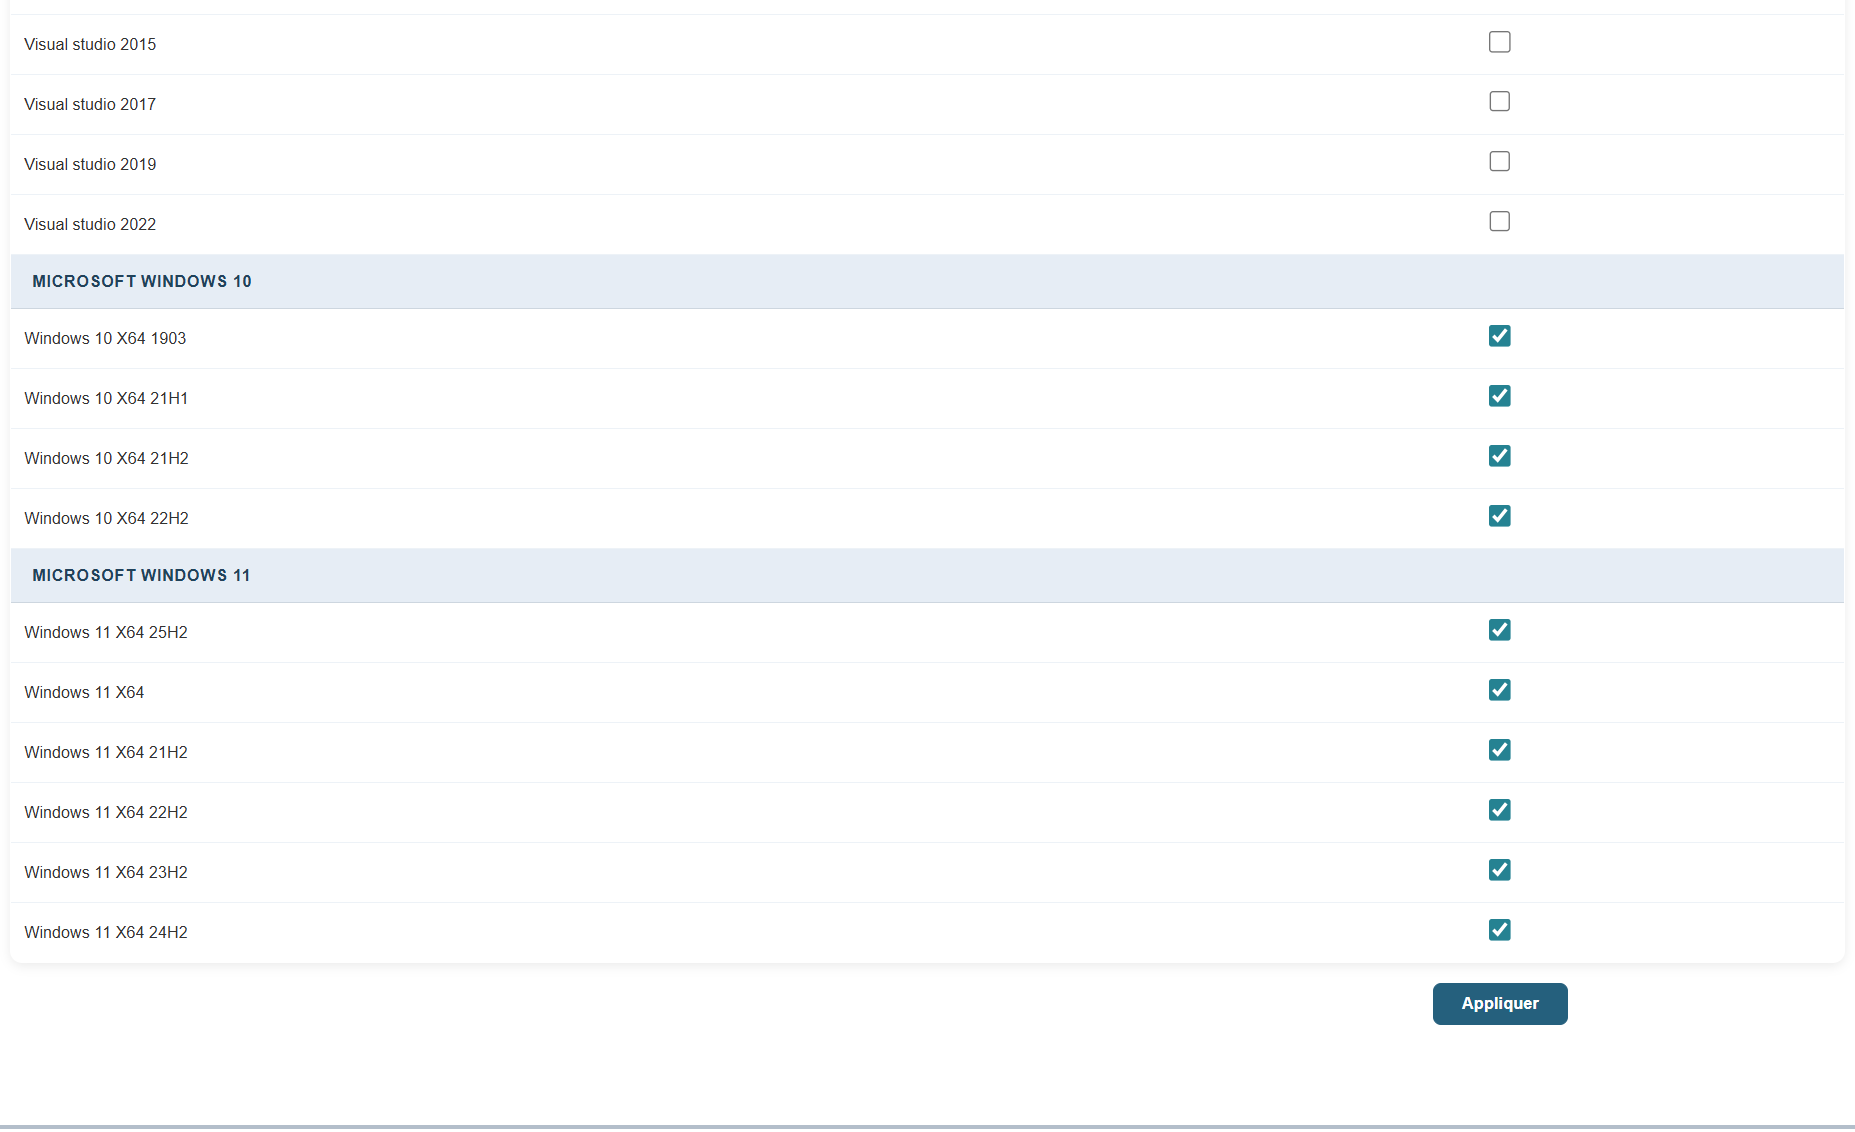
Click the corresponding checkbox and the Apply button.
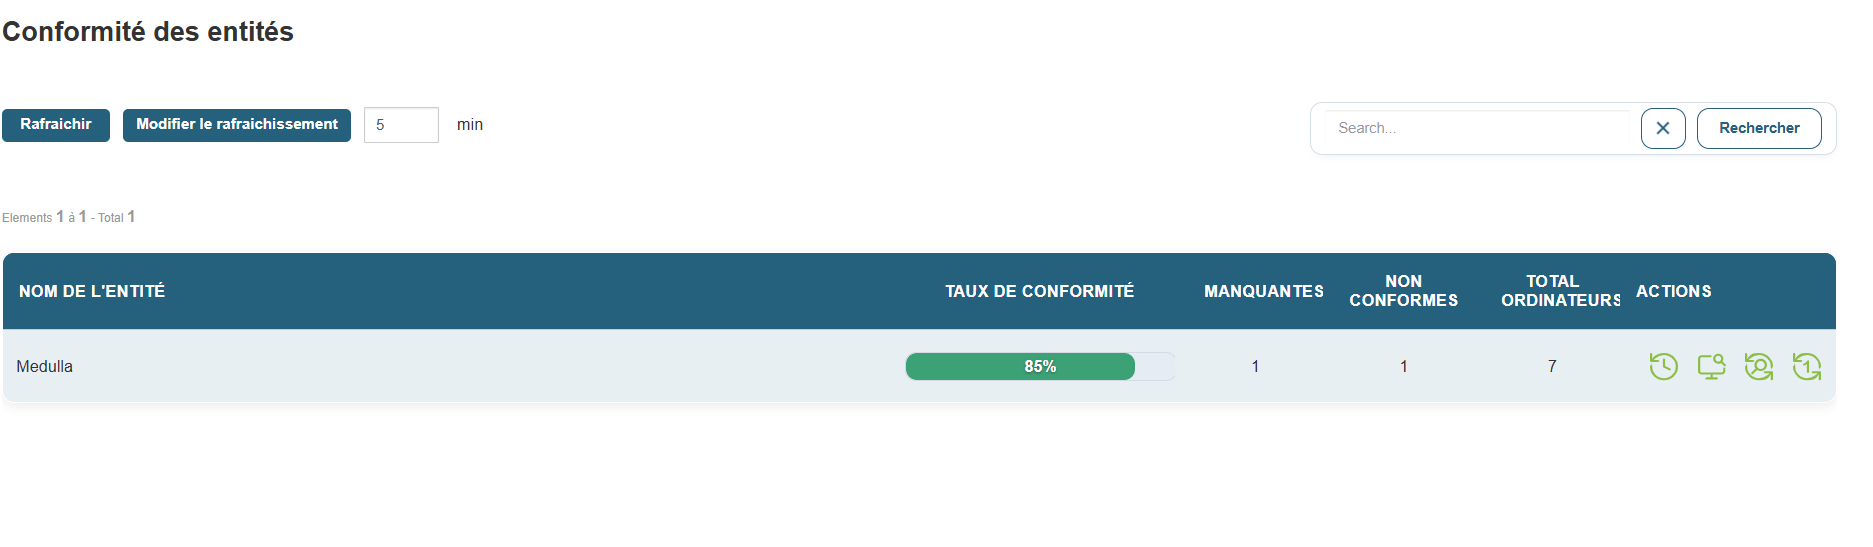
Once in the Update module, you should see all your Entities under "Entity Compliance." You can also view compliance by group by switching to the Group view.
In "Manage Update Lists," you should see the missing updates for all machines in the fleet that meet the criteria.
All updates are placed in the "Grey list" by default.
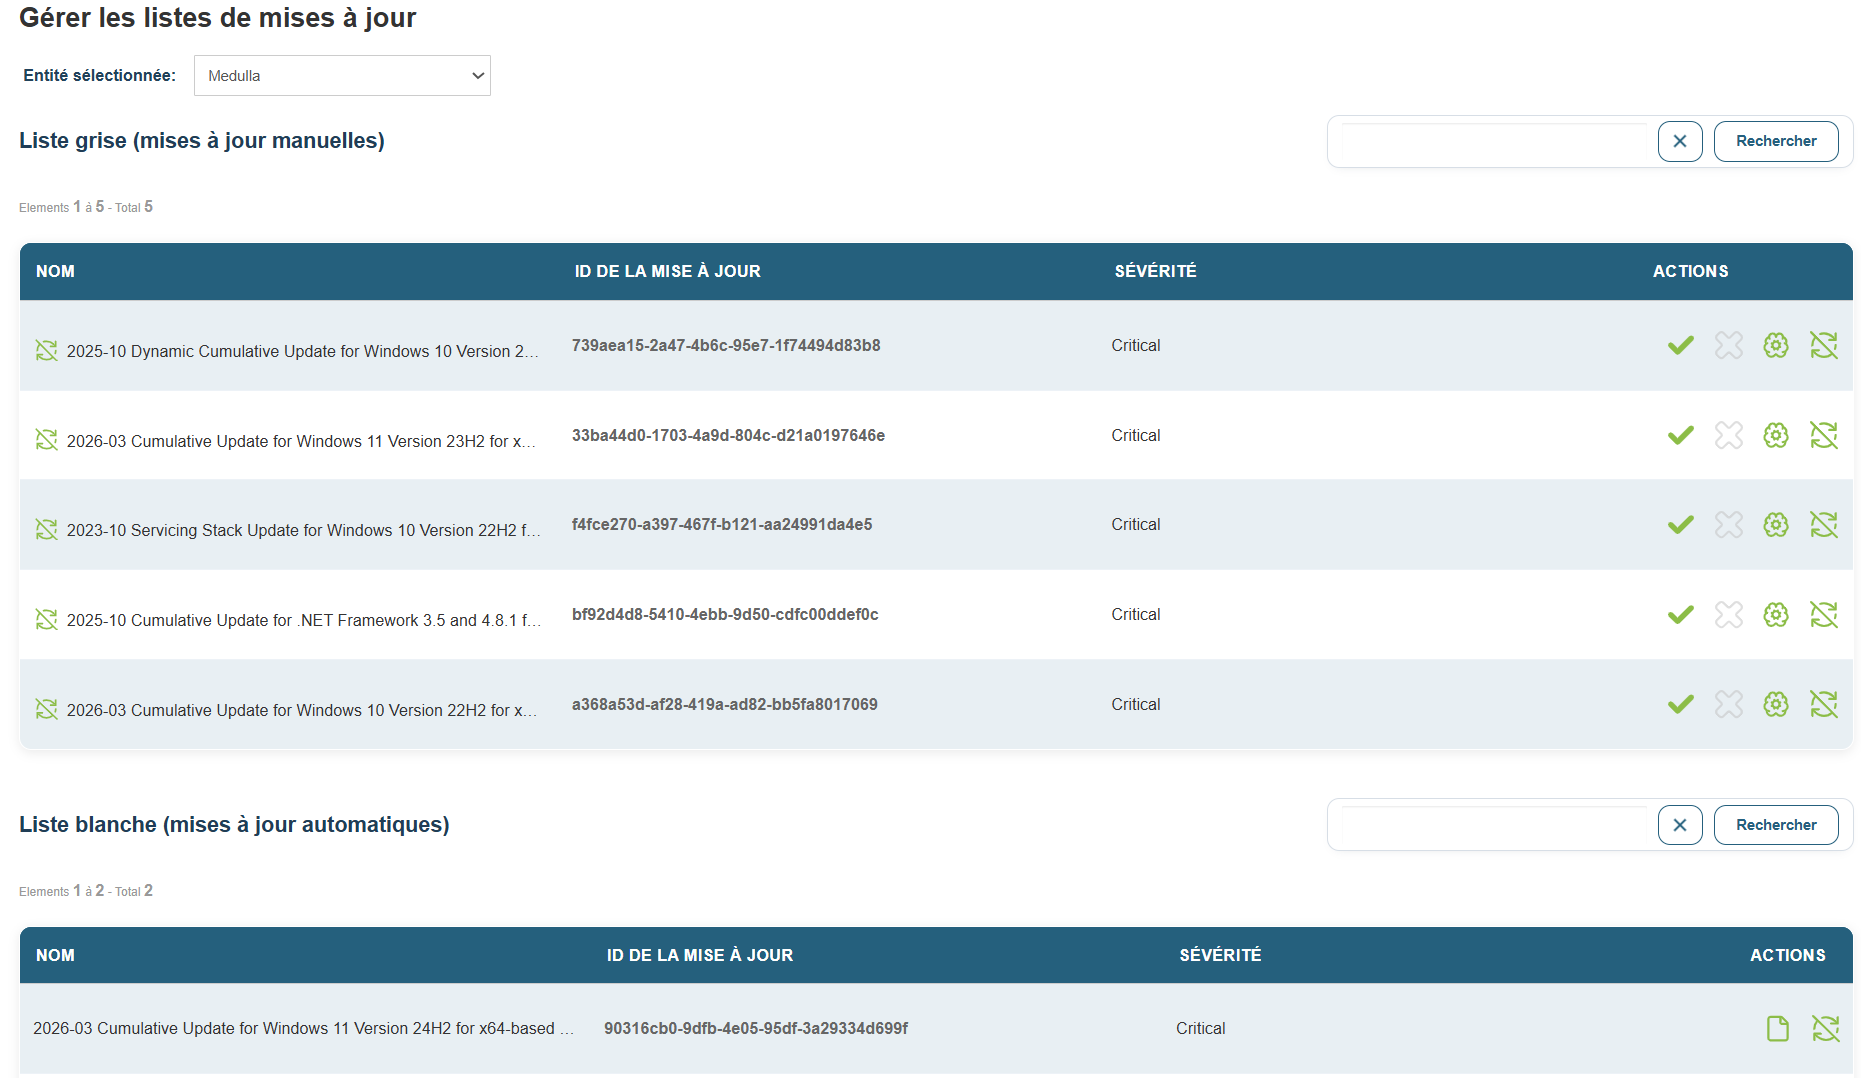
Confirm the desired updates
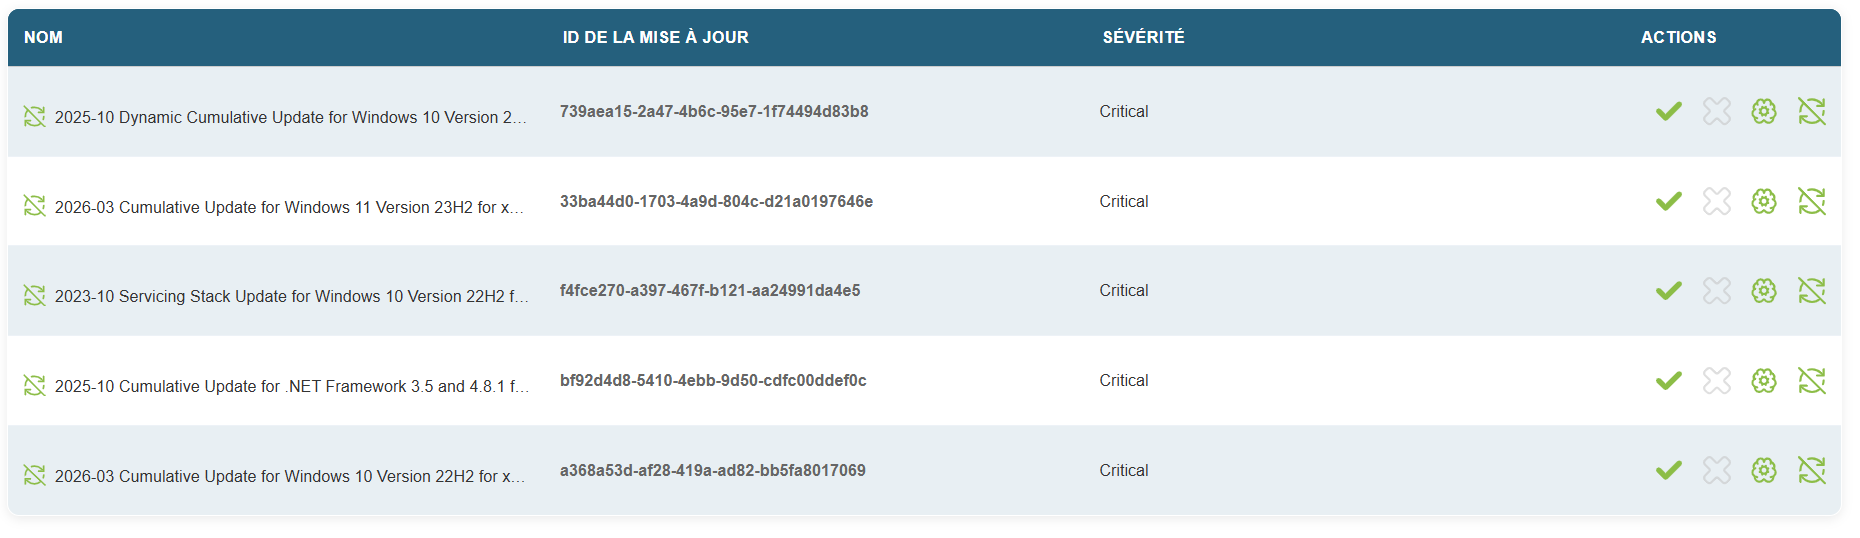
Then locate the missing updates in the details view for each machine.

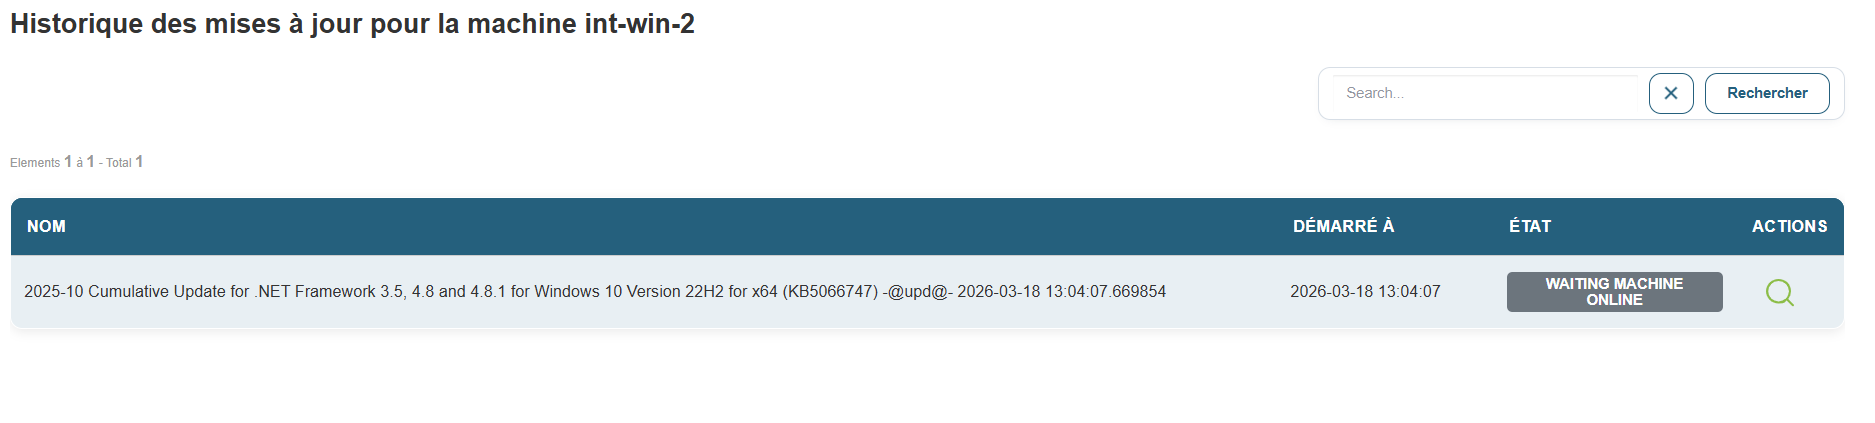
Click the magnifying glass icon labeled "Details" on a machine, then click the "Deploy this update" icon.
A few seconds later, you’ll see the update audit in the “Audit” view.
Recipe Summary
Find the Excel file containing all the tests to be performed at the link below
| Functionality | Chapter | Result |
| Login Test | Getting Started with the Solution | |
| Static Group Creation Test | getting-started-with-the-solution | |
| Machine Presence Test | getting-started-with-the-solution | |
| Machine inventory | Actions | |
| Remote setup | actions | |
| XMPP Console | actions | |
| Edit Configuration Files | actions | |
| Run an inventory | Quick Actions | |
| Show Process List | quick-actions | |
| Disk usage | quick-actions | |
| Agent Details | quick-actions | |
| Reboot | quick-actions | |
| Shutdown | quick-actions | |
| WOL* | quick-actions | |
| WOL Fixed* | quick-actions | |
| WOL Deployment* | quick-actions | |
| Add a quick action: | quick-actions | |
| Deleting a machine | quick-actions | |
| Dynamic Group | machine-groups | |
| Static Group | machine groups | |
| Import a group | machine-groups | |
| Add a package | packages | |
| Update a package | packages | |
| Packages for convergence or kiosk | packages | |
| Interactive Deployment Control | deployments | |
| Deployment Control: Schedule | deployments | |
| Convergence | deployments | |
| Delayed Deployment Control | deployments | |
| Notification | user interactions | |
| User question | user interactions | |
| User Postpone Option | user-interactions | |
| Add a profile | kiosk | |
| Edit a profile | kiosk | |
| Installing the package from the Kiosk | kiosk | |
| Kiosk Notification | kiosk | |
| Select update types | update-wsus | |
| entity compliance | update-wsus | |
| Manage update lists | update-wsus | |
| Deploy this update | update-wsus |