# FAQ - On-Premise
# Deployment (broadcasting)
##### **Why are my deployments stuck in Pending?**
- The "Pending" status indicates that deployments will be processed shortly. If the issue persists, please contact Support or your Administrator.
##### **Why are my deployments stuck in "Deployment Start"?**
- The "Deployment Start" status indicates that deployments will be processed shortly. If the issue persists, please contact Support or your Administrator.
##### **What should I do if I encounter a deployment error: "Abort Package Execution"?**
- You should check the script associated with the package; the error indicates that it is not executing correctly. You can try running the script manually on your machine.
- Check the feedback provided by the deployment audit; this may offer clues as to the cause of the error.
##### **What to do if a deployment error occurs: Transfer Failed?**
- Your computer cannot retrieve the package due to Rsync. Please check the Rsync permissions on several folders for the pulseuser account; the permissions should be set as follows:
```bash
C:\Progra~1\Pulse\var\tmp\packages BUILTIN\Users:(OI)(CI)(F)
NT SERVICE\TrustedInstaller:(I)(F)
NT SERVICE\TrustedInstaller:(I)(CI)(IO)(F)
NT AUTHORITY\SYSTEM:(I)(F)
NT AUTHORITY\SYSTEM:(I)(OI)(CI)(IO)(F)
BUILTIN\Administrators:(I)(F)
BUILTIN\Administrators:(I)(OI)(CI)(IO)(F)
BUILTIN\Users:(I)(RX)
BUILTIN\Users:(I)(OI)(CI)(IO)(GR,GE)
CREATOR OWNER:(I)(OI)(CI)(IO)(F)
APPLICATION PACKAGE AUTHORITY\ALL APPLICATION PACKAGES:(I)(RX)
APPLICATION PACKAGE AUTHORITY\ALL APPLICATION PACKAGES:(I)(OI)(CI)(IO)(GR,GE)
APPLICATION PACKAGE AUTHORITY\ALL RESTRICTED APPLICATION PACKAGES:(I)(RX)
APPLICATION PACKAGE AUTHORITY\ALL RESTRICTED APPLICATION PACKAGES:(I)(OI)(CI)(IO)(GR,GE)
C:\Users\pulseuser\.ssh NT AUTHORITY\SYSTEM:(I)(OI)(CI)(F)
BUILTIN\Administrators:(I)(OI)(CI)(F)
MACHINE_NAME\pulseuser:(I)(OI)(CI)(F)
C:\Users\pulseuser\.ssh\authorized_keys MACHINE_NAME\pulseuser:(F)
NT AUTHORITY\SYSTEM:(F)
```
##### **Why aren't my deployments starting, or why are they taking a long time to start?**
- If your deployments are taking a long time to start, it is possible that your queued deployment is being slowed down by the current load on the SaaS platform.
- If your deployments remain stuck, please contact Support or your Administrator.
##### **How do I stop a deployment?**
- You can use the "Stop Deploy" button in the deployment audit to stop the current deployment.
##### **How do I view the results of my deployment?**
- In the "Audit" view, you can find a list of all your deployments. Click the "  " action button to view your deployment details.
##### **How do I restart a deployment?**
- In the "Audit" view, locate the row corresponding to the deployment you want to restart, then click the action button  to restart the deployment.
# Remote Maintenance & Getting Started
##### **What should I do if remote access (VNC/RDP/PMAD) isn't working?**
- Check the TightVNC service on the affected machines.
- Remote access is not available if the computer appears offline (grayed out); if this is the case, check the status of the medullaagent service on the machine.
- If your default SSH port is not 22, ensure that the following file includes your IP address and the SSH port you are using: **C:\\Program Files\\Medulla\\bin\\reversessh.bat** If this is not the case, then a change must be made on your server in the file: **/etc/pulse-xmpp-agent/reverse\_ssh\_on.ini.local
**You must restart the pulse-xmpp-agent-relay.service
- If your infrastructure has a public IP address and the server cannot reach the endpoints via a private IP address or a VPN, the connection is then established in **reverse** from the endpoint to the server.
To verify that this connection is working properly, manually run the following script:
`C:\Program Files\Medulla\bin\reversessh.bat`
This will allow you to identify any connection errors.
# FLUX Test
Before installing **Medulla**, it is **essential** to verify the communication between:
- Your **Medulla server**,
- Your **relay** (if applicable),
- Your **client machines**.
To do this, we provide a **testing procedure that** includes dedicated scripts. **All data flows must be successfully validated** to ensure a smooth deployment and optimal operation of Medulla.
Please feel free to contact us for any assistance or clarification regarding these tests.
**The scripts are available for download here:**
[https://dl.medulla-tech.io/nc/listen\_ports\_debian.sh](https://dl.medulla-tech.io/nc/listen_ports_debian.sh)
[https://dl.medulla-tech.io/nc/listen\_ports\_windows.ps1](https://dl.medulla-tech.io/nc/listen_ports_windows.ps1 "https://dl.medulla-tech.io/nc/listen_ports_windows.ps1")
[https://dl.medulla-tech.io/nc/medulla\_connection\_check.sh](https://dl.medulla-tech.io/nc/medulla_connection_check.sh "https://dl.medulla-tech.io/nc/medulla_connection_check.sh")
[https://dl.medulla-tech.io/nc/medulla\_relay\_connection\_check.sh](https://dl.medulla-tech.io/nc/medulla_relay_connection_check.sh "https://dl.medulla-tech.io/nc/medulla_relay_connection_check.sh")
[https://dl.medulla-tech.io/nc/windows\_connection\_check\_signed.ps1](https://dl.medulla-tech.io/nc/windows_connection_check_signed.ps1)
[https://dl.medulla-tech.io/nc/check\_connection\_ldap.sh](https://dl.medulla-tech.io/nc/check_connection_ldap.sh "https://dl.medulla-tech.io/nc/check_connection_ldap.sh")
[https://dl.medulla-tech.io/nc/check\_connection\_glpi.sh](https://dl.medulla-tech.io/nc/check_connection_glpi.sh "https://dl.medulla-tech.io/nc/check_connection_glpi.sh")
(Right-click on the links below, then click **"Save link as..."**)
**-----------------------------------------------------------**
### Test Prerequisites
Before you begin, make sure you have downloaded the test scripts provided above and prepared the machines:
1. **On the Linux servers (Medulla & Relai):**
- Install the necessary tools: `sudo apt update && sudo apt install netcat-openbsd
mariadb-client ldap-utils`
- Make the scripts executable:
```
chmod +x listen_ports_debian.sh medulla_connection_check.sh medulla_relay_connection_check.sh
dos2unix *.sh # If necessary
```
2. **On the Windows client machine with the Medulla agent:**
- Right-click on the script, click Properties, check the box to allow the script to run, and confirm.
[](https://docs.medulla-tech.io/uploads/images/gallery/2026-01/6Gs5mDYikDrAhhUU-image.png)
- Allow PowerShell scripts to run:
`Set-ExecutionPolicy -Scope CurrentUser -ExecutionPolicy RemoteSigned`
> \# Answer "Yes for all" (Y or T) if prompted
#### For PowerShell v7.5.4:
There is no need to unblock the script. You must run the command shown above.
It will ask if you want to allow the publisher of the script; simply confirm by clicking R or A.
[](https://docs.medulla-tech.io/uploads/images/gallery/2026-01/vJOscUwLGmSGzsEU-image.png)
- **A. On the Relay Server (Destination):** Start listening on the ports. **
(Do not perform this step if Medulla is already installed or if you are using SaaS)**
```
./listen_ports_debian.sh -r
```
- **B. On the Medulla Server (Source):** Run the connection test.
```
./medulla_connection_check.sh -r
```
- **C. On the Medulla Server (Destination):** Start listening on the ports. **
(Do not perform this step if Medulla is already installed or if you are using SaaS)**
```
./listen_ports_debian.sh -m
```
- **D. On the Relay Server (Source):** Run the connection test.
```
./medulla_relay_connection_check.sh -m
```
---
### 2. Medulla Server <-> Windows Client Test
*Verify direct communication between the server and client workstations.*
**Direction: Server to Client Workstation**
- **A. On the Client Workstation (Destination):** Start listening.
```
.\listen_ports_windows.ps1
```
- **B. On the Medulla Server (Source):** Run the test to the client’s IP address.
```
./medulla_connection_check.sh -c client.example.com
```
- **C. On the Medulla Server (Destination):** Start listening. **
(Do not perform this step if Medulla is already installed or if you are using SaaS)**
```
./listen_ports_debian.sh -m
```
- **D. On the Client Workstation (Source):** Run the test to the server's IP address.
```
.\windows_connection_check_signed.ps1 -Target
-Mode pulse
```
- **A. On the Client Workstation (Destination):** Start listening.
```
.\listen_ports_windows.ps1
```
- **B. On the Relay Server (Source):** Run the test to the workstation’s IP address.
```
./medulla_relay_connection_check.sh -c client.example.com
```
- **C. On the Relay Server (Destination):** Start listening. **
(Do not perform this step if Medulla is already installed or if you are using SaaS)**
```
./listen_ports_debian.sh -r
```
- **D. On the Client Workstation (Source):** Run the test to the relay's IP address.
```
.\windows_connection_check_signed.ps1 -Target
-Mode relay
```
- **A. On the Medulla DMZ Server (Destination):** Start listening. **(Do not perform this step if Medulla is already installed or if you are using SaaS)**
```
./listen_ports_debian.sh -r
```
- **B. On the Mobile Client (Source):** Run the test to the server’s IP address.
```
.\windows_connection_check_signed.ps1 -Target -Mode relay
```
### 5. Test server destined for Medulla -> Your GLPI server
*Verify direct communication between the server and your GLPI server.*
**(Requires the mariadb-client package: *apt install mariadb-client*)**
- **A. On the Medulla server:** Run the test against the external GLPI database.
```
./check_connection_glpi.sh DB_FQDN DB_USERNAME DB_PASSWORD DB_NAME_GLPI
```
- **A. On the Medulla server:** Run the test against the external LDAP server.
```
./check_connection_ldap.sh HOST PORT 'BIND_DN' 'PASSWORD' 'BASE_DN'
```
| **Connection** | **Ports Used (DEST)** | **Notes** |
| **Your internal admin workstation ➡️ Medulla server** | 139/445
8384
| Traffic initiated by the **internal admin workstation to** **Medulla**. |
#### 1. Without Relay Server
| **Connection** | **Ports Used (DEST)** | **Notes** |
| **Internal workstation ➡️ Medulla server** | 22 (SSH)
67/69 (UDP)
80/443
111/2049 (TCP & UDP)
5222
8443
9990
9999,
22067
55415
| Traffic initiated by the **extension to** **Medulla**. |
| **Medulla server ➡️ Internal workstation ** | 9
22 ( SSH)
3389
5900
5985/5986
35621
35623
| Traffic initiated by the **Medulla server to** **internal extensions**. |
#### 2. With Classic Relay Server
| **Connection** | **Ports Used (DEST)** | **Notes** |
| **Internal workstation ➡️ Medulla servers** | 22 (SSH)
67/69 (UDP)
80/443
111/2049 (TCP & UDP)
5222
8443
9990
9999,
22067
55415
| Traffic initiated by the **extension to** **Medulla**. |
| **Medulla servers ➡️ Internal workstation ** | 9
22 ( SSH)
3389
5900
5985/5986
35621
35623
| Traffic initiated by the **Medulla server to** **internal workstations**. |
| --- | --- | --- |
| **Medulla Server ➡️ Relay Server** | 22 ( SSH)
5269
8081
9990
22000
| Traffic initiated by **Medulla to** the **DMZ Server**. |
| **Relay Server ➡️ Medulla Server ** | 22 ( SSH)
5269
7080
8443
9999
22067
22000
| Traffic initiated by the **DMZ server to** **Medulla**. |
| --- |
|
|
| **Internal Station ➡️ Relay Server** | 22
69/69 (UDP)
80/443
111/2049 (TCP & UDP)
5222
9990
| Traffic initiated by the **internal extension to** the **Relay Server**. |
| **Relay Server ➡️ Internal Station** | 9
22
3389
5900
| Traffic initiated by the **Relay Serverto**the **internal extension**. |
#### 3. With DMZ Relay Server
| **Connection** | **Ports Used (DEST)** | **Notes** |
| **Internal workstation ➡️ Medulla Server** | 22 (SSH)
67/69 (UDP)
80/443
111/2049 (TCP & UDP)
5222
8443
9990
9999,
22067
55415
| Traffic initiated by the **extension to** **Medulla**. |
| **Medulla server ➡️ Internal workstation ** | 9
22 ( SSH)
3389
5900
5985/5986
35621
35623
| Traffic initiated by the **Medulla server to** **internal workstations**. |
| --- | --- | --- |
| **Medulla Server ➡️ DMZ Relay Server** | 22 ( SSH)
4369
4370 to 4380
5269
8081
22000
| Traffic initiated by **Medulla to** the **DMZ Server**. |
| **DMZ Relay Server➡️ MedullaServer ** | 22 ( SSH)
4369
4370 to 4380
5269
7080
8443
9999
22067
22000
| Traffic initiated by the **DMZ server to** **Medulla**. |
| --- | --- | --- |
| **External Host ➡️ DMZ Server** | 22 ( SSH)
5222 | Traffic initiated by the **external workstation to** the **DMZ server**.
|
#### Port descriptions
Port 9: used for Wake on LAN (WOL) to wake up a remote workstation.
Port 22 (SSH): SSH port used by Medulla for remote operations, command execution, and agent administration.
Ports 67 and 69 (UDP): used for DHCP and TFTP, particularly during PXE boot or for loading deployment images.
Ports 80 and 443: HTTP and HTTPS, used for web access and secure communication with Medulla services.
Port 111 (TCP and UDP): used by Portmapper / RPCbind, required for NFS services and certain internal network calls.
Port 3389: used for RDP to connect remotely to Windows workstations.
Port 4369: used for an ejabberd cluster if you have a DMZ relay
Ports 4370 to 4380: used for an ejabberd cluster if you have a DMZ relay
Port 5222: used by XMPP for communication between Medulla agents and the server.
Port 5269: used by XMPP for server-to-server communication, particularly between Medulla and the DMZ relay server.
Port 5900: used by VNC for remote control.
Ports 5985 and 5986: used by WinRM (HTTP and HTTPS) for remote commands on Windows.
Ports 7080 and 8081: used by internal services or management APIs required by the relay server or Medulla components.
Port 8443: HTTPS used by Medulla’s secure interface or APIs.
Port 9990: used by an internal Medulla service for management and monitoring.
Port 9999: used as an internal synchronization or exchange port between the Medulla server and components such as the relay.
Port 22000: used by Syncthing as the main channel for data synchronization (packages, artifacts, inventories).
Port 22067: used by Syncthing as a relayed channel, useful for mobile devices or those located behind a NAT.
Ports 35621, 35623, and 55415: dynamic ports used by Medulla agents for real-time communication, inventory, synchronization, or task execution.
# OIDC
#### List my OIDC configurations
Go to the Admin > Manage Providers view.
[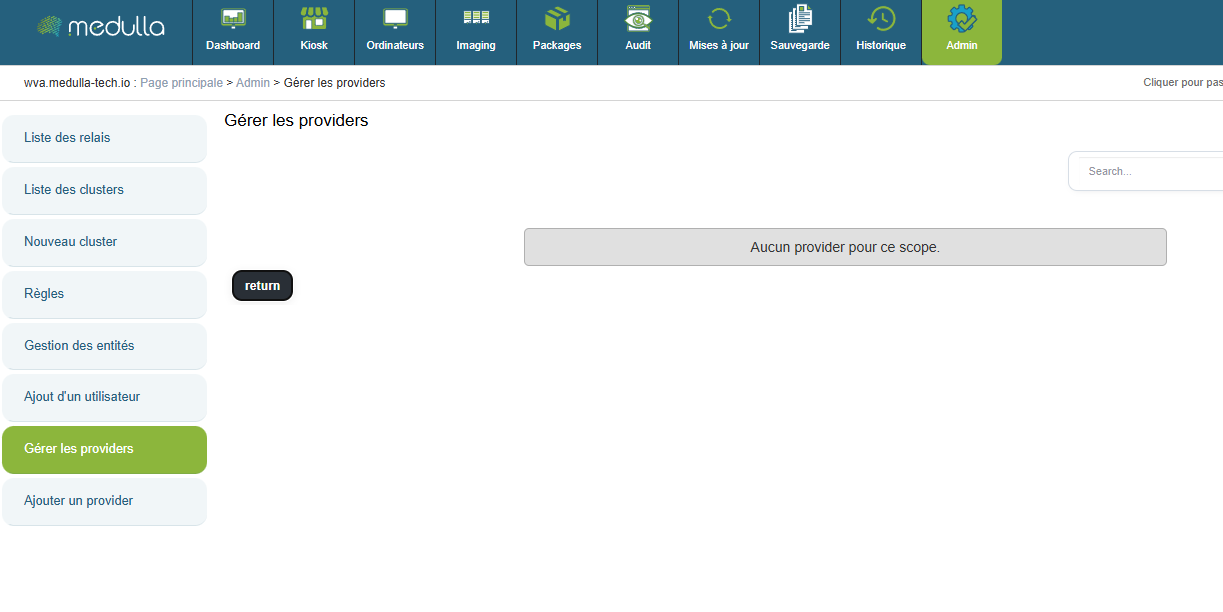](https://docs.medulla-tech.io/uploads/images/gallery/2025-12/m8hUXvE5dh2rZV26-image.png)
Here you will find a list of already configured OIDC providers that can be modified.
#### Create an OIDC configuration
[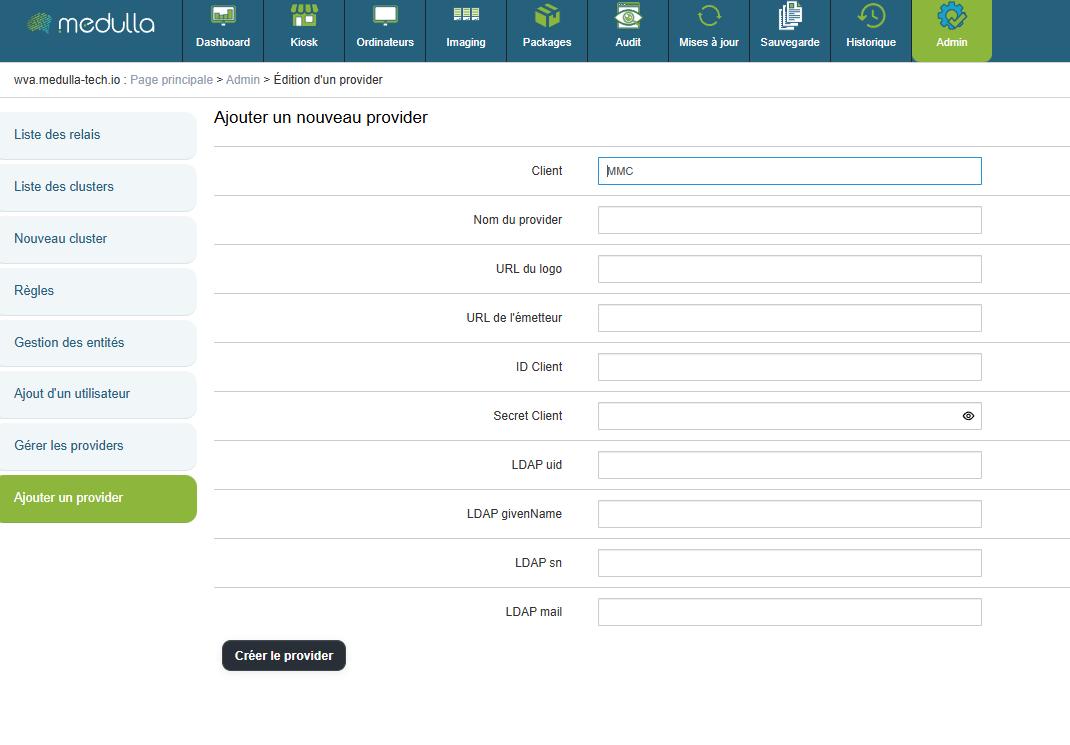](https://docs.medulla-tech.io/uploads/images/gallery/2025-12/HxOYYjzUOcZEDUk3-image.png)
"Provider Name" will be the title displayed on the home page.
"Logo URL" is the web link used to set a logo for the OIDC login button.
"Issuer URL" is the web link that redirects to your OIDC.
"Client ID" is your OIDC's identifier.
"Client Secret" is the password for your OIDC.
- (Optional)
"LDAP uid" corresponds to the mapping of the uid by your OIDC
"LDAP givenName" corresponds to the mapping of the givenName in your OIDC
"LDAP sn" corresponds to the mapping of the sn in your OIDC
"LDAP mail" corresponds to the mapping of the email address in your OIDC
Then click the **"Create Provider"** button to enable logging in via an OIDC on your platform.
# DNS and Medulla Relay views in the DMZ
In a Medulla architecture, a**relay can be placed in the DMZ** to allow external devices to access the platform without directly exposing the internal Medulla server if you do not have a VPN.Since the Medulla agent configuration is unique across the entire network, it supports only a single domain name. To allow machines to reach the server from both the private network and the outside via this single address, the use of a single domain name coupled with **DNS views (Split-Horizon)** or a **Round-Robin** is required.
#### DNS Views
### Principle
A DNS view allows **different responses** to be provided **for the same name** depending on the origin of the request.
- Internal workstations → internal Medulla server
- External workstations → Medulla relay in the DMZ
### Benefits
- Only one DNS name to configure
- No configuration differences on the workstations
- The internal Medulla server is not exposed
- Clear and secure architecture
### Key points
DNS views automatically route endpoints to the correct Medulla access point, while maintaining a single name and simple configuration.
Reference article on Bind9: [https://kb.isc.org/docs/aa-00851](https://kb.isc.org/docs/aa-00851)
#### Round-Robin
Additionally, if you do not wish to configure DNS Views, you can opt for an alternative solution by implementing a ***Round-Robin*** mechanism. This mechanism distributes requests across multiple IP addresses associated with the same domain name, ensuring a balanced distribution of connections.
To do this, you need to follow two steps:
1. Define the internal IP address of the main Medulla server.
2. Define the public IP address of the DMZ relay server.
# Filter machine types by GLPI ID
For the filter, in the main section of /etc/mmc/plugins/glpi.ini.local, add:
filter\_on = <criterion>
> \#Display only computers that match one of these filters:
> \* state
> \* type
> \* entity
> \* autoupdatesystems\_id
>
> \#Each filter may contain a list of values separated by a pipe
> \#Filters are IDs separated by spaces
>
> i.e. state=1 type=2|3|7 entity=2|5
> filter\_on = state=3
# Your GLPI with Read-Only User
Medulla requires the creation of specific views in the **GLPI** database to function properly.
##### GLPI Read-Only
If you provide us with a user who has read-only access to your GLPI database, you will need to manually apply an SQL file before installing Medulla. This file contains the queries needed to create the required views.
Here is the link to the SQL file:
[https://dl.medulla-tech.io/nc/glpi-100.sql](https://dl.medulla-tech.io/nc/glpi-100.sql)
##### GLPI Write Access
If you allow**write** access to your GLPI database, Medulla will automatically apply the necessary views during installation.
---
> *These views are required for Medulla to function.*
# Disable convergence for the Extract drivers package
Go to the Medulla server.
Edit the files:
- /etc/pulse-xmpp-agent-substitute/registeryagent.ini
- /etc/pulse-xmpp-agent-substitute/registeryagent.ini.local
Modify the relevant parameter:
```
[extractdrivers]
# Add the ability to enable or disable the extraction driver mechanism
# Accepted values: 0, false, False
# Accepted values: 1, true, True
activate=0
```
Save the files.
Restart the service:
```bash
systemctl restart pulse-xmpp-master-substitute-registration.service
```
# Configuration Guide: OIDC Authentication and User Synchronization
If you are using an**on-premises** infrastructure and have chosen authentication via the **OIDC (OpenID Connect)** protocol, it is essential to understand how user accounts are routed and managed between your identity provider and the GLPI interface, especially if the latter is empty of users (having been freshly installed alongside Medulla).
### 1. Understanding the Authentication Flow
In this architecture, access management follows a specific path:
1. **Storage:** Your OIDC users are provisioned in the Medulla server’s **local LDAP**.
2. **Authorizations (ACL):** Although authentication is managed by OIDC, access rights and permissions (profiles) are controlled directly within GLPI.
> **Sign of a synchronization issue:** If, after logging in via OIDC, you land on a blank GLPI page or one without menus, this means your account has not yet been imported into the GLPI database. Without this step, the system cannot assign you a profile or access rights.
>
> Adding users to GLPI when logging in via OIDC is now automatic if:
>
> - GLPI is installed by default with Medulla
> - Your GLPI is accessible in read-write mode
---
### 2. Manual synchronization procedure
To activate your users in GLPI, you must establish a connection with the local LDAP directory. Here are the steps to follow:
#### Step A: Access the linking interface
1. Log in to GLPI with a local administrator account.
2. Go to the **Administration** > **Users** menu.
3. Click the **LDAP Directory Link** button.
[](https://docs.medulla-tech.io/uploads/images/gallery/2026-01/NxP9d5b7MOiN6bTI-image.png)
#### Step B: Import accounts
1. Click the **Import New Users** link.
2. Click the **Search** button to list the users in the Medulla LDAP directory.
3. Select the desired users (or all of them) and confirm the synchronization.
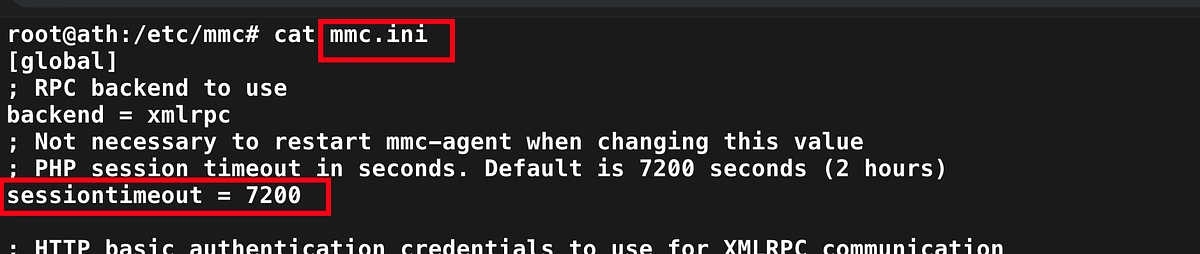
# Increase the connection timeout to the interface
Go to the /etc/mmc/mmi.ini file
Change the **sessiontimeout** value. (This is in seconds)
[](https://docs.medulla-tech.io/uploads/images/gallery/2026-01/4HdPtXnZmQeareo2-image.png)
# Activation Support / WSUS / CVE
**Applies to:** Medulla – Support / WSUS / CVE
**Version:** 5.4.3 or later
**Environment:** On-Premise
**Category:** Support
After updating your Medulla installation, additional steps are required to enable support.
Please retrieve the following file from your server:
```
/etc/mmc/plugins/security.ini.local
```
This file must then be sent to your sales representative.
This step enables your access to support and related services.
# Change the server's FQDN
Download the script from this link:
[https://dl.medulla-tech.io/nc/rename\_fqdn\_and\_protocol.py](https://dl.medulla-tech.io/nc/rename_fqdn_and_protocol.py)
`chmod +x rename_fqdn_and_protocol.py`
To view the script's options:
`./rename_fqdn_and_protocol --help `
##### Change the server's FQDN
To change medulla.mydomain.lan to medulla.mydomain.fr, here is an example of how to use the command:
`./rename_fqdn_and_protocol --old-fqdn medulla.mydomain.lan --new-fqdn medulla.mydomain.fr`
##### Change the protocol
It is also possible to change the protocol from HTTP to HTTPS in the URLs at the same time:
`./rename_fqdn_and_protocol --old-fqdn medulla.mydomain.lan --new-fqdn medulla.mydomain.fr --new-protocol https`
##### Regenerate the agent
If the workstations also need to communicate directly with the new FQDN, you can regenerate the agent with the new FQDN:
`./rename_fqdn_and_protocol --old-fqdn medulla.mondomaine.lan --new-fqdn medulla.mondomaine.fr --update-agent-conf`
For more information, and if you have a Medulla support contract, contact support@medulla-tech.io
# Change the SSH port between Server and Client
Download the scripts from these links:
[https://dl.medulla-tech.io/nc/change\_ssh\_port\_on\_agent.py](https://dl.medulla-tech.io/nc/change_ssh_port_on_agent.py)
[https://dl.medulla-tech.io/nc/change\_ssh\_port\_on\_server.py](https://dl.medulla-tech.io/nc/change_ssh_port_on_server.py)
`chmod +x change_ssh_port_on_agent.py`
`chmod +x change_ssh_port_on_server.py`
To view the script options:
`./change_ssh_port_on_agent.py --help`
`./change_ssh_port_on_server.py --help`
You must change the port using both scripts
The port must be the same in both scripts
##### Change the port on the server
To change port 22 to port 2002, here is an example of how to use the command:
`./change_ssh_port_on_agent.py --new-ssh-port 2002`
`./change_ssh_port_on_server.py --new-ssh-port 2002`
The agent will be regenerated after running the **"change\_ssh\_port\_on\_agent.py"** script; you must then redeploy the agent to your workstations.
# GLPI - Connect an external GLPI
**Applies to**: Medulla/GLPI
**Medulla version**: all
**GLPI version**: 10.0.x
**Environment**: On-Premise
**Category**: Medulla
#### Prerequisites
Before configuring the integration between Medulla and GLPI, ensure that the following items are available and properly configured.
Download the script here: [https://dl.medulla-tech.io/ma/change\_itsm\_parameters.py](https://dl.medulla-tech.io/ma/change_itsm_parameters.py)
##### 1. GLPI database access
Create a dedicated MySQL/MariaDB user for Medulla with the following permissions:
\- Read-only (`READ ONLY`) or read/write as needed
\- Access to the entire GLPI database
##### 2. Network connectivity
Allow communication between the Medulla server and the GLPI database server:
- Port `3306` open (or a custom port depending on your configuration)
##### 3. Creating a GLPI API user
Create a GLPI user dedicated to API calls with a name of your choice:
In GLPI under `Administration > Users`
- Type: standard user (username / password)
\- Recommended profile:
\- `Read-Only` or `Super-Admin`
\- Assignment:
\- Root entity
\- Recursive mode enabled
Then generate a user API token (`user\_token`)
##### 4. Creating a GLPI API client
Create an API client named `MMC`.
In GLPI, go to `Configuration > General > API`
Then generate the application token (`app\_token`)
##### 5. Import SQL views into your GLPI database
In your GLPI database, you must import the file downloaded here:
[https://dl.medulla-tech.io/nc/glpi-100.sql](https://dl.medulla-tech.io/nc/glpi-100.sql)
\---
#### Using the script
##### Help command
> ./change\_itsm\_parameters.py --help
>
> usage: change\_itsm\_parameters.py \[-h\] --url URL --db-host DB\_HOST \[--db-port DB\_PORT\] --db-name DB\_NAME --db-user DB\_USER --db-pass DB\_PASS --api-url API\_URL \[--api-user API\_USER\] \[--api-pass API\_PASS\] \[--readonly READONLY\] \[--crypt-key CRYPT\_KEY\] \[--inv-forward INV\_FORWARD\] \[--inv-forward-url INV\_FORWARD\_URL\] \[--inv-plugin INV\_PLUGIN\] \[--inv-agent INV\_AGENT\] \[--inv-agent-disabled INV\_AGENT\_DISABLED\]
>
> Update ITSM parameters
>
> options:
> -h, --help display this help message and exit
> \--url URL ITSM provider URL
> \--db-host DB\_HOST ITSM provider database host
> \--db-port DB\_PORT ITSM provider database port
> \--db-name DB\_NAME ITSM provider database name
> \--db-user DB\_USER ITSM provider database user
> \--db-pass DB\_PASS ITSM provider database password
> \--api-url API\_URL ITSM provider API URL
> \--api-user API\_USER ITSM provider API user
> \--api-pass API\_PASS ITSM provider API password
> \--readonly READONLY Whether the ITSM provider database is read-only for Medulla (optional)
> \--crypt-key CRYPT\_KEY
> Decoded GLPI crypt key file - base64 /etc/glpi/glpicrypt.key (optional)
> \--inv-forward INV\_FORWARD
> Whether to forward inventory data to the ITSM provider (optional)
> \--inv-forward-url INV\_FORWARD\_URL
> URL to forward inventory data to (optional)
> \--inv-plugin INV\_PLUGIN
> Inventory plugin to use - glpiinventory or fusioninventory (optional)
> \--inv-agent INV\_AGENT
> Inventory agent to use on the client machine - glpiagent or fusioninventory (optional, required if --inv-forward is true)
> \--inv-agent-disabled INV\_AGENT\_DISABLED
> Whether to include the inventory agent in the Medulla agent (optional)
##### Usage examples:
> ./change\_itsm\_parameters.py \\
> \--url https://glpi.mon-domaine.fr/ \\
> \--db-host 10.10.0.101 \\
> --db-port 3306 \\
> \--db-name GLPI \\
> --db-user medulla\_glpi \\
> --db-pass yJxI40UzO8Jn7dd7K5Yaml \\
> \--api-url https://glpi.mon-domaine.fr/apirest.php/ \\
> --api-user medulla\_APIUSER \\
> --api-pass fLN1Zomh877obPhk \\