Medulla - FAQ
- FAQ - SaaS
- Network requirements for Medulla SaaS
- Client Accounts (Status & Visibility)
- Deployment (broadcasting)
- Packages
- Remote Maintenance & Getting Started
- FAQ - On-Premise
- Deployment (broadcasting)
- Remote Maintenance & Getting Started
- FLUX Test
- Firewall
- IMAGING Prerequisites
- Active Directory
- I already have a PXE server on my network. Is that a problem?
- Simplified flowchart of Medulla
- OIDC
- DNS and Medulla Relay views in the DMZ
- Filter machine types by GLPI ID
- Your GLPI with Read-Only User
- Disable convergence for the Extract drivers package
- Configuration Guide: OIDC Authentication and User Synchronization
- Increase the connection timeout to the interface
- Activation Support / WSUS / CVE
- Change the server's FQDN
- Change the SSH port between Server and Client
- GLPI - Connect an external GLPI
- FAQ - Private SaaS
- Network requirements for Medulla Private SaaS
- Client Accounts (Status & Visibility)
- Deployment (broadcasting)
- Packages
- Console & Administration
- Remote Maintenance & Getting Started
- FAQ - All platforms
- Client Accounts (Status & Visibility)
- Packages
- Console & Administration
- Remote Maintenance & Getting Started
- Set the agent to Debug
- Windows Agent Issue
- FAQ - ACL
- FAQ - Interface
- FAQ - Using Medulla
- FAQ - Agents
- Client Accounts (Status & Visibility)
- GPO
- Reconfigure my agent
- Generate Windows and Linux agents
- Agents for the MINT Linux distribution
- Uninstalling the Medulla Agent (Versions prior to 5.5.2)
- Uninstalling Medulla Agent Version 5.5.2 and later
- FAQ - Medulla Infrastructure
- Architecture and Deployment of Medulla Relay Servers
- Procedure for adding relays to Medulla Dedicated SaaS
- Medulla Update - 5.4.x to 5.5.x
- Support Extranet
- Fail2ban
- Debian OS installation for Medulla server
- Verify that inventory data is being properly uploaded to Medulla
- Remote Access Verification
- Reverse SSH Verification
- Imaging - Davos Debug
- Imaging - Debug
- Guacamole - Debug
- Optimizing connection time for phone setup.
- Duplicate MAC Addresses
FAQ - SaaS
Network requirements for Medulla SaaS
Medulla / All Versions / SaaS / Infrastructure
1. Are there any technical prerequisites for using Medulla in SaaS mode?
For the shared SaaS offering, no hardware or software prerequisites are required.
The only requirement is to allow two outbound network connections from your workstations to the Medulla platform.
2. Which ports must be open on the Internet?
Shared SaaS
Only two ports need to be allowedWorkstations → Medulla Server:
-
TCP 2002: primary communication between the Medulla agent and the server
-
TCP 5222: XMPP channel used to orchestrate actions and establish secure tunnels
No other ports should be open on the Internet.
3. Why only two ports?
Because:
-
All operations requiring additional ports (VNC, RDP, WinRM, inventory, package deployments) automatically pass through an OpenSSH tunnel established between the Medulla server and the agent on the workstation.
-
This tunnel is initiated and managed by the XMPP service.
You therefore do not need to expose sensitive ports to the Internet.
4. Which ports are required for the dedicated SaaS offering?
In addition to the ports required for the shared SaaS offering:
-
TCP 55415: used for backup functions
All other ports continue to pass through the OpenSSH tunnel and do not need to be opened.
5. Why are certain ports (UDP 67, 69, 111, 2049) no longer listed in SaaS mode?
Because they arenot used in SaaS mode:
-
No PXE or DHCP over the Internet →UDP 67 / 69 are unnecessary
-
No NFS exposed → 111 / 2049 unnecessary
-
No low-level services are exposed in the Medulla cloud
6. Do I need to open incoming ports on my firewall?
No.
No incoming traffic is required in Medulla SaaS mode.
Your firewall simply needs to allow the following outbound traffic for the agents to communicate:
-
TCP 2002
-
TCP 5222
(+ TCP 55415 if dedicated SaaS)
7. Quick Summary
|
Offer |
Required Data Flows Workstations → Server |
Notes |
|---|---|---|
|
Shared SaaS |
TCP 2002, TCP 5222 |
All other ports go through the OpenSSH tunnel |
|
Dedicated SaaS |
TCP 2002, TCP 5222, TCP 55415 |
Optional backup enabled |
|
Incoming traffic |
None |
Everything is initiated by the workstation |
Client Accounts (Status & Visibility)
Why do some devices appear offline even though they are powered on?
- Check the medullaagent and medullanetnotify services on the offline devices. If the services are indeed "running" but the device appears offline on the interface (grayed-out), please contact Support or your Administrator.
- If there are errors in the agent logs (on the device) "C:\Program Files\Medulla\var\log\xmpp-agent-machine.log," report them to Support or your Administrator.
Why are the inventory reports or reported information incomplete or incorrect?
- Make sure the MAC address of the device that is not reporting its inventory is not already in use. To check if a device is having trouble reporting its inventory, note that it is impossible to deploy to the device—even if it appears online on the interface (blue computer icon)—as the deployment icon for the device in the "Actions" menu will be grayed out.
Deployment (broadcasting)
Why are my deployments stuck in Pending?
- The "Pending" status indicates that deployments will be processed shortly. If the issue persists, please contact Support or your Administrator.
Why are my deployments stuck in "Deployment Start"?
- The "Deployment Start" status indicates that deployments will be processed shortly. If the issue persists, please contact Support or your Administrator.
What should I do if I encounter a deployment error: "Abort Package Execution"?
- You should check the script associated with the package; the error indicates that it is not executing correctly. You can try running the script manually on your machine.
- Check the feedback provided by the deployment audit; this may offer clues as to the cause of the error.
What to do if a deployment error occurs: Transfer Failed?
- Your computer cannot retrieve the package due to Rsync. Please check the Rsync permissions on several folders for the pulseuser account; the permissions should be set as follows:
C:\Progra~1\Pulse\var\tmp\packages BUILTIN\Users:(OI)(CI)(F)
NT SERVICE\TrustedInstaller:(I)(F)
NT SERVICE\TrustedInstaller:(I)(CI)(IO)(F)
NT AUTHORITY\SYSTEM:(I)(F)
NT AUTHORITY\SYSTEM:(I)(OI)(CI)(IO)(F)
BUILTIN\Administrators:(I)(F)
BUILTIN\Administrators:(I)(OI)(CI)(IO)(F)
BUILTIN\Users:(I)(RX)
BUILTIN\Users:(I)(OI)(CI)(IO)(GR,GE)
CREATOR OWNER:(I)(OI)(CI)(IO)(F)
APPLICATION PACKAGE AUTHORITY\ALL APPLICATION PACKAGES:(I)(RX)
APPLICATION PACKAGE AUTHORITY\ALL APPLICATION PACKAGES:(I)(OI)(CI)(IO)(GR,GE)
APPLICATION PACKAGE AUTHORITY\ALL RESTRICTED APPLICATION PACKAGES:(I)(RX)
APPLICATION PACKAGE AUTHORITY\ALL RESTRICTED APPLICATION PACKAGES:(I)(OI)(CI)(IO)(GR,GE)
C:\Users\pulseuser\.ssh NT AUTHORITY\SYSTEM:(I)(OI)(CI)(F)
BUILTIN\Administrators:(I)(OI)(CI)(F)
MACHINE_NAME\pulseuser:(I)(OI)(CI)(F)
C:\Users\pulseuser\.ssh\authorized_keys MACHINE_NAME\pulseuser:(F)
NT AUTHORITY\SYSTEM:(F)Why aren't my deployments starting, or why are they taking a long time to start?
- If your deployments are taking a long time to start, it is possible that your queued deployment is being slowed down by the current load on the SaaS platform.
- If your deployments remain stuck, please contact Support or your Administrator.
How do I stop a deployment?
- You can use the "Stop Deploy" button in the deployment audit to stop the current deployment.
How do I view the results of my deployment?
- In the "Audit" view, you can find a list of all your deployments. Click the "
 " action button to view your deployment details.
How do I restart a deployment?
- In the "Audit" view, locate the row corresponding to the deployment you want to restart, then click the action button
 to restart the deployment.
Packages
I can't add a file to my package.
- Once you have added a file to your package, it is pending; don’t forget to click “Submit pending package.”
I created a package but it’s not available for deployment—why?
- If your package isn't visible in the package list, or isn't visible when you try to deploy it, then it's waiting to be synchronized with the relays; please wait a few moments before it appears in the "Package List."
Why isn’t my package available on the Kiosk package addition page?
- Your package must have an associated inventory to be visible in the list of packages available for the Kiosk.
Remote Maintenance & Getting Started
What should I do if remote access (VNC/RDP/PMAD) isn't working?
- Check the TightVNC service on the affected machines.
- Remote access is not available if the computer appears offline (grayed out); if this is the case, check the status of the medullaagent service on the machine.
FAQ - On-Premise
Deployment (broadcasting)
Why are my deployments stuck in Pending?
- The "Pending" status indicates that deployments will be processed shortly. If the issue persists, please contact Support or your Administrator.
Why are my deployments stuck in "Deployment Start"?
- The "Deployment Start" status indicates that deployments will be processed shortly. If the issue persists, please contact Support or your Administrator.
What should I do if I encounter a deployment error: "Abort Package Execution"?
- You should check the script associated with the package; the error indicates that it is not executing correctly. You can try running the script manually on your machine.
- Check the feedback provided by the deployment audit; this may offer clues as to the cause of the error.
What to do if a deployment error occurs: Transfer Failed?
- Your computer cannot retrieve the package due to Rsync. Please check the Rsync permissions on several folders for the pulseuser account; the permissions should be set as follows:
C:\Progra~1\Pulse\var\tmp\packages BUILTIN\Users:(OI)(CI)(F)
NT SERVICE\TrustedInstaller:(I)(F)
NT SERVICE\TrustedInstaller:(I)(CI)(IO)(F)
NT AUTHORITY\SYSTEM:(I)(F)
NT AUTHORITY\SYSTEM:(I)(OI)(CI)(IO)(F)
BUILTIN\Administrators:(I)(F)
BUILTIN\Administrators:(I)(OI)(CI)(IO)(F)
BUILTIN\Users:(I)(RX)
BUILTIN\Users:(I)(OI)(CI)(IO)(GR,GE)
CREATOR OWNER:(I)(OI)(CI)(IO)(F)
APPLICATION PACKAGE AUTHORITY\ALL APPLICATION PACKAGES:(I)(RX)
APPLICATION PACKAGE AUTHORITY\ALL APPLICATION PACKAGES:(I)(OI)(CI)(IO)(GR,GE)
APPLICATION PACKAGE AUTHORITY\ALL RESTRICTED APPLICATION PACKAGES:(I)(RX)
APPLICATION PACKAGE AUTHORITY\ALL RESTRICTED APPLICATION PACKAGES:(I)(OI)(CI)(IO)(GR,GE)
C:\Users\pulseuser\.ssh NT AUTHORITY\SYSTEM:(I)(OI)(CI)(F)
BUILTIN\Administrators:(I)(OI)(CI)(F)
MACHINE_NAME\pulseuser:(I)(OI)(CI)(F)
C:\Users\pulseuser\.ssh\authorized_keys MACHINE_NAME\pulseuser:(F)
NT AUTHORITY\SYSTEM:(F)Why aren't my deployments starting, or why are they taking a long time to start?
- If your deployments are taking a long time to start, it is possible that your queued deployment is being slowed down by the current load on the SaaS platform.
- If your deployments remain stuck, please contact Support or your Administrator.
How do I stop a deployment?
- You can use the "Stop Deploy" button in the deployment audit to stop the current deployment.
How do I view the results of my deployment?
- In the "Audit" view, you can find a list of all your deployments. Click the "
 " action button to view your deployment details.
How do I restart a deployment?
- In the "Audit" view, locate the row corresponding to the deployment you want to restart, then click the action button
 to restart the deployment.
Remote Maintenance & Getting Started
What should I do if remote access (VNC/RDP/PMAD) isn't working?
- Check the TightVNC service on the affected machines.
- Remote access is not available if the computer appears offline (grayed out); if this is the case, check the status of the medullaagent service on the machine.
- If your default SSH port is not 22, ensure that the following file includes your IP address and the SSH port you are using: C:\Program Files\Medulla\bin\reversessh.bat
If this is not the case, then a change must be made on your server in the file: /etc/pulse-xmpp-agent/reverse_ssh_on.ini.local
You must restart the pulse-xmpp-agent-relay.service - If your infrastructure has a public IP address and the server cannot reach the endpoints via a private IP address or a VPN, the connection is then established in reverse from the endpoint to the server.
To verify that this connection is working properly, manually run the following script:C:\Program Files\Medulla\bin\reversessh.bat
This will allow you to identify any connection errors.
FLUX Test
Before installing Medulla, it is essential to verify the communication between:
- Your Medulla server,
- Your relay (if applicable),
- Your client machines.
To do this, we provide a includes dedicated scripts. All data flows must be successfully validated to ensure a of Medulla.
Please feel free to contact us for any assistance or clarification regarding these tests.
The scripts are available for download here:
https://dl.medulla-tech.io/nc/windows_connection_check_signed.ps1
https://dl.medulla-tech.io/nc/check_connection_ldap.sh
https://dl.medulla-tech.io/nc/check_connection_glpi.sh
(Right-click on the links below, then click "Save link as...")
Test Prerequisites
Before you begin, make sure you have downloaded the test scripts provided above and prepared the machines:
-
On the Linux servers (Medulla & Relai):
-
Install the necessary tools:
sudo apt update && sudo apt install netcat-openbsd mariadb-client ldap-utils -
Make the scripts executable:
chmod +x listen_ports_debian.sh medulla_connection_check.sh medulla_relay_connection_check.sh dos2unix *.sh # If necessary
-
-
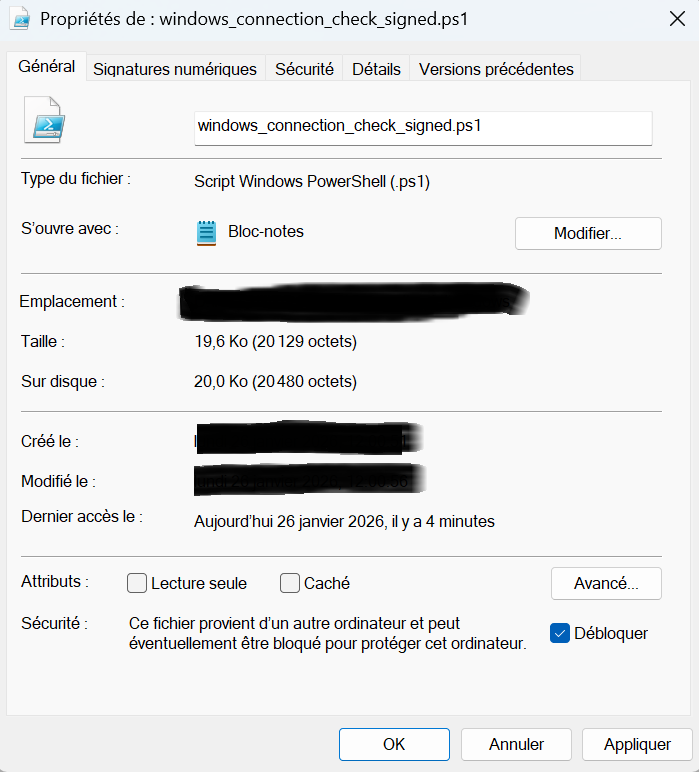
On the Windows client machine with the Medulla agent:
- Right-click on the script, click Properties, check the box to allow the script to run, and confirm.

- Allow PowerShell scripts to run:
Set-ExecutionPolicy -Scope CurrentUser -ExecutionPolicy RemoteSigned# Answer "Yes for all" (Y or T) if prompted
For PowerShell v7.5.4:
There is no need to unblock the script. You must run the command shown above.
It will ask if you want to allow the publisher of the script; simply confirm by clicking R or A.

1. Test Medulla Server <-> Medulla Relay
Verify communication between the main server and the relay.
Direction: Server to Relay
-
A. On the Relay Server (Destination): Start listening on the ports. (Do not perform this step if Medulla is already installed or if you are using SaaS)
./listen_ports_debian.sh -r -
B. On the Medulla Server (Source): Run the connection test.
./medulla_connection_check.sh -r <RELAY_IP>
Direction: Relay to Server
-
C. On the Medulla Server (Destination): Start listening on the ports. (Do not perform this step if Medulla is already installed or if you are using SaaS)
./listen_ports_debian.sh -m -
D. On the Relay Server (Source): Run the connection test.
./medulla_relay_connection_check.sh -m <MEDULLA_IP>
2. Medulla Server <-> Windows Client Test
Verify direct communication between the server and client workstations.
Direction: Server to Client Workstation
-
A. On the Client Workstation (Destination): Start listening.
.\listen_ports_windows.ps1 -
B. On the Medulla Server (Source): Run the test to the client’s IP address.
./medulla_connection_check.sh -c client.example.com
Direction: Client Workstation to Server
-
C. On the Medulla Server (Destination): Start listening. (Do not perform this step if Medulla is already installed or if you are using SaaS)
./listen_ports_debian.sh -m -
D. On the Client Workstation (Source): Run the test to the server's IP address.
.\windows_connection_check_signed.ps1 -Target <SERVER_IP> -Mode pulse
A log file has been created (in the location where you are running the script) that summarizes several tests, named: LOG_Test_Flux.txt
If you encounter permission errors when creating the log file, try placing the scripts in the user’s Downloads folder, or grant the windows_connection_check.ps1 script permission to create a file in the same location.
3. Medulla Relay <-> Windows Client Workstation Test
Only if the workstations need to communicate via a relay.
Direction: Relay to Client Workstation
-
A. On the Client Workstation (Destination): Start listening.
.\listen_ports_windows.ps1 -
B. On the Relay Server (Source): Run the test to the workstation’s IP address.
./medulla_relay_connection_check.sh -c client.example.com
Direction: Client Workstation to Relay
-
C. On the Relay Server (Destination): Start listening. (Do not perform this step if Medulla is already installed or if you are using SaaS)
./listen_ports_debian.sh -r -
D. On the Client Workstation (Source): Run the test to the relay's IP address.
.\windows_connection_check_signed.ps1 -Target <RELAY_IP> -Mode relay
A log file has been created (in the location where you are running the script) that summarizes several tests, named:LOG_Test_Flux.txt
If you encounter permission errors after creating the log file, try placing the scripts in the user’s Downloads folder, or grant the windows_connection_check.ps1 script permission to create a file in the same location.
4. Medulla Relay DMZ <-> Windows Mobile Client Test
Verification of direct communication between the server and client workstations.
(Mobile clients can only be reached on ports 5222 and 22)
Direction: Client Workstation to Server
-
A. On the Medulla DMZ Server (Destination): Start listening. (Do not perform this step if Medulla is already installed or if you are using SaaS)
./listen_ports_debian.sh -r -
B. On the Mobile Client (Source): Run the test to the server’s IP address.
.\windows_connection_check_signed.ps1 -Target <SERVER_IP> -Mode relay
5. Test server destined for Medulla -> Your GLPI server
Verify direct communication between the server and your GLPI server.
(Requires the mariadb-client package: apt install mariadb-client)
-
A. On the Medulla server: Run the test against the external GLPI database.
./check_connection_glpi.sh DB_FQDN DB_USERNAME DB_PASSWORD DB_NAME_GLPI
6. Server Test for Medulla -> Your LDAP Server
Verify direct communication between the server and your LDAP server.
(Requires the ldap-utils package: apt install ldap-utils)
-
A. On the Medulla server: Run the test against the external LDAP server.
./check_connection_ldap.sh HOST PORT 'BIND_DN' 'PASSWORD' 'BASE_DN'
Firewall
If a firewall is located between the server and the workstations, it is essential to ensure that the ports required for communication are open in both directions (inbound and outbound).
The following ports must be accessible:
-
22: SSH (remote access and secure transfers)
-
9: Wake-on-LAN
-
5900: VNC (remote control)
-
3389: RDP (Remote Desktop Connection)
-
35621 and 35623: Backups
-
5985 and 5986: WinRM (HTTP/HTTPS remote management)
In summary:
Verify that these ports are not blocked by the server’s firewall, client workstations, or any intermediate network equipment (router, hardware firewall, etc.).
IMAGING Prerequisites
PXE/DHCP Configuration
After installing and configuring your server, a document dedicated to setting up DHCP/PXE will be sent to you.
Imaging Workshop
Before scheduling your Imaging workshop, you need to prepare a few things:
- To create a clean image, you need a fresh Windows machine that hasn’t completed the OOBE questions.
Start the installation of a Windows machine, and when the OOBE appears, cancel it using: CTRL + SHIFT + F3
- Have a few PCs ready for deployment.
We can also provide you with masters for certain Windows models; please let us know which Windows models you wish to deploy.
Active Directory
For an on-premises deployment, three separate Active Directory service accounts must be provided.
1. Read-Only Account
This account is used to query LDAP for information about users and groups.
-
Role:
Read-Only. -
Function: Retrieves user and group information via the LDAP (or LDAPS) protocol.
-
Required Permissions: Must have the necessary rights to search and read user attributes in the Active Directory directory.
-
Location in the application: The credentials for this account will be configured in the Medulla configuration file (information requested in the delivery form).
2. Machine Enrollment Account (Imaging/Mastering)
This account is dedicated to provisioning and registering new machines in the domain during the imaging (or mastering) process.
-
Role: Rights to enroll machines in the domain.
-
Function: Allow computers to be added to the Active Directory domain.
-
Required Permissions: Must have the "Add workstations to the domain" right .
-
Process Integration: This account will be integrated and used by
Sysprepto perform the domain join operation during machine mastering.
3. Script Execution Account (Medulla Agent Installation)
This account is required for post-deployment administration tasks, specifically forthe remote installation of the Medulla agent via PowerShell, targeting a defined Organizational Unit (OU).
-
Role: List AD computers and run PowerShell scripts remotely with delegated rights.
-
Function: List computers in Active Directory. Install and configure the Medulla agent on client machines, targeting machines in a specific OU.
-
Required permissions:
-
Delegated Rights on the Target OU: Must have rights to modify
Computerobjects and rights allowing the execution of remote commands (via WinRM or an equivalent solution) on machines in the specified OU. -
Access to network share: If the Medulla agent script or installer is stored on a share, the account must have read permissions on that share.
- List AD computers: Musthave the right to list AD computers to select the computers on which the agent should be installed.
-
-
Usage: This account will be used by the Python application to initiate and validate the execution of PowerShell scripts on the machines, ensuring that the agent is installed and that the machine is correctly assigned to the correct OU structure.
I already have a PXE server on my network. Is that a problem?
Coexistence with an Existing PXE Server
The Medulla installation includes setting up a dedicated PXE (Preboot Execution Environment) server to facilitate deployment. We understand that your environment may already have an operational PXE server.
This is not a problem.
The key to coexistence lies in the DHCP (Dynamic Host Configuration Protocol), which acts as the orchestrator of the network boot process (PXE).
1. DHCP is the sole decision-maker
The PXE server (whether Medulla’s or an existing one) cannot act alone. It is theDHCP server that directs the client to the correct boot server.
When you power on a machine that needs to boot via PXE, it sends a DHCP request. The DHCP server not only provides it with an IP address but also two pieces of information crucial for network booting:
Even if two PXE servers are listening on the network, only the DHCP server has the authority to tell the client which server to use.
We provide a DHCP/PXE configuration after installing the Medulla server.
2. Selective Filtering (MAC Address / Scopes)
It is possible to manage filtering by MAC address.
-
MAC Address Control:
You can configure the DHCP server to check the MAC address of the requesting client.
-
If the MAC address is
00:1A:2B:3C:4D:5E, the DHCP server sendsOption 66 pointing to Medulla’s PXE. -
For all other addresses, the DHCP server sends no PXE option, or points to your existing PXE.
-
-
Control by Scope or Vendor Class:
DHCP can also apply these PXE routing rules to specific IP address ranges or based on a specific identifier sent by the client (the PXE client’s Vendor Class).
In summary, both PXE servers can exist in parallel, but they remain inactive until DHCP formally instructs the client to contact one of them via the next-server directive.
Simplified flowchart of Medulla
Simplified Flow Rules
The rules are interpreted as follows:
-
SOURCE -> DESTmeans that the flow is initiated from the SOURCE to the DESTINATION. - If the protocol is not specified, then it defaults to TCP.
If you have a single Medulla server, refer to the table:
- 1. Without a Relay Server
If you have a Medulla server and a relay server, refer to the table:
- 2. With a Classic Relay Server
If you have a Medulla server and a DMZ relay server, refer to the table:
- 3. With a DMZ Relay Server
Medulla external access:
- updates.siveo.net:443
- download.windowsupdate.com:80
Medulla access to other internal servers:
- Your GLPI server (if you have one)
- Your LDAP server (if you have one; see our LDAP documentation: LDAP DOC)
Access from your Admin Machine to Medulla:
| Connection | Ports Used (DEST) | Notes |
| Your internal admin workstation ➡️ Medulla server |
139/445 8384 |
Traffic initiated by the internal admin workstation to Medulla. |
1. Without Relay Server
| Connection | Ports Used (DEST) | Notes |
| Internal workstation ➡️ Medulla server | 22 (SSH) 67/69 (UDP) 80/443 111/2049 (TCP & UDP) 5222 8443 9990 9999, 22067 55415 |
Traffic initiated by the extension to Medulla. |
| Medulla server ➡️ Internal workstation | 9 22 ( SSH) 3389 5900 5985/5986 35621 35623 |
Traffic initiated by the Medulla server to internal extensions. |
2. With Classic Relay Server
| Connection | Ports Used (DEST) | Notes |
| Internal workstation ➡️ Medulla servers | 22 (SSH) 67/69 (UDP) 80/443 111/2049 (TCP & UDP) 5222 8443 9990 9999, 22067 55415 |
Traffic initiated by the extension to Medulla. |
| Medulla servers ➡️ Internal workstation | 9 22 ( SSH) 3389 5900 5985/5986 35621 35623 |
Traffic initiated by the Medulla server to internal workstations. |
| --- | --- | --- |
| Medulla Server ➡️ Relay Server |
22 ( SSH) 5269 9990 |
Traffic initiated by Medulla to the DMZ Server. |
| Relay Server ➡️ Medulla Server |
22 ( SSH) 5269 |
Traffic initiated by the DMZ server to Medulla. |
| --- | ||
| Internal Station ➡️ Relay Server |
22 69/69 (UDP) 80/443 111/2049 (TCP & UDP) 5222 9990 |
Traffic initiated by the internal extension to the Relay Server. |
| Relay Server ➡️ Internal Station |
9 22 3389 5900 |
Traffic initiated by the Relay Servertothe internal extension. |
3. With DMZ Relay Server
| Connection | Ports Used (DEST) | Notes |
| Internal workstation ➡️ Medulla Server | 22 (SSH) 67/69 (UDP) 80/443 111/2049 (TCP & UDP) 5222 8443 9990 9999, 22067 55415 |
Traffic initiated by the extension to Medulla. |
| Medulla server ➡️ Internal workstation | 9 22 ( SSH) 3389 5900 5985/5986 35621 35623 |
Traffic initiated by the Medulla server to internal workstations. |
| --- | --- | --- |
| Medulla Server ➡️ DMZ Relay Server |
22 ( SSH) 4369 4370 to 4380 |
Traffic initiated by Medulla to the DMZ Server. |
| DMZ Relay Server➡️ MedullaServer |
22 ( SSH) 4369 4370 to 4380 |
Traffic initiated by the DMZ server to Medulla. |
| --- | --- | --- |
| External Host ➡️ DMZ Server | 22 ( SSH) 5222 |
Traffic initiated by the external workstation to the DMZ server.
|
Port descriptions
Port 9: used for Wake on LAN (WOL) to wake up a remote workstation.
Port 22 (SSH): SSH port used by Medulla for remote operations, command execution, and agent administration.
Ports 67 and 69 (UDP): used for DHCP and TFTP, particularly during PXE boot or for loading deployment images.
Ports 80 and 443: HTTP and HTTPS, used for web access and secure communication with Medulla services.
Port 111 (TCP and UDP): used by Portmapper / RPCbind, required for NFS services and certain internal network calls.
Port 3389: used for RDP to connect remotely to Windows workstations.
Port 4369: used for an ejabberd cluster if you have a DMZ relay
Ports 4370 to 4380: used for an ejabberd cluster if you have a DMZ relay
Port 5222: used by XMPP for communication between Medulla agents and the server.
Port 5269: used by XMPP for server-to-server communication, particularly between Medulla and the DMZ relay server.
Port 5900: used by VNC for remote control.
Ports 5985 and 5986: used by WinRM (HTTP and HTTPS) for remote commands on Windows.
Ports 7080 and 8081: used by internal services or management APIs required by the relay server or Medulla components.
Port 8443: HTTPS used by Medulla’s secure interface or APIs.
Port 9990: used by an internal Medulla service for management and monitoring.
Port 9999: used as an internal synchronization or exchange port between the Medulla server and components such as the relay.
Port 22000: used by Syncthing as the main channel for data synchronization (packages, artifacts, inventories).
Port 22067: used by Syncthing as a relayed channel, useful for mobile devices or those located behind a NAT.
Ports 35621, 35623, and 55415: dynamic ports used by Medulla agents for real-time communication, inventory, synchronization, or task execution.
OIDC
List my OIDC configurations
Go to the Admin > Manage Providers view.
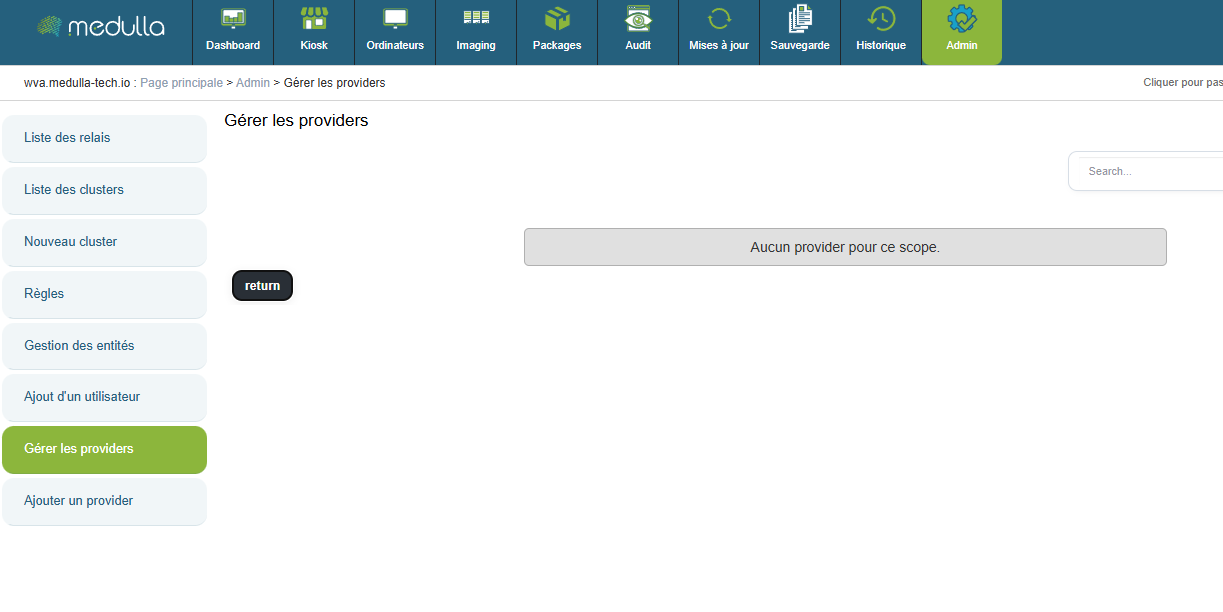
Here you will find a list of already configured OIDC providers that can be modified.
Create an OIDC configuration
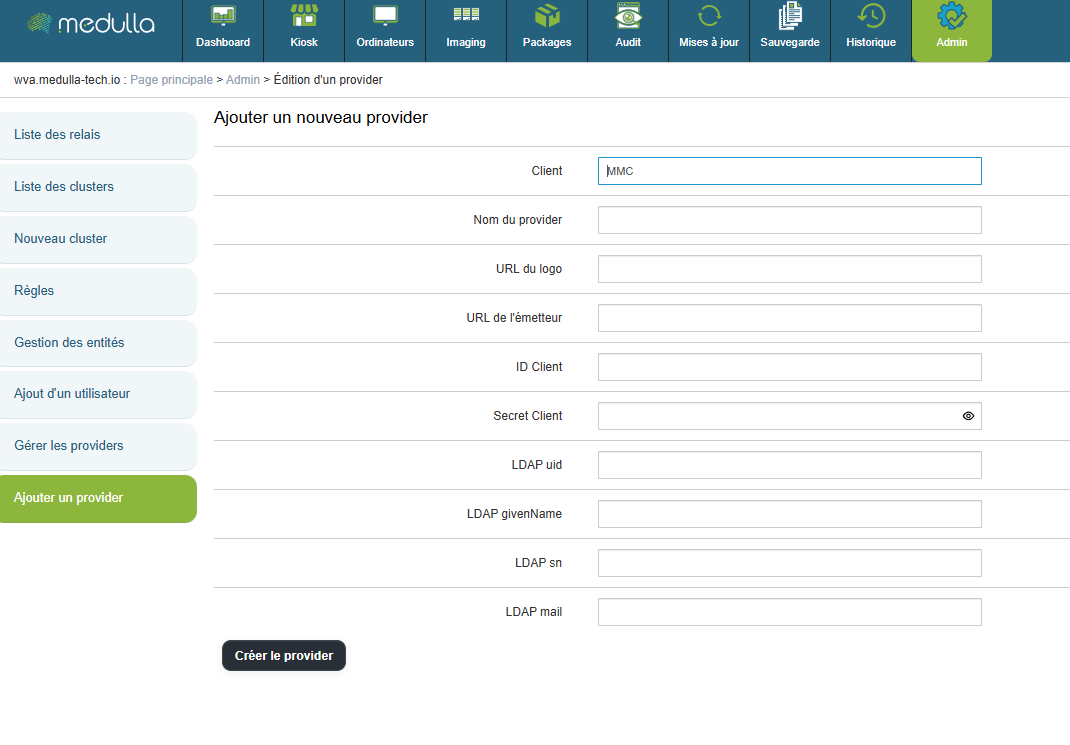
"Provider Name" will be the title displayed on the home page.
"Logo URL" is the web link used to set a logo for the OIDC login button.
"Issuer URL" is the web link that redirects to your OIDC.
"Client ID" is your OIDC's identifier.
"Client Secret" is the password for your OIDC.
- (Optional)
"LDAP uid" corresponds to the mapping of the uid by your OIDC
"LDAP givenName" corresponds to the mapping of the givenName in your OIDC
"LDAP sn" corresponds to the mapping of the sn in your OIDC
"LDAP mail" corresponds to the mapping of the email address in your OIDC
Then click the "Create Provider" button to enable logging in via an OIDC on your platform.
DNS and Medulla Relay views in the DMZ
Since the Medulla agent configuration is unique across the entire network, it supports only a single domain name. To allow machines to reach the server from both the private network and the outside via this single address, the use of a single domain name coupled with DNS views (Split-Horizon) or a Round-Robin is required.
DNS Views
Principle
A DNS view allows different responses to be provided for the same name depending on the origin of the request.
- Internal workstations → internal Medulla server
- External workstations → Medulla relay in the DMZ
Benefits
- Only one DNS name to configure
- No configuration differences on the workstations
- The internal Medulla server is not exposed
- Clear and secure architecture
Key points
DNS views automatically route endpoints to the correct Medulla access point, while maintaining a single name and simple configuration.
Reference article on Bind9: https://kb.isc.org/docs/aa-00851
Round-Robin
Additionally, if you do not wish to configure DNS Views, you can opt for an alternative solution by implementing a Round-Robin mechanism. This mechanism distributes requests across multiple IP addresses associated with the same domain name, ensuring a balanced distribution of connections.
To do this, you need to follow two steps:
- Define the internal IP address of the main Medulla server.
- Define the public IP address of the DMZ relay server.
Filter machine types by GLPI ID
For the filter, in the main section of /etc/mmc/plugins/glpi.ini.local, add:
filter_on = <criterion>
#Display only computers that match one of these filters:
* state
* type
* entity
* autoupdatesystems_id#Each filter may contain a list of values separated by a pipe
#Filters are IDs separated by spacesi.e. state=1 type=2|3|7 entity=2|5
filter_on = state=3
Your GLPI with Read-Only User
Medulla requires the creation of specific views in the GLPI database to function properly.
GLPI Read-Only
If you provide us with a user who has read-only access to your GLPI database, you will need to manually apply an Medulla. This file contains the queries needed to create the required views.
Here is the link to the SQL file:
https://dl.medulla-tech.io/nc/glpi-100.sql
GLPI Write Access
If you allowwrite access to your GLPI database, during installation.
.
Disable convergence for the Extract drivers package
Go to the Medulla server.
Edit the files:
- /etc/pulse-xmpp-agent-substitute/registeryagent.ini
- /etc/pulse-xmpp-agent-substitute/registeryagent.ini.local
Modify the relevant parameter:
[extractdrivers]
# Add the ability to enable or disable the extraction driver mechanism
# Accepted values: 0, false, False
# Accepted values: 1, true, True
activate=0Save the files.
Restart the service:
systemctl restart pulse-xmpp-master-substitute-registration.serviceConfiguration Guide: OIDC Authentication and User Synchronization
If you are using anon-premises infrastructure and have chosen authentication via the OIDC (OpenID Connect) protocol, it is essential to understand how user accounts are routed and managed between your identity provider and the GLPI interface, especially if the latter is empty of users (having been freshly installed alongside Medulla).
1. Understanding the Authentication Flow
In this architecture, access management follows a specific path:
-
Storage: Your OIDC users are provisioned in the Medulla server’s local LDAP.
-
Authorizations (ACL): Although authentication is managed by OIDC, access rights and permissions (profiles) are controlled directly within GLPI.
Sign of a synchronization issue: If, after logging in via OIDC, you land on a blank GLPI page or one without menus, this means your account has not yet been imported into the GLPI database. Without this step, the system cannot assign you a profile or access rights.
Adding users to GLPI when logging in via OIDC is now automatic if:
- GLPI is installed by default with Medulla
- Your GLPI is accessible in read-write mode
2. Manual synchronization procedure
To activate your users in GLPI, you must establish a connection with the local LDAP directory. Here are the steps to follow:
Step A: Access the linking interface
-
Log in to GLPI with a local administrator account.
-
Go to the Administration > Users menu.
-
Click the LDAP Directory Link button.

Step B: Import accounts
-
Click the Import New Users link.
-
Click the Search button to list the users in the Medulla LDAP directory.
-
Select the desired users (or all of them) and confirm the synchronization.
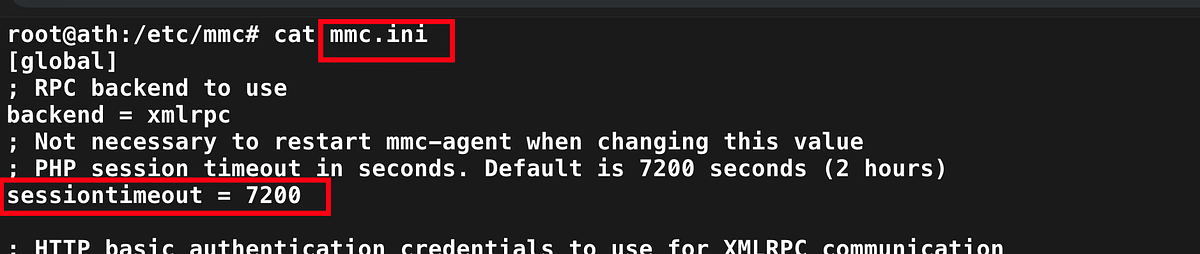
Increase the connection timeout to the interface
Go to the /etc/mmc/mmi.ini file
Change the sessiontimeout value. (This is in seconds)
Activation Support / WSUS / CVE
Applies to: Medulla – Support / WSUS / CVE
Version: 5.4.3 or later
Environment: On-Premise
Category: Support
After updating your Medulla installation, additional steps are required to enable support.
Please retrieve the following file from your server:
/etc/mmc/plugins/security.ini.local
This file must then be sent to your sales representative.
This step enables your access to support and related services.
Change the server's FQDN
Download the script from this link:
https://dl.medulla-tech.io/nc/rename_fqdn_and_protocol.py
chmod +x rename_fqdn_and_protocol.py
To view the script's options:
./rename_fqdn_and_protocol --help
Change the server's FQDN
To change medulla.mydomain.lan to medulla.mydomain.fr, here is an example of how to use the command:
./rename_fqdn_and_protocol --old-fqdn medulla.mydomain.lan --new-fqdn medulla.mydomain.fr
Change the protocol
It is also possible to change the protocol from HTTP to HTTPS in the URLs at the same time:
./rename_fqdn_and_protocol --old-fqdn medulla.mydomain.lan --new-fqdn medulla.mydomain.fr --new-protocol https
Regenerate the agent
If the workstations also need to communicate directly with the new FQDN, you can regenerate the agent with the new FQDN:
./rename_fqdn_and_protocol --old-fqdn medulla.mondomaine.lan --new-fqdn medulla.mondomaine.fr --update-agent-conf
For more information, and if you have a Medulla support contract, contact support@medulla-tech.io
Change the SSH port between Server and Client
Download the scripts from these links:
https://dl.medulla-tech.io/nc/change_ssh_port_on_agent.py
https://dl.medulla-tech.io/nc/change_ssh_port_on_server.py
chmod +x change_ssh_port_on_agent.py
chmod +x change_ssh_port_on_server.py
To view the script options:
./change_ssh_port_on_agent.py --help
./change_ssh_port_on_server.py --help
You must change the port using both scripts
The port must be the same in both scripts
Change the port on the server
To change port 22 to port 2002, here is an example of how to use the command:
./change_ssh_port_on_agent.py --new-ssh-port 2002
./change_ssh_port_on_server.py --new-ssh-port 2002
The agent will be regenerated after running the "change_ssh_port_on_agent.py" script; you must then redeploy the agent to your workstations.
GLPI - Connect an external GLPI
Applies to: Medulla/GLPI
Medulla version: all
GLPI version: 10.0.x
Environment: On-Premise
Category: Medulla
Prerequisites
Before configuring the integration between Medulla and GLPI, ensure that the following items are available and properly configured.
Download the script here: https://dl.medulla-tech.io/ma/change_itsm_parameters.py
1. GLPI database access
Create a dedicated MySQL/MariaDB user for Medulla with the following permissions:
- Read-only (`READ ONLY`) or read/write as needed
- Access to the entire GLPI database
2. Network connectivity
Allow communication between the Medulla server and the GLPI database server:
- Port `3306` open (or a custom port depending on your configuration)
3. Creating a GLPI API user
Create a GLPI user dedicated to API calls with a name of your choice:
In GLPI under `Administration > Users`
- Type: standard user (username / password)
- Recommended profile:
- `Read-Only` or `Super-Admin`
- Assignment:
- Root entity
- Recursive mode enabled
Then generate a user API token (`user_token`)
4. Creating a GLPI API client
Create an API client named `MMC`.
In GLPI, go to `Configuration > General > API`
Then generate the application token (`app_token`)
5. Import SQL views into your GLPI database
In your GLPI database, you must import the file downloaded here:
https://dl.medulla-tech.io/nc/glpi-100.sql
---
Using the script
Help command
./change_itsm_parameters.py --help
usage: change_itsm_parameters.py [-h] --url URL --db-host DB_HOST [--db-port DB_PORT] --db-name DB_NAME --db-user DB_USER --db-pass DB_PASS --api-url API_URL [--api-user API_USER] [--api-pass API_PASS] [--readonly READONLY] [--crypt-key CRYPT_KEY] [--inv-forward INV_FORWARD] [--inv-forward-url INV_FORWARD_URL] [--inv-plugin INV_PLUGIN] [--inv-agent INV_AGENT] [--inv-agent-disabled INV_AGENT_DISABLED]
Update ITSM parameters
options:
-h, --help display this help message and exit
--url URL ITSM provider URL
--db-host DB_HOST ITSM provider database host
--db-port DB_PORT ITSM provider database port
--db-name DB_NAME ITSM provider database name
--db-user DB_USER ITSM provider database user
--db-pass DB_PASS ITSM provider database password
--api-url API_URL ITSM provider API URL
--api-user API_USER ITSM provider API user
--api-pass API_PASS ITSM provider API password
--readonly READONLY Whether the ITSM provider database is read-only for Medulla (optional)
--crypt-key CRYPT_KEY
Decoded GLPI crypt key file - base64 /etc/glpi/glpicrypt.key (optional)
--inv-forward INV_FORWARD
Whether to forward inventory data to the ITSM provider (optional)
--inv-forward-url INV_FORWARD_URL
URL to forward inventory data to (optional)
--inv-plugin INV_PLUGIN
Inventory plugin to use - glpiinventory or fusioninventory (optional)
--inv-agent INV_AGENT
Inventory agent to use on the client machine - glpiagent or fusioninventory (optional, required if --inv-forward is true)
--inv-agent-disabled INV_AGENT_DISABLED
Whether to include the inventory agent in the Medulla agent (optional)
Usage examples:
./change_itsm_parameters.py \
--url https://glpi.mon-domaine.fr/ \
--db-host 10.10.0.101 \
--db-port 3306 \
--db-name GLPI \
--db-user medulla_glpi \
--db-pass yJxI40UzO8Jn7dd7K5Yaml \
--api-url https://glpi.mon-domaine.fr/apirest.php/ \
--api-user medulla_APIUSER \
--api-pass fLN1Zomh877obPhk \
FAQ - Private SaaS
Network requirements for Medulla Private SaaS
See:
https://docs.medulla-tech.io/books/medulla-faq/page/faq-pre-requis-reseau-pour-medulla-saas
Client Accounts (Status & Visibility)
Why do some devices appear offline even though they are powered on?
- Check the medullaagent and medullanetnotify services on the offline devices. If the services are indeed "running" but the device appears offline on the interface (grayed-out), please contact Support or your Administrator.
- If there are errors in the agent logs (on the device) "C:\Program Files\Medulla\var\log\xmpp-agent-machine.log," report them to Support or your Administrator.
Why are the inventory reports or reported information incomplete or incorrect?
- Make sure the MAC address of the device that is not reporting its inventory is not already in use. To check if a device is having trouble reporting its inventory, note that it is impossible to deploy to the device—even if it appears online on the interface (blue computer icon)—as the deployment icon for the device in the "Actions" menu will be grayed out.
Deployment (broadcasting)
Why are my deployments stuck in Pending?
- The "Pending" status indicates that deployments will be processed shortly. If the issue persists, please contact Support or your Administrator.
Why are my deployments stuck in "Deployment Start"?
- The "Deployment Start" status indicates that deployments will be processed shortly. If the issue persists, please contact Support or your Administrator.
What should I do if I encounter a deployment error: "Abort Package Execution"?
- You should check the script associated with the package; the error indicates that it is not executing correctly. You can try running the script manually on your machine.
- Check the feedback provided by the deployment audit; this may offer clues as to the cause of the error.
What to do if a deployment error occurs: Transfer Failed?
- Your computer cannot retrieve the package due to Rsync. Please check the Rsync permissions on several folders for the pulseuser account; the permissions should be set as follows:
C:\Progra~1\Pulse\var\tmp\packages BUILTIN\Users:(OI)(CI)(F)
NT SERVICE\TrustedInstaller:(I)(F)
NT SERVICE\TrustedInstaller:(I)(CI)(IO)(F)
NT AUTHORITY\SYSTEM:(I)(F)
NT AUTHORITY\SYSTEM:(I)(OI)(CI)(IO)(F)
BUILTIN\Administrators:(I)(F)
BUILTIN\Administrators:(I)(OI)(CI)(IO)(F)
BUILTIN\Users:(I)(RX)
BUILTIN\Users:(I)(OI)(CI)(IO)(GR,GE)
CREATOR OWNER:(I)(OI)(CI)(IO)(F)
APPLICATION PACKAGE AUTHORITY\ALL APPLICATION PACKAGES:(I)(RX)
APPLICATION PACKAGE AUTHORITY\ALL APPLICATION PACKAGES:(I)(OI)(CI)(IO)(GR,GE)
APPLICATION PACKAGE AUTHORITY\ALL RESTRICTED APPLICATION PACKAGES:(I)(RX)
APPLICATION PACKAGE AUTHORITY\ALL RESTRICTED APPLICATION PACKAGES:(I)(OI)(CI)(IO)(GR,GE)
C:\Users\pulseuser\.ssh NT AUTHORITY\SYSTEM:(I)(OI)(CI)(F)
BUILTIN\Administrators:(I)(OI)(CI)(F)
MACHINE_NAME\pulseuser:(I)(OI)(CI)(F)
C:\Users\pulseuser\.ssh\authorized_keys MACHINE_NAME\pulseuser:(F)
NT AUTHORITY\SYSTEM:(F)Why aren't my deployments starting, or why are they taking a long time to start?
- If your deployments are taking a long time to start, it is possible that your queued deployment is being slowed down by the current load on the SaaS platform.
- If your deployments remain stuck, please contact Support or your Administrator.
How do I stop a deployment?
- You can use the "Stop Deploy" button in the deployment audit to stop the current deployment.
How do I view the results of my deployment?
- In the "Audit" view, you can find a list of all your deployments. Click the " " action button to view your deployment details.
How do I restart a deployment?
- In the "Audit" view, locate the row corresponding to the deployment you want to restart, then click the action button to restart the deployment.
Packages
I can't add a file to my package.
- Once you have added a file to your package, it is pending; don’t forget to click “Submit pending package.”
I created a package but it’s not available for deployment—why?
- If your package isn't visible in the package list, or isn't visible when you try to deploy it, then it's waiting to be synchronized with the relays; please wait a few moments before it appears in the "Package List."
Why isn’t my package available on the Kiosk package addition page?
- Your package must have an associated inventory to be visible in the list of packages available for the Kiosk.
Console & Administration
Why is the console slow, unstable, or inaccessible?
- The platform may be overloaded. Please wait a few minutes while we resolve the issue. If the problem persists, please contact Support or your Administrator.
How do I resolve user permission issues?
- A user has a profile with permissions predefined by Medulla. If you are a Super-Admin, you can modify their profile by going to the "Admin" view, then "Entity Management," and clicking the "Manage Users" button
 on the row of the entity where the user is located. Click the "Edit" button (
 ) for the relevant user to modify their profile.
Why don’t I have access to certain groups, audits, or scheduled tasks?
- If you are not a Super-Admin, contact someone with the Super-Admin profile so they can modify your "Profile".
What should I do if the console freezes or I encounter XMPP errors?
- Try logging out and then logging back in; you can also try clearing your browser’s cache and cookies. If the problem persists, please contact Support or your Administrator, explaining your situation in as much detail as possible and providing the error message that was displayed.
Remote Maintenance & Getting Started
What should I do if remote access (VNC/RDP/PMAD) isn't working?
- Check the TightVNC service on the affected machines.
- Remote access is not available if the computer appears offline (grayed out); if this is the case, check the status of the medullaagent service on the machine.
FAQ - All platforms
Client Accounts (Status & Visibility)
Applies to: Medulla – Agents
Version:5.4.3 or later
Environment: On-Premise - Shared SaaS and Private SaaS
Category: Support
Why do some endpoints appear offline even though they are powered on?
- Check the medullaagent and medullanetnotify services on the offline workstations. If the services are indeed "running" but the workstation appears offline on the interface (grayed-out), please contact Support or your Administrator.
- If there are errors in the agent logs (on the device) "C:\Program Files\Medulla\var\log\xmpp-agent-machine.log", report them to Support or your Administrator.
Why are the inventory reports or reported information incomplete or incorrect?
- Make sure the MAC address of the device that is not reporting its inventory is not already in use. To check if a device is having trouble reporting its inventory, note that it is impossible to deploy to the device—even if it appears online on the interface (blue computer icon)—as the deployment icon for the device in the "Actions" menu will be grayed out.
Packages
Medulla Modules Packages / All versions / Public and private SaaS and On-premise / Maintenance
I can't add a file to my package.
- Once you have added a file to your package, it is pending; don’t forget to click “Submit pending package.”
I created a package but it’s not available for deployment—why?
- If your package isn’t visible in the package list, or isn’t visible when you try to deploy it, it’s waiting to sync with the relays. Please wait a few moments before it appears in the “Package List.”
Why isn’t my package available on the Kiosk package addition page?
- Your package must have an associated inventory to be visible in the list of packages available for the Kiosk.
Console & Administration
Medulla / All versions / Public and private SaaS and On-premise / Maintenance
Why is the console slow, unstable, or inaccessible?
- The platform may be overloaded. Please wait a few minutes while we resolve the issue. If the problem persists, please contact Support or your Administrator.
How do I resolve user permission issues?
- A user has a profile with permissions predefined by Medulla. If you are a Super-Admin, you can modify their profile by going to the "Admin" view, then "Entity Management," and clicking the "Manage Users" button
 on the row of the entity where the user is located. Click the "Edit" button (
 ) for the relevant user to modify their profile.
Why don’t I have access to certain groups, audits, or scheduled tasks?
- If you are not a Super-Admin, contact someone with the Super-Admin profile so they can modify your "Profile".
What should I do if the console freezes or I encounter XMPP errors?
- Try logging out and then logging back in; you can also try clearing your browser’s cache and cookies. If the problem persists, please contact Support or your Administrator, explaining your situation in as much detail as possible and providing the error message that was displayed.
Remote Maintenance & Getting Started
Medulla Modules Computers / All versions / Public and private SaaS and On-premise / Maintenance
What to do if remote access (VNC/RDP/PMAD) isn't working?
- Check the TightVNC service on the affected machines.
- Remote access is not available if the computer appears offline (grayed out); if this is the case, check the status of the medullaagent service on the machine.
Set the agent to Debug
Medulla / All versions / Public and private SaaS and On-premise / Maintenance
Setting the agent toDEBUG mode couldn’t be simpler.
Go to the agentconf.ini file located at: C:\Program Files\Medulla\etc\agentconf.ini
In the [global] section
- Change the value log_level = INFO to log_level = DEBUG
- Change the value log_level_slixmpp = FATAL to log_level_slixmpp = DEBUG
Windows Agent Issue
Medulla / All versions / Public and private SaaS and On-premise / Maintenance
Is your issue related to an interaction betweenMedulla and a Windows workstation (agent not reporting, actions not applied, workstation not visible, etc.)?
To facilitate troubleshooting, Medulla provides a verification script that allows you to check network connectivity, the agent’s status, and the workstation’s configuration.
Download the script:
https://dl.medulla-tech.io/nc/windows_connection_check_signed.ps1
(right-click on the link below, then click "Save link as...")
Test Prerequisites
Before you begin, make sure you have downloaded the script above and prepared the machines.
On the Windows client machine with the Medulla agent:
- Right-click on the script, click on Properties, check the box to allow the script to run, and confirm.
- Allow PowerShell scripts to run:
Set-ExecutionPolicy -Scope CurrentUser -ExecutionPolicy RemoteSigned
# Answer "Yes for all" (Y or T) if prompted
For PowerShell v7.5.4:
There is no need to unblock the script. You must run the command shown above.
It will ask if you want to allow the publisher of the script; simply confirm by clicking R or A.

Medulla Server Test <- Windows Client Workstation
Verify direct communication between the server and the client workstations.
On the Client Workstation (Source): Run the test against the server’s hostname or IP address.
.\windows_connection_check_signed.ps1 -Target <SERVER_IP> -Mode pulse
A log file is created (in the location from which you run the script) and summarizes the tests performed: LOG_Test_Flux.txt
If you encounter permission errors when creating the log file, try placing the script in the user’s Downloads folder, or grant the windows_connection_check.ps1 script permission to create a file in that location.
Medulla On-Premise
If you have a Medulla On-Premise server, you can also run a server diagnostic test from the workstation:
On the Medulla Server (Source): Run the test against the workstation’s hostname or IP address.
./medulla_connection_check.sh -c client.example.com
Recommendation: Please attach the LOG_Test_Flux.txt file when submitting a support request.
FAQ - ACL
Introduction
Definitions:
ACL: Defines access to each of Medulla’s features based on the profile of the logged-in user.
ACLs evolve with each Medulla release as features are added
Profile: Defined in the ITSM tool and used to define a user’s permissions on an entity.
Three profiles are defined: Super-Admin, Admin, and Technician
Restriction: There is no differentiation between profile/entity pairs in Medulla. If a user has different profiles across different entities, the most permissive profile will always be applied to all permitted entities.
Configuration:
ACLs are configured in the file:/etc/mmc/plugins/glpi.ini.local
The three parameters are:
profile_acl_Super-Admin
profile_acl_Admin
profile_acl_Technician
Configuration steps:
1- List the desired features
2- Convert the ACLs into a continuous string and end with /
3- Copy the string into the configuration file for the desired profile
4 - Restart the services
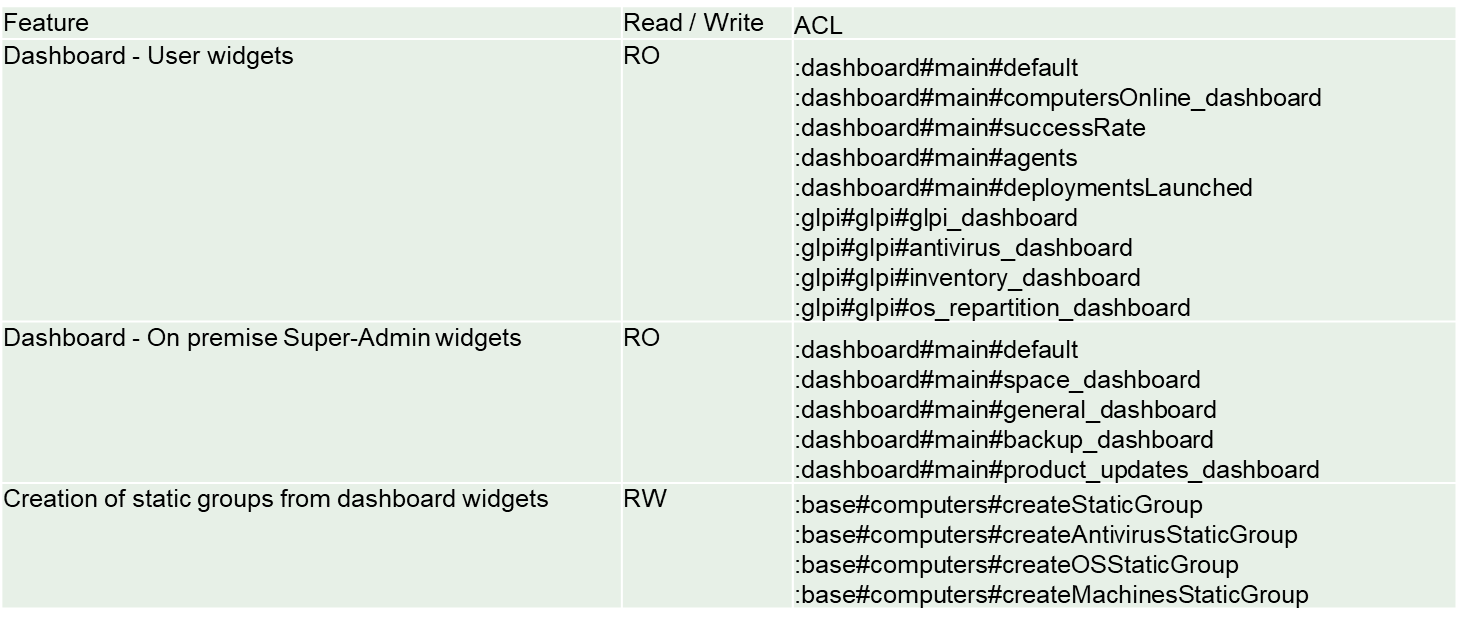
ACLs
Dashboard:
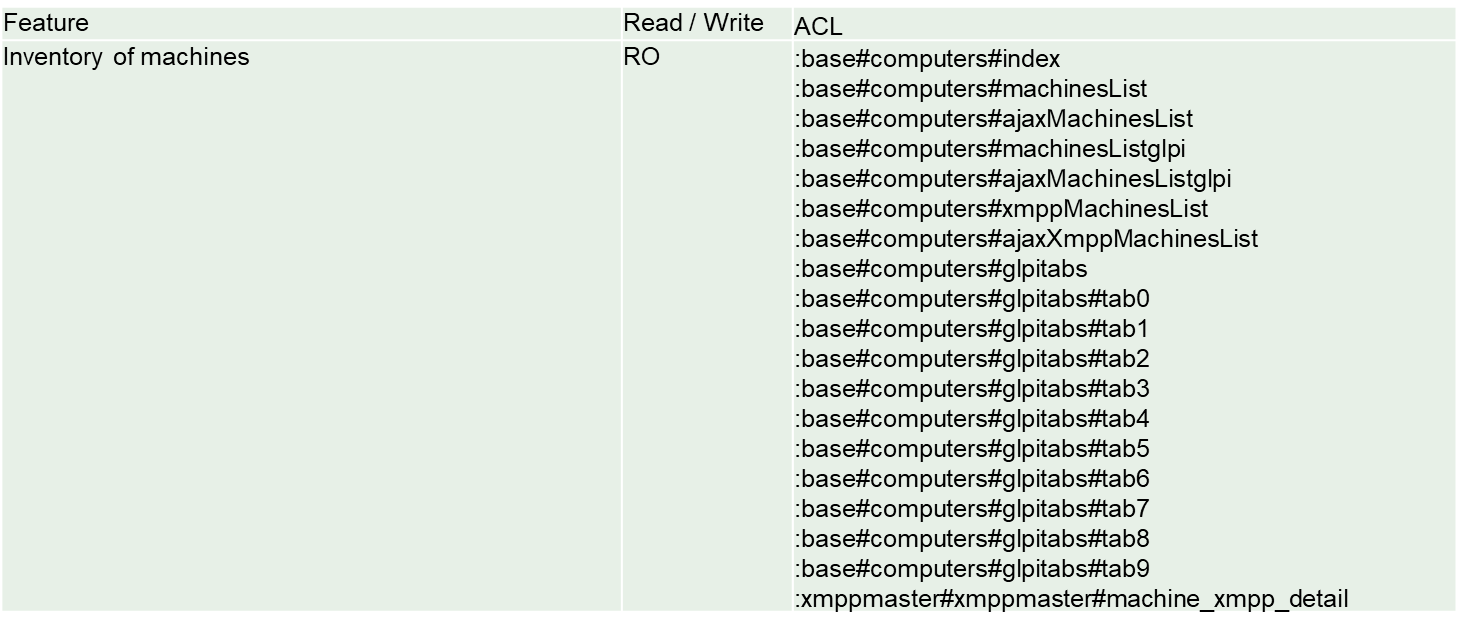
Inventory:
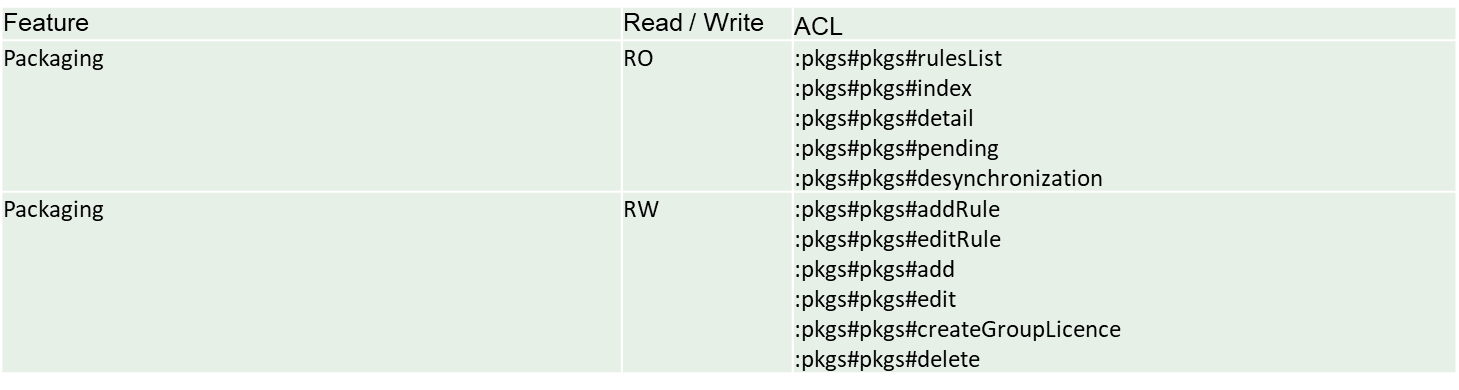
Packaging:
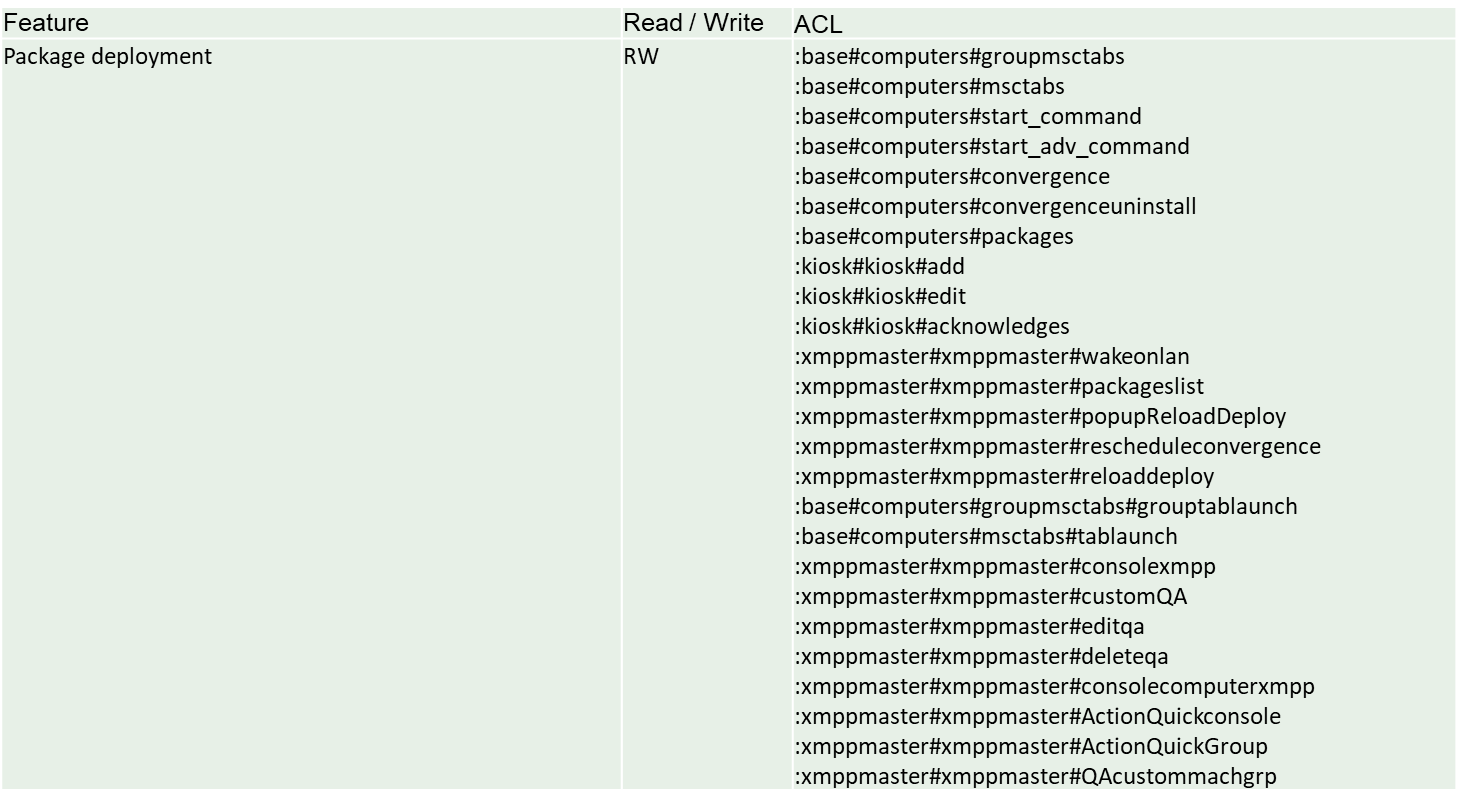
Package Deployment:
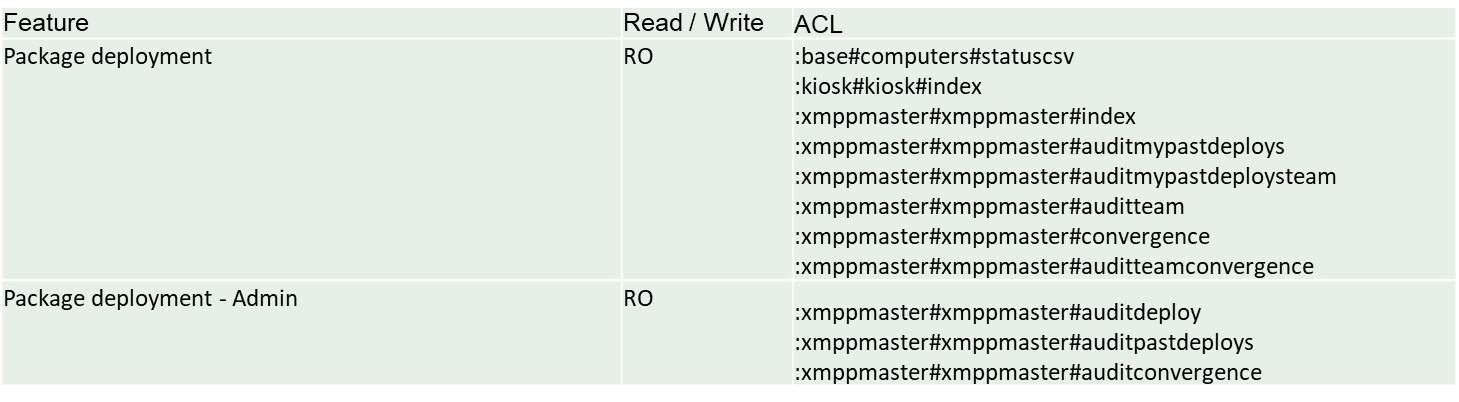
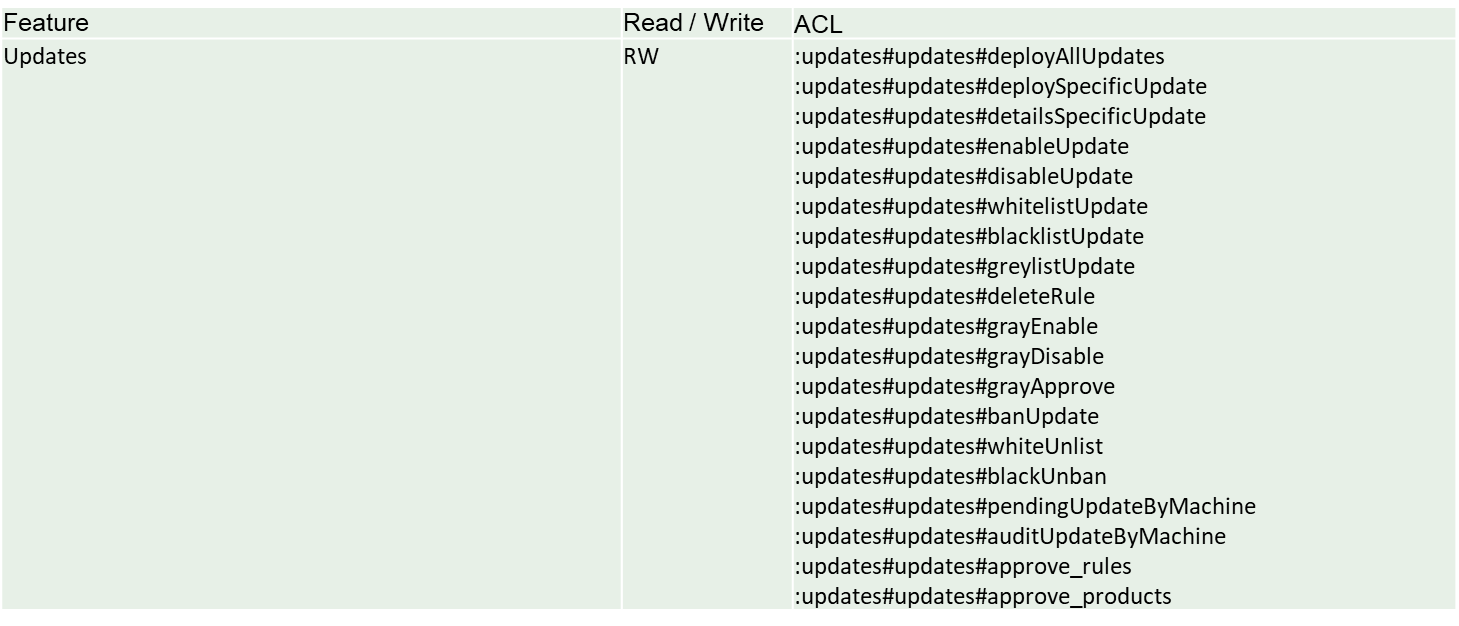
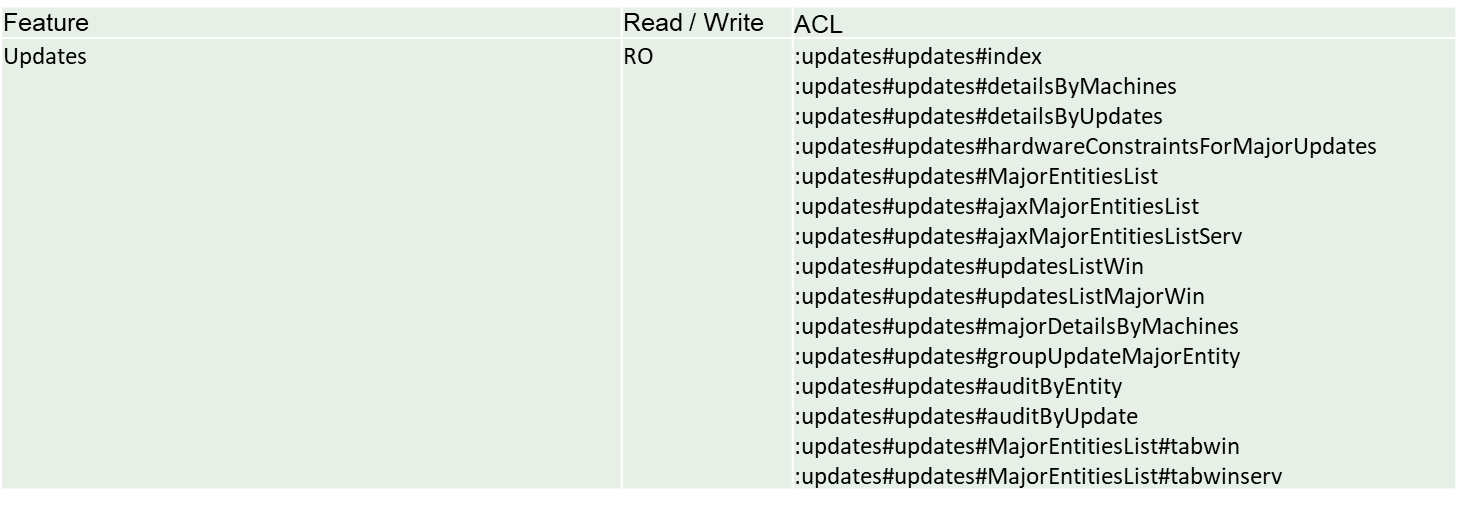
ACLs continued
Imaging:
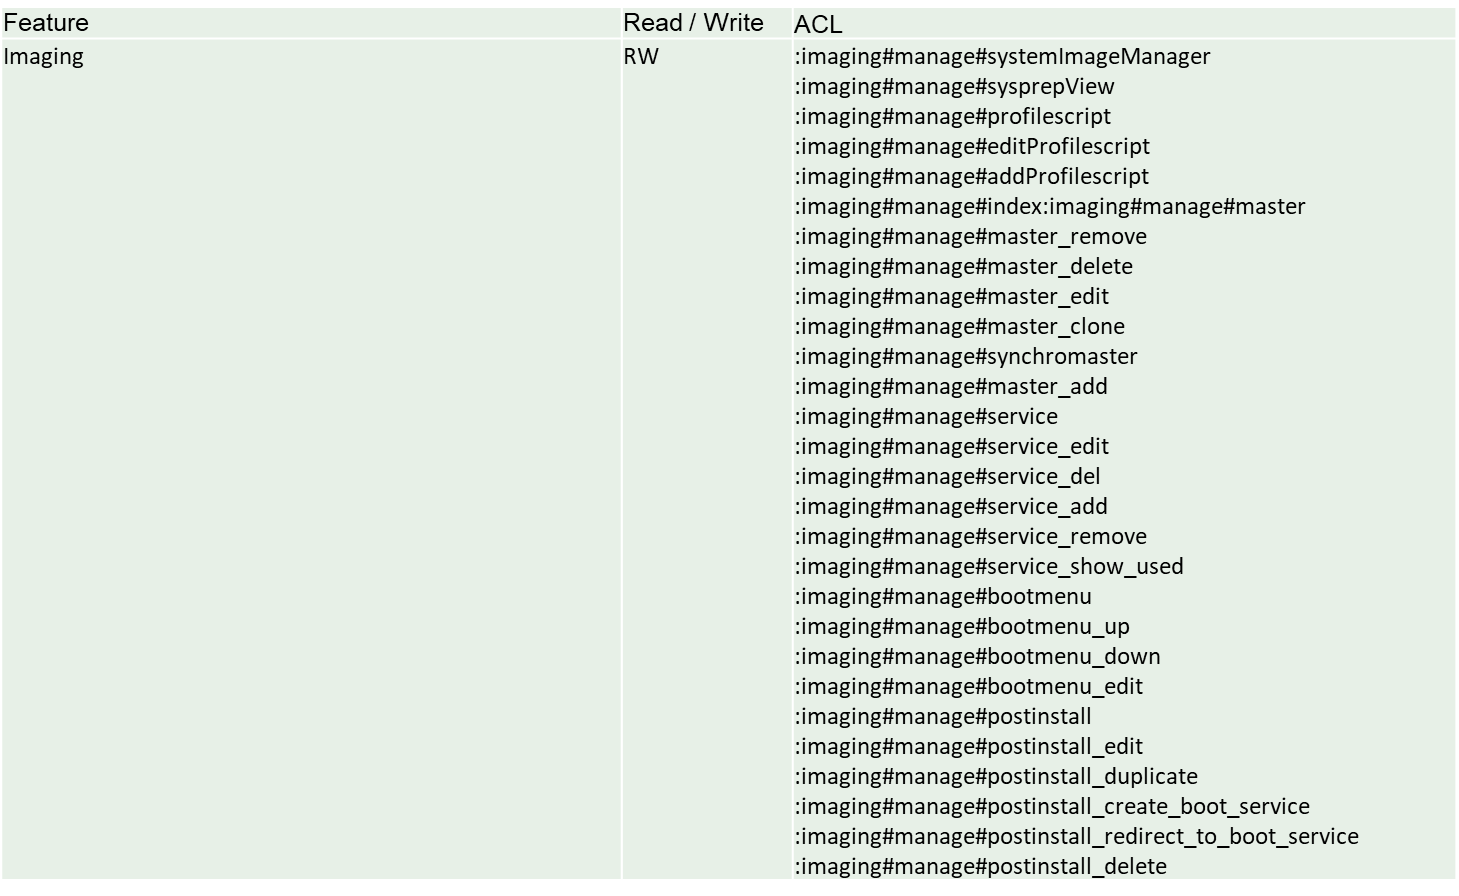
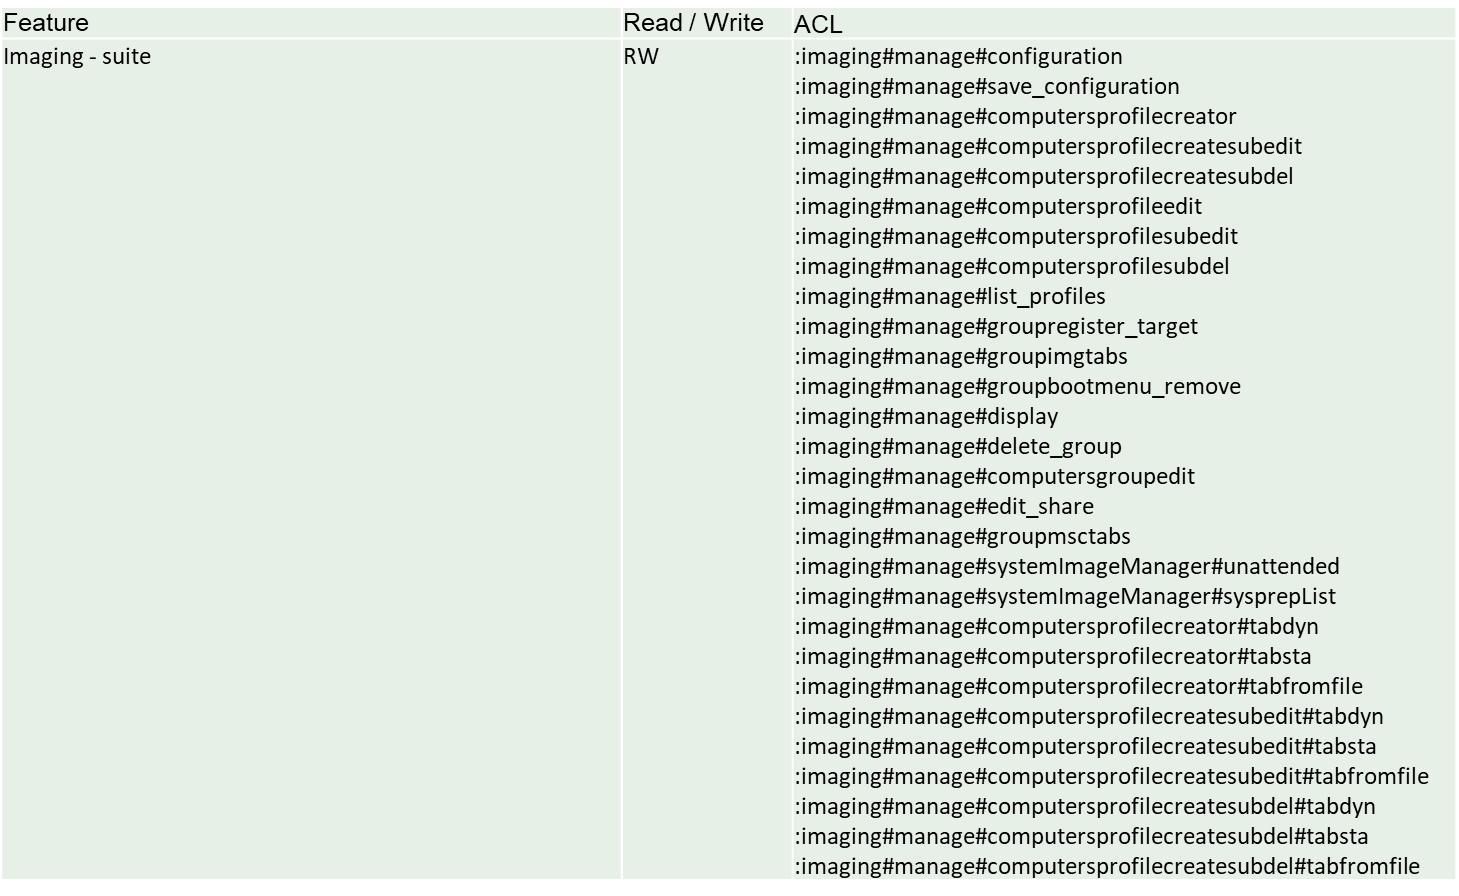
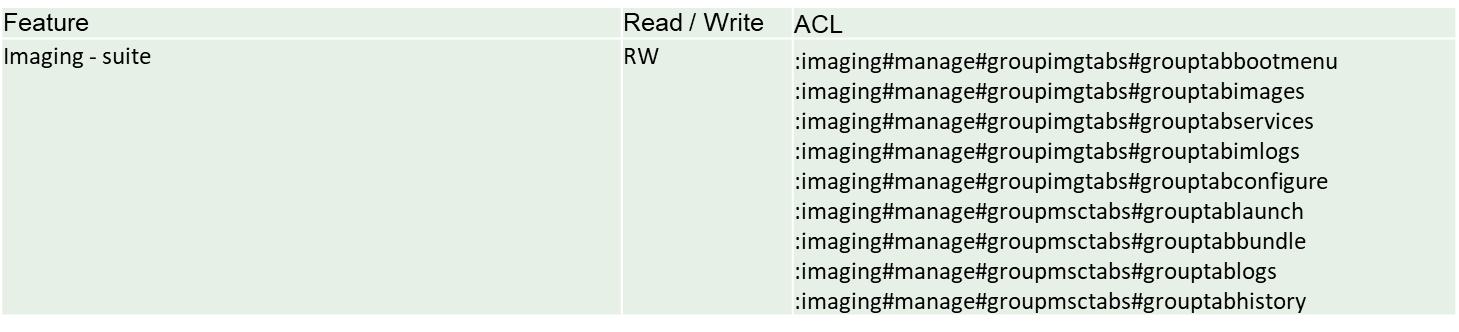
Updates:
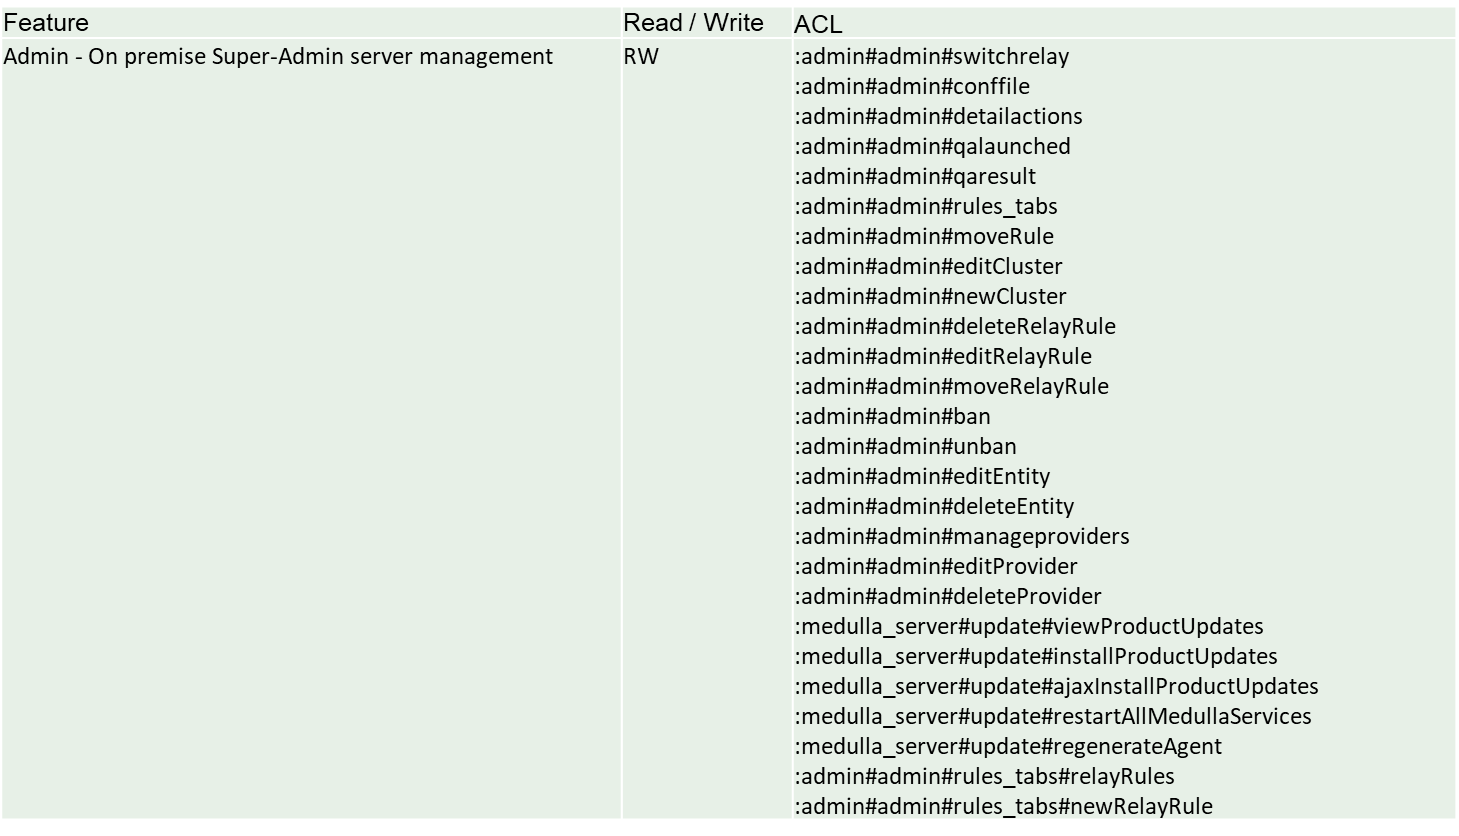
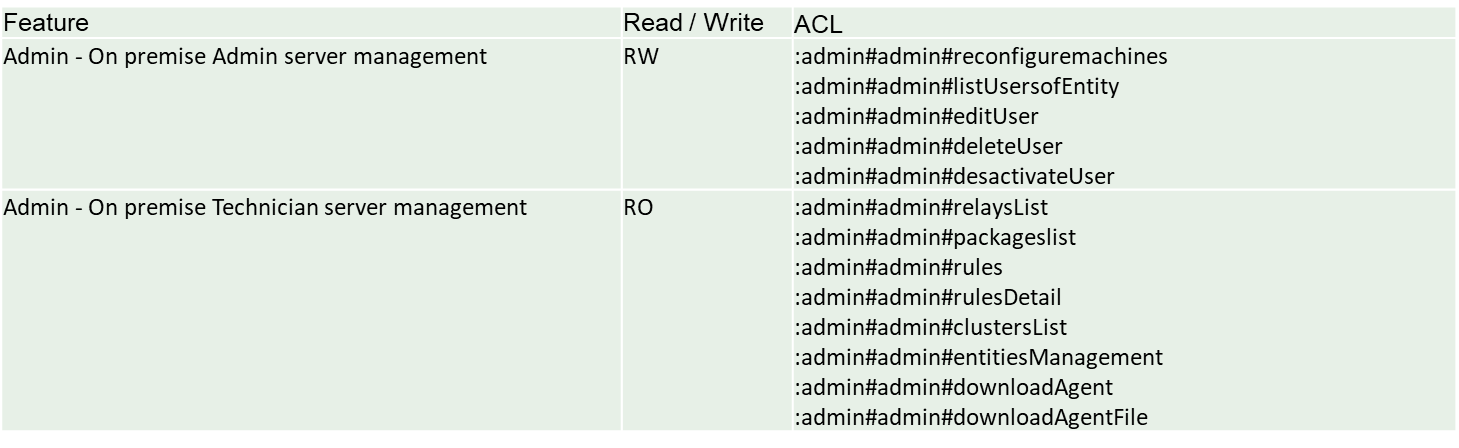
Admin On-premise Super Admin Server Management:
FAQ - Interface
Console & Administration
Applies to: Medulla – Interface
Version: All
Environment: On-Premise / Private SaaS / Shared SaaS
Category: Medulla Interface / Support
Why is the console slow, unstable, or inaccessible?
- The platform may be overloaded. You can check the logs for errors, such as "/var/log/mmc/mmc-agent" or "/var/log/mmc/master-*.log". If you are using SaaS, please contact us.
How do I resolve user permission issues?
- Each user has a profile with permissions predefined by Medulla. If you are a Super-Admin, you can modify their profile by going to the "Admin" view, then "Entity Management," and clicking the "Manage Users" button on the row of the entity where the user is located. Click the "Edit" button ( ) for the relevant user to modify their profile.
Why don’t I have access to certain groups, audits, or scheduled tasks?
- If you are not a Super-Admin, contact someone with the Super-Admin profile so they can modify your "Profile".
What should I do if the console freezes or I encounter XMPP errors?
- Try logging out and then logging back in; you can also try clearing your browser’s cache and cookies. If the problem persists, please contact Support or your Administrator, explaining your situation in as much detail as possible and providing the error message that was displayed.
FAQ - Using Medulla
Deployment (broadcasting)
Why are my deployments stuck in Pending?
- The "Pending" status indicates that deployments will be processed shortly. If the issue persists, please contact Support or your Administrator.
Why are my deployments stuck in "Deployment Start"?
- The "Deployment Start" status indicates that deployments will be processed shortly. If the issue persists, please contact Support or your Administrator.
What should I do if I encounter a deployment error: "Abort Package Execution"?
- You should check the script associated with the package; the error indicates that it is not executing correctly. You can try running the script manually on your machine.
- Check the feedback provided by the deployment audit; this may offer clues as to the cause of the error.
What to do if a deployment error occurs: Transfer Failed?
- Your computer cannot retrieve the package due to Rsync. Please check the Rsync permissions on several folders for the pulseuser account; the permissions should be set as follows:
C:\Progra~1\Pulse\var\tmp\packages BUILTIN\Users:(OI)(CI)(F)
NT SERVICE\TrustedInstaller:(I)(F)
NT SERVICE\TrustedInstaller:(I)(CI)(IO)(F)
NT AUTHORITY\SYSTEM:(I)(F)
NT AUTHORITY\SYSTEM:(I)(OI)(CI)(IO)(F)
BUILTIN\Administrators:(I)(F)
BUILTIN\Administrators:(I)(OI)(CI)(IO)(F)
BUILTIN\Users:(I)(RX)
BUILTIN\Users:(I)(OI)(CI)(IO)(GR,GE)
CREATOR OWNER:(I)(OI)(CI)(IO)(F)
APPLICATION PACKAGE AUTHORITY\ALL APPLICATION PACKAGES:(I)(RX)
APPLICATION PACKAGE AUTHORITY\ALL APPLICATION PACKAGES:(I)(OI)(CI)(IO)(GR,GE)
APPLICATION PACKAGE AUTHORITY\ALL RESTRICTED APPLICATION PACKAGES:(I)(RX)
APPLICATION PACKAGE AUTHORITY\ALL RESTRICTED APPLICATION PACKAGES:(I)(OI)(CI)(IO)(GR,GE)
C:\Users\pulseuser\.ssh NT AUTHORITY\SYSTEM:(I)(OI)(CI)(F)
BUILTIN\Administrators:(I)(OI)(CI)(F)
MACHINE_NAME\pulseuser:(I)(OI)(CI)(F)
C:\Users\pulseuser\.ssh\authorized_keys MACHINE_NAME\pulseuser:(F)
NT AUTHORITY\SYSTEM:(F)Why aren't my deployments starting, or why are they taking a long time to start?
- If your deployments are taking a long time to start, it is possible that your queued deployment is being slowed down by the current load on the SaaS platform.
- If your deployments remain stuck, please contact Support or your Administrator.
How do I stop a deployment?
- You can use the "Stop Deploy" button in the deployment audit to stop the current deployment.
How do I view the results of my deployment?
- In the "Audit" view, you can find a list of all your deployments. Click the " " action button to view your deployment details.
How do I restart a deployment?
- In the "Audit" view, locate the row corresponding to the deployment you want to restart, then click the action button to restart the deployment.
Packages
I can't add a file to my package.
- Once you have added a file to your package, it is pending; don’t forget to click “Submit pending package.”
I created a package but it’s not available for deployment—why?
- If your package isn't visible in the package list, or isn't visible when you try to deploy it, then it's waiting to be synchronized with the relays; please wait a few moments before it appears in the "Package List."
Why isn’t my package available on the Kiosk package addition page?
- Your package must have an associated inventory to be visible in the list of packages available for the Kiosk.
Increase the package upload size
Run these commands with the desired size;post_max_size and upload_max_filesize correspond to the new desired upload size.
crudini --set /etc/php/8.2/fpm/php.ini PHP post_max_size 800M crudini --set /etc/php/8.2/fpm/php.ini PHP upload_max_filesize 800M crudini --set /etc/php/8.2/fpm/php.ini PHP memory_limit 2048M crudini --set /etc/php/8.2/fpm/php.ini PHP max_execution_time 60 crudini --set /etc/php/8.2/fpm/php.ini PHP max_input_time 60 systemctl restart php8.2-fpm
memory_limit must be at least 2.5 times the upload size.
Performance may slow down after this change. Be reasonable when increasing these values.
Updates (Windows Updates)
Are your devices not reporting any updates?
- Check the "Microsoft Product Validation" submenu to ensure you have enabled the correct products for Windows 10 or 11 devices.
- Check the log file "/tmp/medulla-generate-winupdate-packages.log"; if it contains: "Error downloading https://updates.medulla-tech.io/updates_protected/xxxx-xxxxxx-dumptable_update_data.sql," please open a ticket with Medulla Support, indicating the errors found in the log file.
- Check the log file "/var/log/mmc/medulla-mariadb-synchro-update-package.log"; if it contains errors, please open a ticket with Medulla Support, indicating the errors found in the log file.
This feature requires an active support contract.
This module relies on advanced processing (vulnerability analysis, data correlation, status calculation) performed on Medulla servers.
The support contract helps fund the infrastructure required for these processes as well as their maintenance in operational condition.
The support contract also includes:
technical support and assistance,
access to new features subject to an active support contract,
participation in the continuous improvement of the solution.
To activate these features, we invite you to sign up for a support contract by contacting us at the following address: medulla@medulla-tech.io
Imaging menus
Applies to: Medulla – Imaging
Version:5.4.3 or later
Environment: On-Premise / Private SaaS with imaging relay.
Category: Usage
This document focuses on the management and generation of imaging menus.
What is an imaging menu?
- The machine has no associated menu: the server assigns it a default menu
- The machine is part of a group of machines: the server sends it the menu associated with that group.
- The machine is not part of a group and has an associated menu: the server sends it that menu.
The rest of the imaging process depends on the contents of this menu.
There are different levels of menus:
The imaging server menus:
Each imaging server receives a default menu. This menu consists of the following services:
- `continue`: This service allows you to boot the machine normally.
- `backup`: creates a copy of the machine's disk in the imaging system.
- Modifications
Changes to the default menu do not affect the menus of machines or groups. For machines to benefit from changes to the default menu, it is necessary to perform a "reset" of the entity's menus.
- Add / Remove a Service
Several services that can be added to the menu are available.
The page defining the services available in a menu is as follows:
MMC > Imaging > Manage Menu Services.
On this page, services are associated with the selected entity. Changing the entity modifies the list of services associated with that entity.
- Add / Remove a Master
This section does not cover how to convert an image into a master.
Masters present on the imaging server can be associated with the default menu.
The page for associating masters with the default menu is as follows:
MMC > Imaging > Manage Masters.
- Change the order of services and masters
The various services and masters associated with the default menu can be viewed on the following page:
`MMC > Imaging > Default Startup Menu`.
On this page, you can change the order of menu items. You can also modify settings specific to the associated items.
- Minimum services for a menu
Currently, a menu must contain at least one service (or one image). Generally, the `continue` service is required for the menu to function.
The minimum service must have the following options enabled:
- Default enabled so that this service is selected by default
- Visible enabled so that this service is visible in the startup menu
- Default WOL enabled to prevent a traceback, even though I don’t know what this option is for.
A fix is being considered to prevent the removal of the last service from a menu.
This page is organized into three tabs:
- Startup Menu: This tab allows you to view and edit the menu.
- Menu Services: This tab allows you to associate services with the machine menu.
- Images and Masters: This tab allows you to associate masters with the machine menu.
To access it, go to the following page:
MMC > Imaging > All Imaging Groups > action:Imaging Management.
In this case, the machine displays its own custom menu, not the group’s menu. This can cause confusion for the administrator.
FAQ - Agents
Client Accounts (Status & Visibility)
Applies to: Medulla – Agent
Version: All
Environment: On-Premise / Private SaaS / Shared SaaS
Category: Medulla Agent / Support
Why do some workstations appear offline even though they are powered on?
- Check the medullaagent and medullanetnotify services on the offline workstations. If the services are indeed "running" but the workstation appears offline on the interface (grayed-out), please contact Support or your Administrator.
- If there are errors in the agent logs (on the device) "C:\Program Files\Medulla\var\log\xmpp-agent-machine.log", please report them to Support or your Administrator.
Why are the inventory reports or reported information incomplete or incorrect?
- Make sure the MAC address of the device that is not reporting its inventory is not already in use. To check if a device is having trouble reporting its inventory, note that it is impossible to deploy to the device—even if it appears online on the interface (blue computer icon)—as the deployment icon for the device in the "Actions" menu will be grayed out.
GPO
Applies to:Medulla – Agent
Version: All
Environment: On-Premise / Private SaaS / Shared SaaS
Category: Medulla Agent
Deploying the Medulla Agent via GPO
What is the best method for deploying the Medulla agent on all computers in an Active Directory domain?
The recommended method is to use ascheduled task via Group Policy Preferences (GPP) with the"Apply once and do not reapply" option.
This method is:
- Compatible with any EXE file (no MSI required)
- Executed only once per workstation
- Run with SYSTEM (administrator) privileges
- Officially supported by Microsoft
- Reliable and avoids repeated reinstallations
How do you set up this method?
Step 1: Prepare the installation file
1. Copy the installer to an accessible network share: (Make sure the path is accessible to "Everyone" or "Domain Computers" with read permissions).
\\SERVER\DEPLOYMENT\Medulla-Agent-windows-FULL-latest.exe
Create a PowerShell script like this:
$SetupPath = "\\SERVER\DEPLOYMENT\Medulla-Agent-windows-FULL-latest.exe"
$Arguments = "/S"$ServiceName = "medullaagent"
$ServiceStatus = Get-Service -Name $ServiceName -ErrorAction SilentlyContinue
if ($ServiceStatus) {
Write-Output "The $ServiceName service already exists. Installation canceled."
Exit 0
}try {
Start-Process -FilePath $SetupPath -ArgumentList $Arguments -Wait -NoNewWindow -ErrorAction Stop
}
catch {
Write-Error "Installation error: $_"
Exit 1
}
2. Configure permissions on the share:
- Readfor the Domain Computers group
Step 2: Create the GPO
1. Open theGroup Policy Management console
2. Create a new GPO, for example: `Medulla Agent Deployment`
Step 3: Configure the scheduled task
1. Edit the GPO and navigate to:
Computer Configuration
→ Preferences
→ Control Panel
→ Scheduled Tasks
2. Right-click →New →One-time task (Windows 7 or later)
3. In the General tab :
- Name: `Install Medulla Agent`
- Account: SYSTEM
- Run with highest privileges
4. In theActionstab:
-
Action: Run a program.
-
Program/script:
powerhselle_install_path/powershell.exe -
Add arguments:
-ExecutionPolicy Bypass -File "\\Server\Share\YourScript.ps1"(Make sure the path is accessible by "Everyone" or "Domain Computers" for reading).
Step 4: Apply the GPO
1. Link the GPO tothe Organizational Unit (OU)containing your workstations
2. On a test workstation, run:
gpupdate /force
3. Restart the workstation or wait for the next policy update
Note: It is always mandatory for workstations to restart after installing the agent; the default GPO does not automatically restart the workstation. Therefore, keep in mind that each workstation must be restarted after installing the agent.
Why not use a startup or logon script?
Traditional scripts (Startup Script or Logon Script) have several drawbacks:
- Risk of multiple executions
- Complexity in detecting whether the installation has already been performed
- Permission issues depending on the execution context
- Less reliable than GPP scheduled tasks
The GPP scheduled task method resolves all these issues.
What does the "Apply once and do not reapply" option do?
This option ensures that:
- The task runsonly onceon each workstation
- Even if the GPO remains active for years, the installation does not run again
- No need for complex detection scripts
- No accidental reinstallation
This is equivalent to a "fire and forget" deployment.
With the "Apply once and do not reapply" option, it is essential to verify that the agent has installed correctly. If the installation failed during the process, it will not run again.
You can choose not to enable this option ( "Apply once and do not reapply") to prevent agent installation issues, but keep the IF section in the PowerShell script that checks whether the medullaagent service is present (by default, already included in the script above):
if ($ServiceStatus) {
Write-Output "The $ServiceName service already exists. Installation canceled."
Exit 0
}
How do you verify that the deployment worked?
On a client machine:
1. Verify that the scheduled task has been created:
Control Panel → Administrative Tools → Task Scheduler
Look for the task `Installation Agent Medulla`
2. Check the Medulla Agent installation logs
3. Verify that the workstation appears in the Medulla console
On the domain controller:
Use GPO reports to see which computers have applied the policy.
Can I use this method to update the agent?
By default, the agent updates itself automatically, but if not, yes, with a few caveats:
- If you create a new GPO with a new task name, it will run once on all workstations (if "Apply once" is enabled)
- If you change the EXE file path in an existing task with "Apply once," it will not run again ( that is the purpose of this option)
For updates, it is best to:
1. Create a new GPO with a new task name for each major version
2. Or use Medulla’s built-in update system
What are the prerequisites?
- An Active Directory domain controller (Windows Server 2008 R2 or later)
- A network share accessible for reading by the workstations
- The Medulla agent installer with silent installation option (`/S`)
- Permissions to create and link GPOs
How long does it take for all workstations to be deployed?
Deployment occurs as group policies are updated:
- By default: every90 minutes(with a random delay of 0 to 30 minutes)
- Upon workstation restart
- With `gpupdate /force` (immediate)
For a quick deployment across a fleet of 100 workstations, expect it to take about2 to 4 hours, depending on network traffic.
Run the installation after logging in
A GPO is typically run before the user logs in with SYSTEM privileges.
This can be inconvenient for the user, who may think their computer has frozen.
Solution 1: The "At logon" Scheduled Task
The user arrives at their desktop, and the installation launches silently in the background with SYSTEM privileges.
-
In your Computer GPO (not User), go to: Preferences > Control Panel Settings > Scheduled Tasks.
-
New > Scheduled Task (at least Windows 7).
-
General tab:
-
User account:
NT AUTHORITY\SYSTEM(or just typeSYSTEM). -
Check Run with maximum permissions.
-
-
Triggers tab:
-
New > At logon.
-
You can select "Any user".
-
-
Actions tab:
-
Program:
powershell_install_path/powershell.exe/powershell.exe -
Arguments:
-ExecutionPolicy Bypass -File "\\Server\Share\SCRIPT_POWERSHELL.ps1"
-
SCRIPT_POWERSHELL.PS1 corresponds to the script at the top of the page that allows you to install the agent silently.
Solution 2: The "Asynchronous" option
If you want to keep your current script (in "Startup Scripts") but just stop the "Please wait..." screen from appearing:
-
Go to the GPO: Computer Configuration > Administrative Templates > System > Scripts.
-
Look for the setting: Run startup scripts asynchronously.
-
Set it to Enabled.
Note: If you create a task with an "On login" trigger and check "Apply once and do not reapply, " the GPO will create the task once, butthe task itself will remain on the PC and continue to run at every login. So be sure to keep theIF conditionin the script that checks for the presence of the medullaagent service (already included by default in the script above):
if ($ServiceStatus) {
Write-Output "The $ServiceName service already exists. Installation canceled."
Exit 0
}
Additional Resources
- [Official Microsoft documentation on Group Policy Preferences](https://docs.microsoft.com/fr-fr/previous-versions/windows/it-pro/windows-server-2012-R2-and-2012/dn581922(v=ws.11))
- [Medulla deployment documentation](https://medulla-project.org/)
---
Created: December 2024
Author: Medulla Documentation
Version: 1.0
Reconfigure my agent
Applies to:Medulla – Agent
Version: All
Environment: On-Premise / Private SaaS / Shared SaaS
Category: Medulla Agent
You can reconfigure the agent to change the DNS name it uses to communicate, but it is also possible to modify several other settings.
Here is the agent's location on the server:/var/lib/pulse2/clients/
You will find a script named: generate-pulse-agent.sh. If you run it with the --help parameter, you will see all the configurable settings:
./generate-pulse-agent.sh --help
Usage:
./generate-pulse-agent.sh [--conf-xmppserver=<XMPP server configuration>]
[--conf-xmppport=<XMPP server port>]
[--conf-xmpppasswd=<XMPP server password>]
[--aes-key=<32-character AES PSK>]
[--xmpp-passwd=<XMPP server password>]
[--chat-domain=<XMPP domain>]
[--inventory-tag=<Tag added to the inventory>]
[--minimal [--base-url=<URL for downloading agent and dependencies from>]]
[--disable-vnc (Disable VNC Server)]
[--vnc-port=<Default port 5900>]
[--vnc-password=<DES-encrypted VNC password>]
[--ssh-port=<Default port 22>]
[--disable-rdp (Disable RDP setup)]
[--disable-inventory (Disable Fusion Inventory)]
[--disable-geoloc (Disable geolocation, for example on machines that do not access the internet)]
[--linux-distros (Supported Linux distributions)]
[--updateserver (Download URL for agent updates)]
Examples:
XMPP Server
To reconfigure the machine's contact DNS entry (the server the machine must contact):
./generate-pulse-agent.sh --conf-xmppserver monserver.domain.fr
SSH Port
To change the server's SSH contact port:
./generate-pulse-agent.sh --ssh-port 2022
If you change the SSH port, also follow this documentation:
https://docs.medulla-tech.io/books/medulla-faq/draft/497
Disable VNC
To disable VNC on your agents:
./generate-pulse-agent.sh --disable-vnc
Disable RDP
To disable RDP on your agents:
./generate-pulse-agent.sh --disable-rdp
Generate Windows and Linux agents
Applies to: Medulla – Agents
Version: All
Environment: On-Premise / Private SaaS / Shared SaaS
Category: Agents / Support
Before generating agents for your Windows or Linux workstations, it is important to define your attachment strategy in GLPI:
- Either one agent per GLPI entity,
- Or a global agent, which will report all machines to the parent entity.
Generate an agent per entity
To generate a separate agent per GLPI entity:
generate_medulla_agent.sh all force
Then verify that each entity has its own agent:
ls /var/lib/pulse2/medulla_agent/*
Each entity is associated with a tag. You will find a directory for each tag containing the corresponding agents.
Generate a global agent
To generate a single agent per operating system (linked to the parent GLPI entity):
/var/lib/pulse2/clients/generate-pulse-agent.sh
Then verify the presence of the agents:
ls /var/lib/pulse2/clients/win/ls /var/lib/pulse2/clients/lin/
Generate an agent without GLPI inventory
This option requires Medulla and the agent version 5.5.2 or higher.
/var/lib/pulse2/clients/generate-pulse-agent.sh --disable-inventory
Managing entities with a global agent
If you are using a global agent but want to distribute machines across different GLPI entities, two options are available:
- Manually move the machines in GLPI,
- Set up automatic rules in GLPI (by subnet, name, or other criteria).
Agents for the MINT Linux distribution
Applies to:Medulla – Agent
Version: lower than 5.5.1
Environment: On-Premise / Private SaaS / Shared SaaS
Category: Medulla Agent
In version 5.5.1 of Medulla, support for the Linux Mint distribution will be native.
For versions prior to 5.5.1, to install the Medulla agent on the Linux Mint distribution, simply follow the steps below.
All commands must be entered as root.
To do this, type: once logged into your user account. Alternatively, add `sudo` before each command.
sudo su - You will be prompted for a password; enter it.
Download the agent installation script from your Linux machine
wget https://serveur/downloads/lin/Medulla-Agent-linux-MINIMAL-latest.shType the following commands:
chmod u+x Medulla-Agent-linux-MINIMAL-latest.shModify the script by adding the linuxmint section in the following locations:
Lines 50-51:
case "$DISTRO" in
debian|ubuntu|zorin)
Modify the line by adding |linuxmint after zorin.
case "$DISTRO" in
debian|ubuntu|zorin|linuxmint)Then
Lines 215-216
case "$DISTRO" in
ubuntu|zorin)
Edit the line by adding |linuxmint after zorin
case "$DISTRO" in
ubuntu|zorin|linuxmint) Add the following command after line 63:
apt updateSave your script.
Run the command to execute the installation script:
./Medulla-Agent-linux-MINIMAL-latest.shThe installation will proceed, and the following result will appear on your machine.

Uninstalling the Medulla Agent (Versions prior to 5.5.2)
Applies to: Medulla – Agent
Version: lower than 5.5.2
Environment: On-Premise / Private SaaS / Shared SaaS
Category: Medulla Agent
To uninstall the Medulla agent:
Then go to the left-hand menu in Settings and click on Apps:
Scroll down through your apps to find the Medulla Agent entry.
Click on  A drop-down menu opens with Edit / Uninstall.
Click on Uninstall
You will be asked to confirm; click the Uninstall button again
The Medulla Agent will uninstall its components via an executable that will appear on your screen:
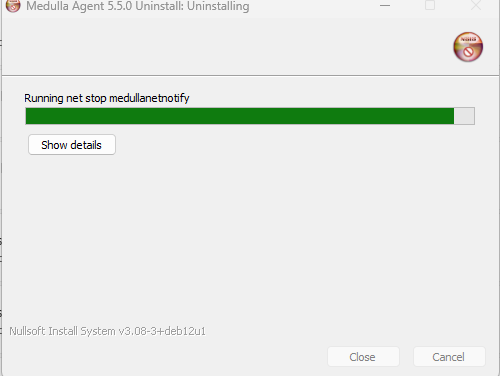
Once uninstallation is complete, click the Close button
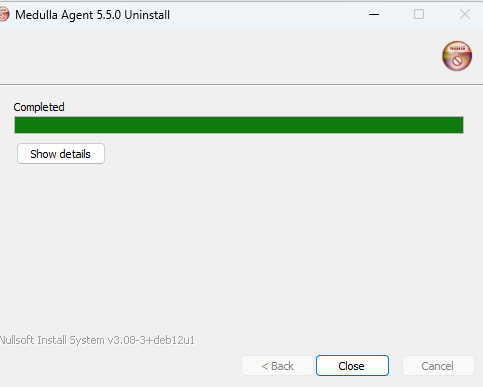

These are two registry entries. To remove them:
Return to the Windows Start menu.
Type " regedit " in the search bar and press Enter
Navigate down the tree:
HKEY_LOCAL_MACHINE\SOFTWARE\Microsoft\Windows\CurrentVersion\Uninstall
Look for the first registry key, "Medulla Extract Drivers." Right-click on the folder icon for this key, click "Delete," and then confirm.

Do the same for "Medulla Update Info."
Uninstalling Medulla Agent Version 5.5.2 and later
Applies to:Medulla – Agent
Version: 5.5.2 and later
Environment: On-Premise / Private SaaS / Shared SaaS
Category: Medulla Agent
Windows:
A script is available on your Medulla server:
https://votreserveur/downloads/win/uninstall-medulla-agent-windows.ps1
Open a PowerShell console with administrator privileges. Make sure PowerShell is configured to run scripts:
Set-ExecutionPolicy RemoteSigned -Scope CurrentUserAnswer [A] "Yes to all"
- Download the uninstall-medulla-agent-windows.ps1script to the machine.
- Run the script depending on the scenario you want to handle:
- Uninstall only the agent and its Medulla dependencies.
.\uninstall-medulla-agent.ps1 - Uninstall the agent and glpi-agent
.\uninstall-medulla-agent.ps1 -RemoveGLPI:$true- Uninstall the agent, GLPI, and TightVNC
.\uninstall-medulla-agent.ps1 -RemoveGLPI:$true -RemoveTightVNC:$true- Uninstall the agent, glpi-agent, tightvnc, and Python
.\uninstall-medulla-agent.ps1 -RemovePython:$true -RemoveGLPI:$true -RemoveTightVNC:$trueA -SILENT option is available, which allows you to run the uninstallation in silent mode in each case.
Linux:
A script is available on your Medulla server:
https://votreserveur/downloads/win/uninstall-medulla-agent-linux.sh
The script runs as root or via the sudo command:
Type the following commands:
wget https://votreserveur/downloads/win/uninstall-medulla-agent-linux.sh
chmod u+x uninstall-medulla-agent-linux.sh./uninstall-medulla-agent-linux.sh./uninstall-medulla-agent-linux.sh --remove-python./uninstall-medulla-agent-linux.sh --remove-glpi./uninstall-medulla-agent-linux.sh --remove-python --remove-glpiFAQ - Medulla Infrastructure
Architecture and Deployment of Medulla Relay Servers
Relay servers are local components designed to optimize resource distribution and communication between agents and the mainMedulla server.
1. The Classic Relay (LAN / Private Network)
The classic relay is installed within the company network. Its purpose is to serve as a local "cache" and distribution point for agents located on the same site or network segment.
-
Function: Bandwidth optimization and image deployment (Imaging).
-
Location: Remote site, behind a router or an inter-site link.
2. The DMZ Relay (Public Exposure)
The DMZ relay is a secure gateway between the Internet and the main Medulla server.
-
Function: Enables the management of mobile workstations (teleworking, travel) without directly exposing the main server to the Internet.
-
Location: Demilitarized Zone (DMZ), accessible via a public IP address or an external domain name.
-
Note: It does not support remote imaging (mastering) via the Internet.
3. Sizing (Technical Specifications)
The hardware requirements are identical for both roles, but their software functions will differ during configuration.
A. Relay Server(s) (LAN)
| Component | Recommended Specification |
| OS | Debian 12.x |
| Architecture | x86-64 |
| CPU | 4 cores |
| RAM | 8 GB |
| Partition / | 20 GB (EXT4) |
| /var partition | ≥ 400 GB (XFS) or mount point on array |
B. DMZ Relay Server (Mobile Workstations)
| Component | Recommended specification |
| OS | Debian 12.x |
| Architecture | x86-64 |
| CPU | 4 cores |
| RAM | 8 GB |
| Partition / | 20 GB (EXT4) |
| /var partition | ≥ 200 GB (XFS) or mount point on array |
4. Decision Summary
This table helps you determine which type of server to deploy based on your situation:
| Condition | Required Relay Type | Main reason |
| Fleet > 5,000 workstations on the same network | Classic Relay (LAN) | Reduction of CPU/RAM load on the main Medulla server. |
| Remote site (Different network without a transparent LAN connection) | Classic Relay (LAN) | Enable local imaging and save WAN bandwidth. |
| Mobile workstations (Remote work, outside the private network, without VPN) | DMZ Relay | Ensure secure agent communication over the Internet. |
| Interconnected sites (High-speed private connection, authorized LAN traffic) | None (Optional) | The main server can manage the entire system, including imaging. |
Procedure for adding relays to Medulla Dedicated SaaS
1. Setting up the server
Required settings:
- OS: Debian 12.x
- Architecture: x86-64
- CPU: 4 vCPUs
- RAM: 8 GB
- Storage
- /: 20 GB – EXT4
- /var: ≥ 400 GB – XFS (Or a dedicated mount point on an external array/volume)
2. Creating a user
Create the user "medulla" and grant them sudo privileges.
3. Installing the SSH key
The SSH public key provided as an attachment must be added to:
/home/medulla/.ssh/authorized_keys
4. Opening network ports
Traffic must be allowed in both directions between:
- Medulla Server
- Relay (your server)
4.1. Medulla Server → Relay Traffic
Port | Description
- 5269 | TCP / XMXPP
- 22 | TCP / SSH
- 22000 | TCP / Syncthing
- 8081 | TCP / HTTP(S)
- 9990 | TCP / XML RPC HTTPS
4.2. Relay Stream → Medulla Server
Port | Description
- 5269 | TCP / XMXPP
- 22 | TCP / SSH
- 22000 | TCP / Syncthing
- 8443 | TCP / HTTPS
- 22067 | TCP / BEP-Relay/TLS
- 9999 | TCP / XML RPC/HTTPS
- 7080 | TCP / XML RPC/HTTPS
5. Information to Provide
The team must provide us with:
- Create the entity you wish to dedicate to the relay in ITSM (only if you want an entity different from the parent entity).
- Confirmation that the above network ports have been opened.
- Confirmation that the SSH key has been added to the relay server.
- The password for the "medulla" user with passwordless sudo privileges.
- The FQDN of your relay server
6. Continuation of the installation
Once the machine is ready, we will perform the full software installation via Ansible.
A Medulla agent will be automatically generated to connect the workstations to this relay.
Medulla Update - 5.4.x to 5.5.x
Medulla / 5.4.x / Updating Medulla to 5.5.x / Medulla Maintenance
To update from version 5.4.x to 5.5.x and higher, please follow the steps below:
Download the file to the Medulla server:
curl https://dl.medulla-tech.io/up/update_medulla.shGrant execution permissions to the script:
chmod +x update_medulla.shRun the update:
./update_medulla.shOnce the procedure is complete, return to the Medulla interface.
All commands must be run as root or with an account that has administrator privileges.
Support Extranet
If you would like to create a support account for yourself or one of your employees after subscribing to a Medulla support contract, it’s easy—just go to https://extranet.medulla-tech.io/portal/
Click on "Forgot your password?" and enter your email address and username (First Name + Last Name).
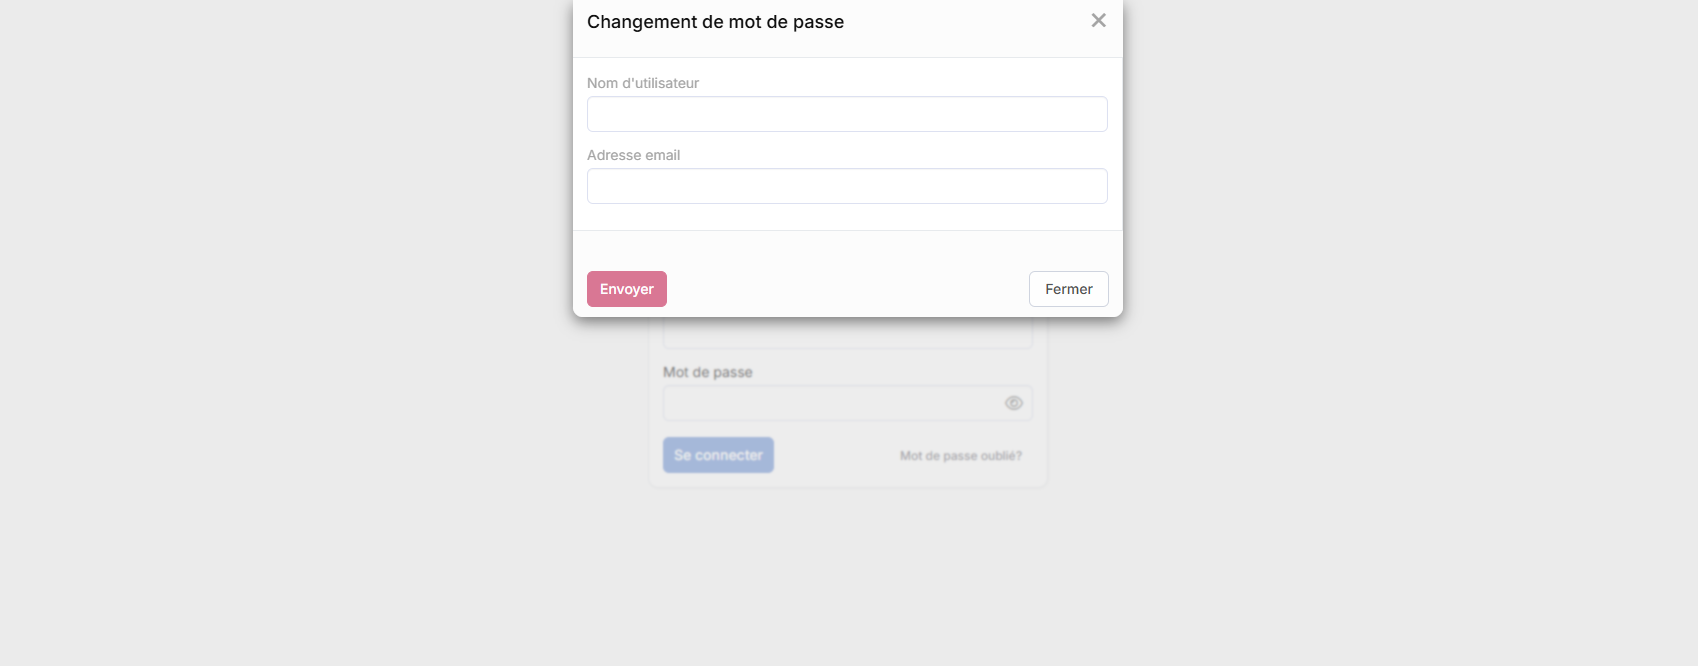
Fail2ban
What is Fail2Ban?
Fail2Ban is an intrusion prevention tool that monitors suspicious login attempts in system logs and can be deployed on your on-premises infrastructure.
What exactly does it block?
Fail2Ban primarily protects against "brute force" attacks.
To determine if an activity is malicious, Fail2Ban analyzes login attempts and identifies specific patterns. Here are the common errors that trigger an alert and a ban:
-
-
Invalid user: Someone is trying to log in with random usernames (e.g.,admin,root,test,guest). This is a typical sign of a bot testing username dictionaries. -
Wrong password: A known user exists, but the entered password is incorrect. Too many attempts indicate a brute-force attack. -
Authentication failure: A general error that occurs when the credentials provided do not match anything in the server’s secure database. -
Failed public key authentication: Even if you use security keys (which are more secure than passwords), Fail2Ban blocks those who repeatedly attempt to present unauthorized keys.
-
If an IP address generates 5 failures within a 10-minute window, it is banned for 10 minutes
Debian OS installation for Medulla server
Technical Specifications
|
Prerequisites – Server Sizing |
||
|
Main Server |
OS |
Debian 12.x |
|
Architecture |
x86-64 |
|
|
CPU |
8 cores |
|
|
RAM |
8 GB |
|
|
Partition / |
20 GB in EXT4 |
|
|
/var partition |
400 GB minimum in XFS or mount point on a storage array |
|
|
Multi-site relay servers (if applicable) |
OS |
Debian 12.x |
|
Architecture |
x86-64 |
|
|
CPU |
4 cores |
|
|
RAM |
8 GB |
|
|
Partition / |
20 GB in EXT4 |
|
|
/var partition |
At least 400 GB in XFS or mount point on a storage array |
|
Debian Server Installation
Summary:
- Separate only /var from / and place them in LVM
- Install the SSH server and standard system utilities
- Do not install antivirus software or a firewall
- Set up an account that
o can switch to sudo without a password
o can log in from the IP address 94.130.207.190
o can log in with the following key:
ssh-rsa AAAAB3NzaC1yc2EAAAADAQABAAABgQCScgwfwJKM5BtgzAYu6FEeJ5jW3onkzFp8D8piLR22kWbRcT/AJ1z0jhS5ZDtn6mumfidVPFbLkDf382u54pOU6JGwy9GhvEIXOSlzgxZMH5kcfeBE/8Ovr9zLtbRKsWQN9YUSt5y6lmcSxuQNVhkRy49/593oamVJACSitSVJ68716hj0gp4N8gUMVkvNgEBDZVSPe0DXz2h7JEzOKx2ejjRaw22ve+qARTw+60gMP0aCLGt/m0cyv+90AZigQwWIPcUk+bBRJn3Ku+Bkw+JuLYURlVc4xoTvT1JTWKXAzMln4nrlisIc9Ex5eEHSkvs/fgJCgU28Fza5n5mBj/pbQRY+/AWLjvBVuLiVReO7hq60fhrX9+j7MWMCYCZQiHbk/r7OprLyl2yGFX1DbgRGF1Sk2R9DtqRhwPzPxtQ7ZtKSjIhLjrZxJ/YJLHSoUsw+4CHprjzU0gXBt1RCQoyhYqEGcnuFyfd9dIBXCINkmp4jfz7CQjrC8uPqAtS1zQU= support@support
Disk Partitioning Configuration
Partition the disks according to the instructions below:
Perform manual partitioning


Creating the /boot partition


Creating the LVM


Creating the vg volume group


Create the logical volume lvroot


Repeat for the lvswap and lvvar volumes


To obtain the following LVM layout:


Configure the / partition


Repeat for each of the swap and /var partitions:


To obtain the following partitioning scheme:

Installing packages

Server verification
1. Download the verification script from https://dl.medulla-tech.io/nc/check_server_before_install.sh
wget https://dl.medulla-tech.io/nc/check_server_before_install.sh2. Run the following commands:
chmod +x check_server_before_install.sh
./check_server_before_install.sh3.
All script tests must pass. Once completed, you can request the installation script via the contact form:
https://github.com/medulla-tech/medulla/blob/master/README.fr.md
If you have a support contract, please send the results to delivery@medulla-tech.io. If not, please contact the "Sales" department via our websitemedulla-tech.io.
Here are the most common errors:
1. Core Dump Limits
Context: The file /etc/security/limits.d/10-coredump-debian.conf defines the maximum size of "core dump" files. Our script expects specific values that do not match the current configuration.
How to fix: Edit the file mentioned to match the requirements.
-
Open the file:
sudo nano /etc/security/limits.d/10-coredump-debian.conf -
Adjust the lines so they look like this:
-
* hard core infinity -
root hard core infinity -
* soft core 0 -
root soft core 0
-
Suggested sources: Debian documentation on limits.conf and core dump.
2. Number of open files (lsof)
Context: The lsof lines for users xxx and messagebus indicate that the number of currently open files deviates from the value expected by the verification script (often because services are already running or are misconfigured).
How to fix: This is often informative, but if you need to reduce these numbers:
-
Identify what these users are doing:
ps -u user_id_in_error. -
Restart the associated services (e.g.,
sudo systemctl restart dbusfor messagebus). -
If the expected values are too strict for your use case, you may need to adjust the validation script itself or the global
ulimitsettings.
Suggested sources: lsof manual and file descriptor management in Linux.
3. systemd settings (NPROC and SIGPENDING)
Context: The DefaultLimitNPROC (maximum number of processes) and DefaultLimitSIGPENDING (pending signals) values must be31541.
How to fix: You must force these values in the global systemd configuration so that they match the expected values exactly.
-
Edit the configuration file:
sudo nano /etc/systemd/system.conf -
Uncomment or add the following lines:
-
DefaultLimitNPROC=31541 -
DefaultLimitSIGPENDING=31541
-
-
Reload the configuration and reboot (or use
systemctl daemon-reexec).
Suggested sources: systemd-system.conf documentation on freedesktop.org.
Verify that inventory data is being properly uploaded to Medulla
Please run:
dir c:\progra~1\medulla\tmp\inventory.txt*
If the inventory is not generated automatically, please run:
"c:\progra~1\GLPI-Agent\glpi-agent.bat" --config=none --scan-profiles --backend-collect-timeout=120 --local="c:\progra~1\Medulla\tmp\inventory.txt"
=> Either you figure out how to resolve the error, or you send the command output tosupport@medulla-tech.io
Please run:
curl $(crudini --get /etc/pulse-xmpp-agent-substitute/agent_master_substitute_inv.ini.local glpi url_to_forward)
=> Either you figure out how to resolve the error, or you send the command output tosupport@medulla-tech.io
Please run the following (replacing the name if necessary):
mysql --defaults-group-suffix=itsm glpi -e "SELECT * FROM glpi_computers WHERE name='CLIENT_WORKSTATION_NAME'\G"
=> From Medulla, force an inventory request from the Computers view > Quick Action > Run Inventory for the machine in question
Please run:
mysql --defaults-group-suffix=medulla xmppmaster -e "SELECT jid, hostname, id_glpi, enabled FROM machines WHERE hostname='CLIENT_WORKSTATION_NAME'\G"
=> From Medulla, force a re-registration of the machine via Computers > Quick Action > Custom command > Reconfigure machine agent
=> If the issue is still not resolved, send the output of all commands tosupport@medulla-tech.io
Remote Access Verification
Workflow

Logs
- /var/log/apache2/*.log
- /var/log/mmc/mmc-agent.log
- /var/log/pulse/xmpp-agent-relay.log
- /var/log/mmc/master-mast.log
- C:\Program Files\Medulla\var\log\xmpp-agent-machine.log
- /var/log/tomcat9/*.log
- /var/log/tomcat9/*.txt
- journalctl -u guacd -f
Debugging operations
- List the Guacamole connections recorded for a machine:
USE xmppmaster;
SELECT jid,
hostname,
machine_id,
idguacamole,
protocol
FROM machines
JOIN has_guacamole
ON machines.id = has_guacamole.machine_id
WHERE jid like '%machine_name%';
If there is still no connection after re-registration, verify that the protocols are enabled on the machine (VNC running, RDP enabled, OpenSSH daemon running).
- Display connection details (performed on the machine's relay)
USE guacamole;
SELECT guacamole_connection.protocol as protocol,
guacamole_connection.connection_id as connection_id,
parameter_name,
parameter_value
FROM guacamole_connection_parameter
JOIN guacamole_connection
ON guacamole_connection_parameter.connection_id = guacamole_connection.connection_id
where guacamole_connection.connection_id = 6084964;
+----------+---------------+-----------------+-----------------+ | protocol | connection_id | parameter_name | parameter_value | +----------+---------------+-----------------+-----------------+ | vnc | 6084964 | color-depth | 24 | | vnc | 6084964 | hostname | localhost | | vnc | 6084964 | listen-timeout | 50000 | | vnc | 6084964 | port | 47749 | | vnc | 6084964 | reverse-connect | true | +----------+---------------+-----------------+-----------------+
- Verifying the reverse connection
netstat -vatpn | grep <port>
SUPPORT - Reverse SSH - Support
- VNC Debugging
netstat -an | find "5500"
On the client machine, verify that reverse SSH is set up correctly:
netstat | find "ssh"
netstat -vatpn | grep sshd
The GUACD port on the server is then redirected to port 5500 in the tunnel. This redirection occurs when the reverse connection is established.
See the reverse SSH debug section above
On the relay, verify that guacd is listening on the port specified by the guacamole settings (here 54775):
netstat -vatpn |grep guacd
Reverse SSH Verification
Logs
- /var/log/pulse/xmpp-agent-relay.log
- /var/log/mmc/master-mast.log
- C:\Program Files\Medulla\var\log\xmpp-agent-machine.log
Debugging operations
- Linux: /var/lib/pulse2/reversessh.sh
- Windows: c:\Program Files\Medulla\bin\reversessh.ps1
/usr/bin/ssh -t -t -R 51891:localhost:22 -o StrictHostKeyChecking=no -i "/var/li b/pulse2/.ssh/id_rsa" -l reversessh 192.168.2.15 -p 22
sc stop sshdaemon
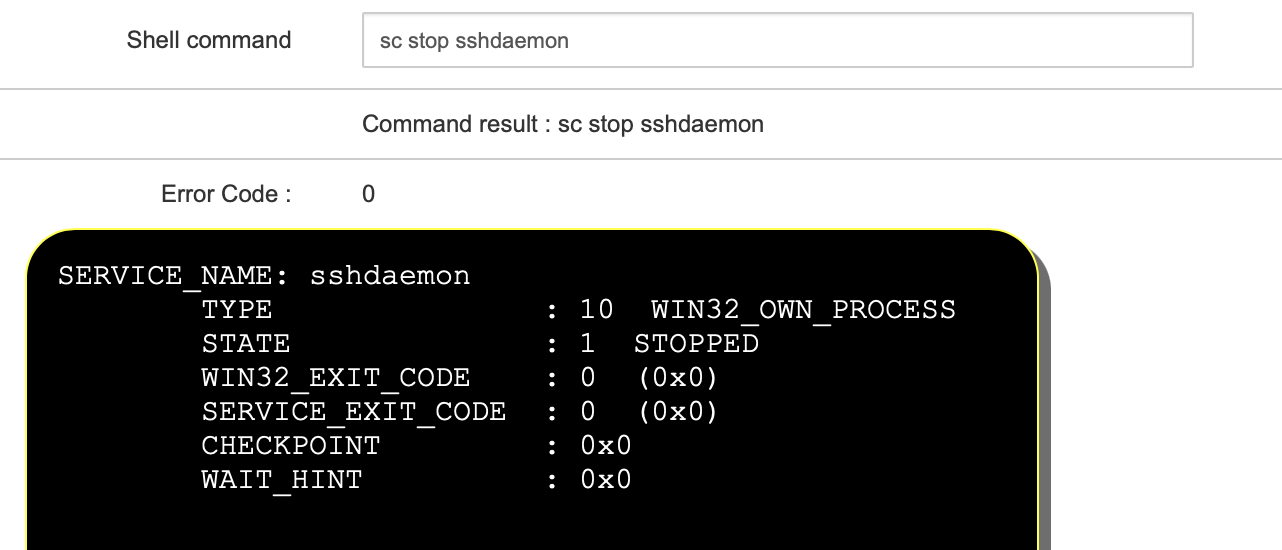
Start a deployment. In the audit view, the result of the reverse SSH connection will be displayed:
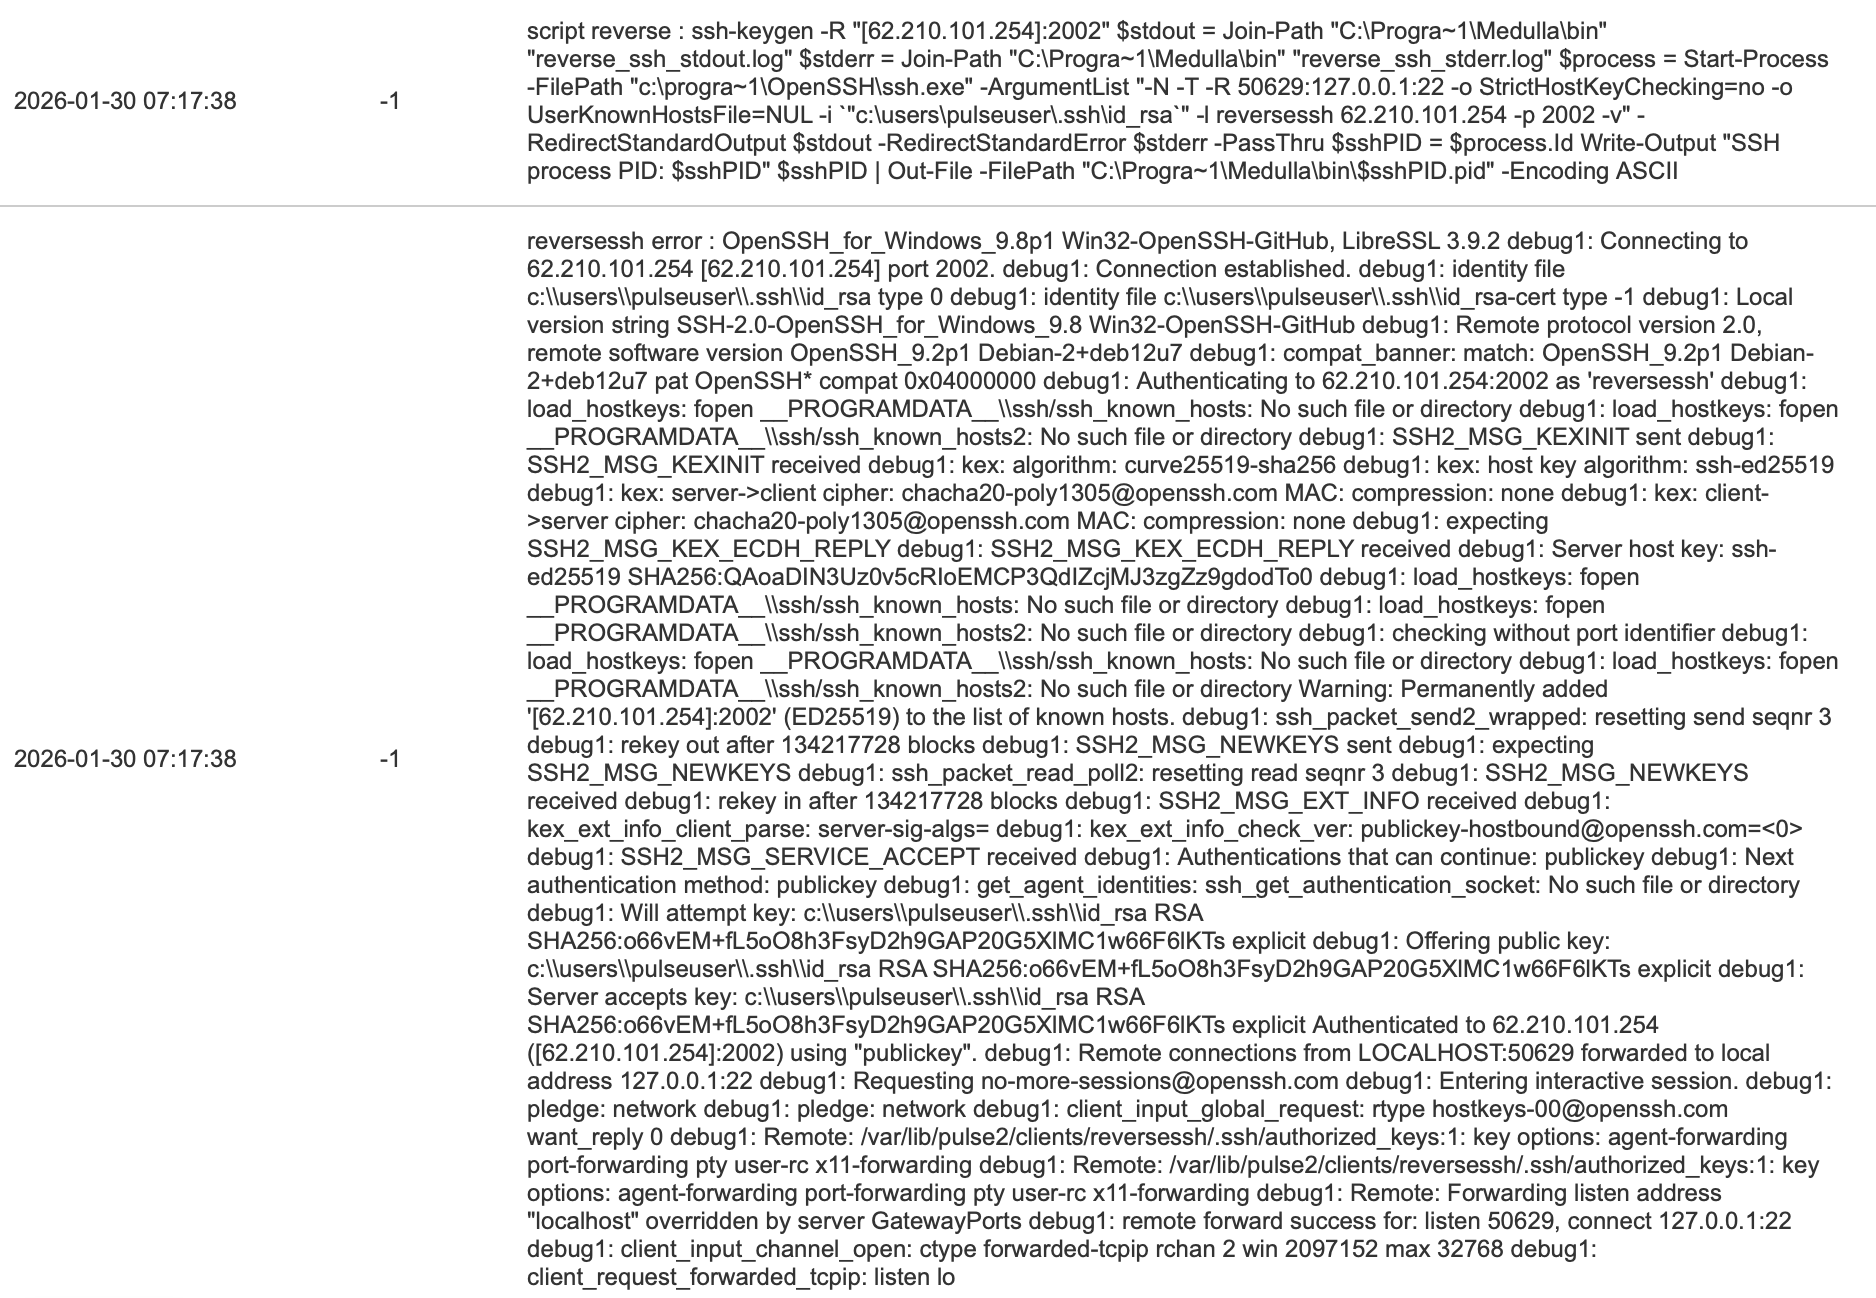
If the tunnel does not establish, it is either a port issue or a key issue
#!/bin/bash echo "port $1" echo "reverse exists" netstat -an | egrep "tcp.*:$1.*LISTEN" echo "reverse in use" netstat -an | egrep "tcp.*:$1.*ESTABLISHED" echo "reverse PID" lsof -t -i :$1 -s tcp:LISTEN
ps aux | grep ssh
reverse+ 2280 0.0 0.0 95184 3868 ? S 15:26 0:00 sshd: reversessh@pts/7
on Windows:
tasklist | findstr ssh
Imaging - Davos Debug
From here, there are two options: Local connection or SSH
Local connection:
# in the Davos console sudo su dpkg-reconfigure keyboard-configuration systemctl restart keyboard-setup python3
SSH connection:
First, retrieve the machine's IP address, then from the relay server:
ssh user@<IP>
sudo su python3
- To register the machine:
from davos import davosManager from davos.inventory import Inventory davos = davosManager() inv = Inventory(davos) # # Enter the hostname in the input # this will send the XML to pulse2-register-pxe
print("mac address: {}".format(inv.macaddress))
print("ip address: {}".format(inv.ipaddress))
print("netmask: {}".format(inv.netmask))
print("disk : {}".format(inv.disk))
# The inventory (unmodified) is located in: less /tmp/inventory.xml # There must be a missing / between tmp and macaddress, causing the file to be generated in / /tmp<macaddress.xml
- To debug the backup
from davos import davosManager from davos.image_saver import imageSaver davos = davosManager() saver = imageSaver(davos) saver.start()
saver.imaging_api.imageDone(saver.manager.mac, saver.image_uuid)
- To debug the restore:
from davos import davosManager from davos.image_restorer import imageRestorer davos = davosManager() img = imageRestorer(davos, "unicast")
img.start()
img.run_postimaging()
/var/log/davos.log
/var/log/davos_restorer.logThe post-install logs are located in:
/tmp/postinst.xxx.logPostinstalls are located in /imaging_server/masters/<master_uuid>/postinst.d/
The master UUID can be retrieved from the imaging.Image table in the database.
Imaging - Debug
Set tftp to verbose mode:
In /etc/default/tftpd-hpa, add -v to the TFTP_OPTIONS parameter and restart the tftpd-hpa service
In the tftp logs (/var/log/syslog or journalctl --unit tftpd-hpa --follow), look for these lines:
in.tftpd[491332]: RRQ from 10.104.108.113 filename bootloader-uefi64/ipxe.efi in.tftpd[491333]: RRQ from 10.104.108.113 filename bootloader-uefi64/autoexec.ipxe
To debug TFTP, capture the frames:
tcpdump -s 0 host <CLIENT_IP> and udp
tftp <SERVER_IP> get bootloader-uefi64/ipxe.efi
2. Retrieving the boot menu
In the Apache logs, locate this line:
"GET /mmc/imaging/bootmenu.php?mac=54:bf:64:5c:77:25&uuid=4c4c4544-0057-3210-8053-c4c04f4b5132&srv=10.104.1.20 HTTP/1.1" 200 3717 "-" "iPXE/1.21.1+ (gdd35 )"
3. Davos Recovery
In the Apache logs, look for these lines:
"GET /downloads/davos/ipxe.png HTTP/1.1" 404 489 "-" "iPXE/1.21.1+ (gdd35)" "GET /downloads/davos/vmlinuz HTTP/1.1" 200 15403668 "-" "iPXE/1.21.1+ (gdd35)" "GET /downloads/davos/initrd.img HTTP/1.1" 200 64921280 "-" "iPXE/1.21.1+ (gdd35)" "GET /downloads/davos/fs.squashfs HTTP/1.1" 200 1041178859 "-" "Wget"
Once these steps have been verified, refer to "Debugging Davos"
in.tftpd[357001]: tftp: client does not accept optionsIf this line appears, restart your tftpd-hpa service
systemctl restart tftpd-hpaIf the problem persists, check for a phantom tftpd-hpa service and restart your server. Then restart the tftpd-hpa service again.
Guacamole - Debug
Debug Guacamole
Done:
journalctl -u tomcat9 -f
Check for the following line:
[http-nio-8081-exec-9] WARN o.a.g.r.auth.AuthenticationService - Authentication attempt from [10.48.2 50.43, 127.0.0.1] for user "root" failed.
If it is present:
systemctl restart tomcat9 journalctl -u tomcat9 -f
Check for the following line:
ERROR o.a.g.extension.ExtensionModule - Extension "guacamole-auth-jdbc-mysql-1.5.4.jar" could not be loaded: Unable to read contents of directory /etc/guacamole/lib
If present:
chmod 755 /etc/guacamole/lib/
Optimizing connection time for phone setup.
To reduce connection time when setting up remote workstations:
Check the following:
- The ssh executable (C:\Program Files\OpenSSH\ssh.exe) is excluded from real-time scanning by your antivirus and EDR software
- The medulla executable (C:\Program Files\Python3\medulla.exe) is excluded from real-time scanning by your antivirus and EDR
- Outgoing XMPP traffic from clients (to port 5222 on the server) and its corresponding incoming traffic are excluded from firewall packet analysis (do not forget the client machine’s firewall)
- Outgoing SSH traffic from clients (to port 22 or 2002 on the server) and its incoming counterpart are excluded from firewall packet analysis (don’t forget the client machine’s firewall)
Once the previous points have been verified, if the reverse SSH connection takes less than 30 seconds to establish, the timeout can be reduced.
This change is made in the /etc/mmc/mmc.ini.local file .
You should add a guacamole section and set the reversessh_timeout parameter (in seconds).
Example to set the timeout to 20 seconds:
[guacamole]
reversessh_timeout = 20You must then restart the mmc-agent service:
systemctl restart mmc-agentThis setting is available in version 5.5.1 or later.
Duplicate MAC Addresses
If you encounter an issue with certain components installed on your computer, such as Fortinet, that assign the same MAC address to all machines, this causes a problem in Medulla where the machines do not register in the correct entities and are reported in GLPI with a UUID that already exists for another machine:
In the file /etc/pulse-xmpp-agent-substitute/registeryagent.ini.local
add the following section and information, ensuring you use the correct case.
[parameters]
blacklisted_mac_addresses = 00\:00\:00\:00\:00\:00, 00\:09\:0f\:aa\:00\:01In /etc/pulse-xmpp-agent-substitute/registeryagent.ini.local, add the MAC addresses to be blacklisted
00\:00\:00\:00\:00\:00 must be present
Colons must be escaped, and addresses must be separated by commas