Chapter 13: Admin
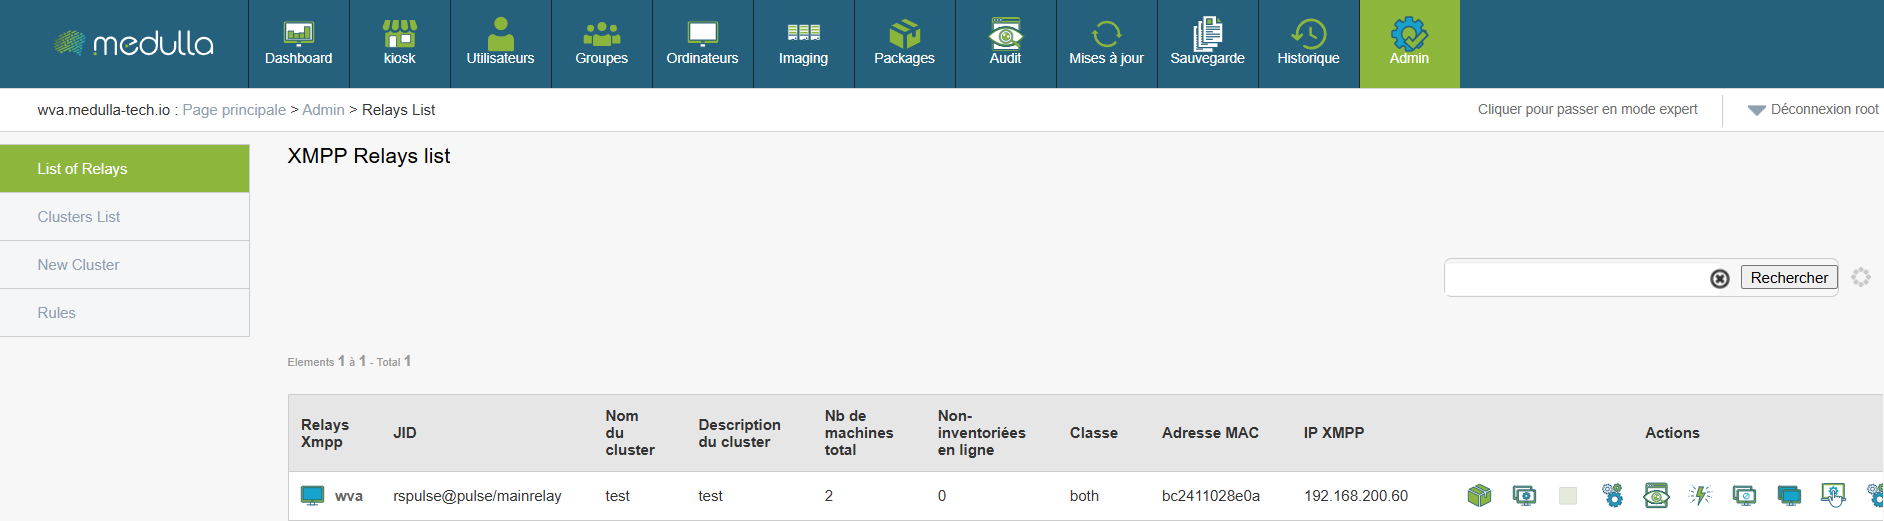
List of XMPP relays
TheXMPP relay are communication points between the different machines in your network.
Why is it useful:
This allows you to see all active connections and understand how machines communicate with each other.
Steps:
Tip:
You can search a relay by typing a keyword in the search bar at the top of the list.
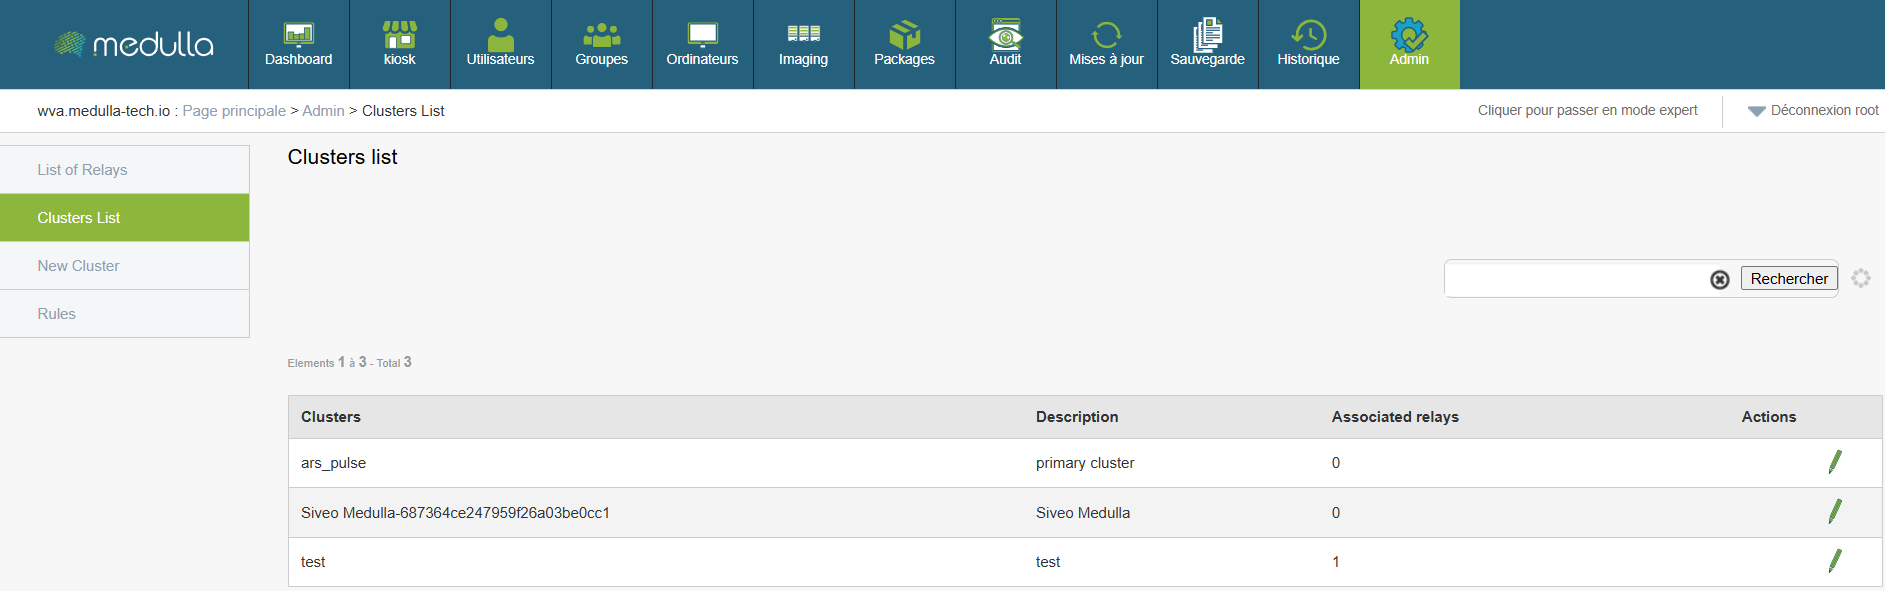
Cluster List
Onecluster, it is a group of relays that are grouped together to organize the network more logically.
Why is it useful:
This helps you better manage your network, especially if you have different environments (e.g. testing, production, etc.).
Steps:
-
Go to the section .
-
You will see a list with:
-
The name of cluster
-
Its Description
-
The type (private or public)
-
The relay Associated
-
Example:
A cluster named Public can contain all shared public relays.
By clicking on the pencil in Actions, you can edit the Cluster by following the following steps:
- Choose a cluster name
- Select text for description
- Select external relays to the cluster to put in the cluster and vice versa
- Validate

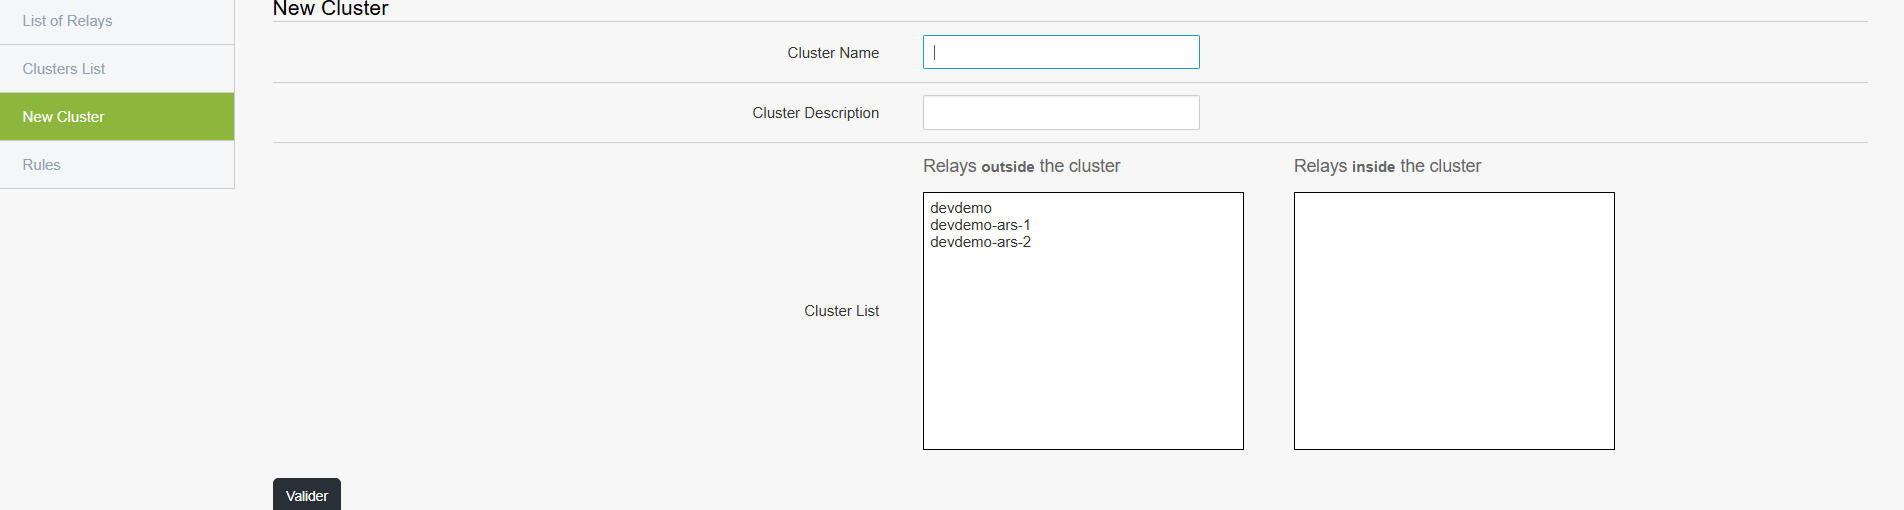
Create a cluster
Create acluster allows you to better organize your relays according to your needs (e.g. separate tests from production). This is exactly the same form as the editing form.
Steps:
Click New Cluster in the menu.
Press the button Add a new cluster.
Fill in the fields:
Name of the cluster (e.g. "TestCluster")
Description (e.g. "Cluster for test relays")
Choose the relays you want to associate with (a list displays).
Click to record.
Managing Rules (Rules)
Therules allow you to automate certain actions or behaviors of the network.

Why is it useful:
This can, for example, initiate automatic verification or apply specific parameters under defined conditions.
Steps:
Click "Rules" in the menu.
On the page you can:
Change order of priority existing rules by pressing the arrow that points down to decrease it or the one that points up to increase it.


Add new rule according to your needs

- See detail a rule


When clicking on the logo plus to add a new rule, you can access the following form:
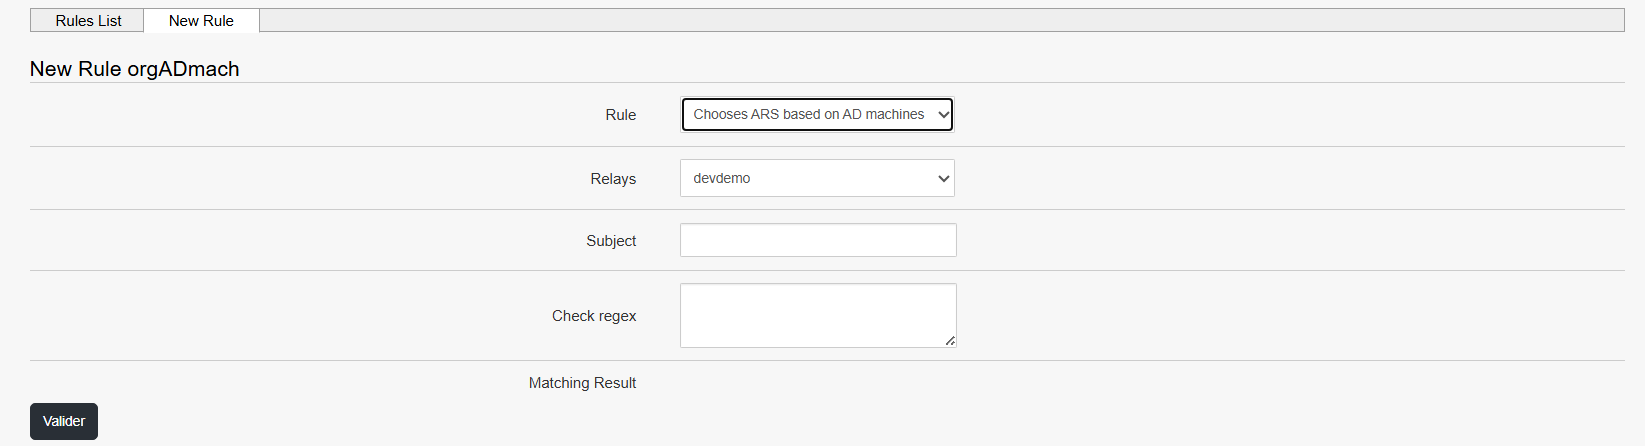
Fill the fields one by one:
- Choose the rule
- Choose your relay (Relays)
- Describe the subject
- Write the regex to check
- Validate
Even without being technical, you can ask an administrator what rules are recommended for your environment.
Quick action

Each XMPP relay has a set ofrapid action which allow direct interaction with the machines it manages. These actions are accessible from the list of relays and are designed to simplify the day-to-day operations of administration, diagnosis or configuration, without requiring advanced technical knowledge.
Here is a detailed overview of each action, its usefulness and the procedure for using it.
1. See the list of installed packages
Objective
View software installed on machines attached to a relay.
Procedure

Click on the button "List of packages" to the right of the relay concerned.
A window opens displaying installed software, with its name and version.
When to use
To verify the presence of a program.
To control deployed software versions.
2. Reconfigure relay related machines
Objective
Automatically reapply the active configuration to the machines attached to the relay.
Procedure

Click "Reconfigure".
Confirm the action if validation is requested.
The machines are again given the current configuration.
When to use
After changing the settings, rules or configuration files.
If a machine appears to be unsynchronised or non-compliant.
3. Change the relay of one or more machines (Switch function)
Objective
Move one or more machines from one relay to another.
Procedure

Click Switch to the right of the original relay.
Select the moving machines.
Choose the destination relay.
Validate to apply the change.
When to use
In case of maintenance or removal of a relay.
During a reorganization of the network architecture.
4. Edit Configuration Files
Objective
Manually modify the configuration files of a relay or its machines.
Procedure

Click "Edit configuration files" (first working image)
An editing interface opens.
Make the necessary changes.
Save the changes.
When to use
To adjust a specific configuration to a specific need.
During a test or manual procedure.
Note This operation acts directly on the system. Use with caution.
5. Show current or past audits (QA)
Objective
Consult compliance, safety or quality tests performed on machines.
Procedure

Click "QA launched".
A window displays the list of tests performed and their status (successful or failed).
When to use
To check that the rules are being applied.
To identify possible malfunctions.
6. Access system actions (advanced diagnostic)
Objective
Use remote diagnostic or intervention tools on a machine.
Procedure

Click Action Next to the relay.
Select one of the available options:
Reboot : restarting the machine.
Process : visualization of processes in progress.
Disk use : consultation of the disk space used.
Agent version : version of software agent installed.
Netstat : display of active network connections.
Console : opening of a command line interface.
When to use
When a machine is broken, slowed or unstable.
For quick diagnosis or manual verification.
7. Banning a machine
Objective
Temporaryly block a machine's access to the system.
Procedure

Click "Bannir" Next to the relay.
Confirm the banner.
The machine is isolated from the rest of the network.
When to use
In case of abnormal behaviour, suspicion of compromise or critical error.
8. Debanniating a machine
Objective
Lift the block applied to a previously banned machine.
Procedure

Click "Debannier".
The machine regains its normal communication rights.
When to use
After correcting the initial problem.
If the machine was incorrectly blocked.
9. Remote control
Objective
Control a machine remotely as if you were physically in front of it.
Procedure

Click "Hand-to-hand".
A remote session opens, allowing you to interact with the machine's graphical interface.
When to use
To intervene manually.
To diagnose a specific problem.
When no other automated action is enough.
10. Manage relay rules
Objective
Consult, modify or add specific operating rules to a relay.
Procedure
Click "Relay rules" (last working image)
From the interface:
View existing rules.
Change or delete outdated rules.
Add new rules as needed.
When to use
To automate repetitive actions.
To dynamically adapt the relay behavior to a specific use.