# Chapter 8: Packages
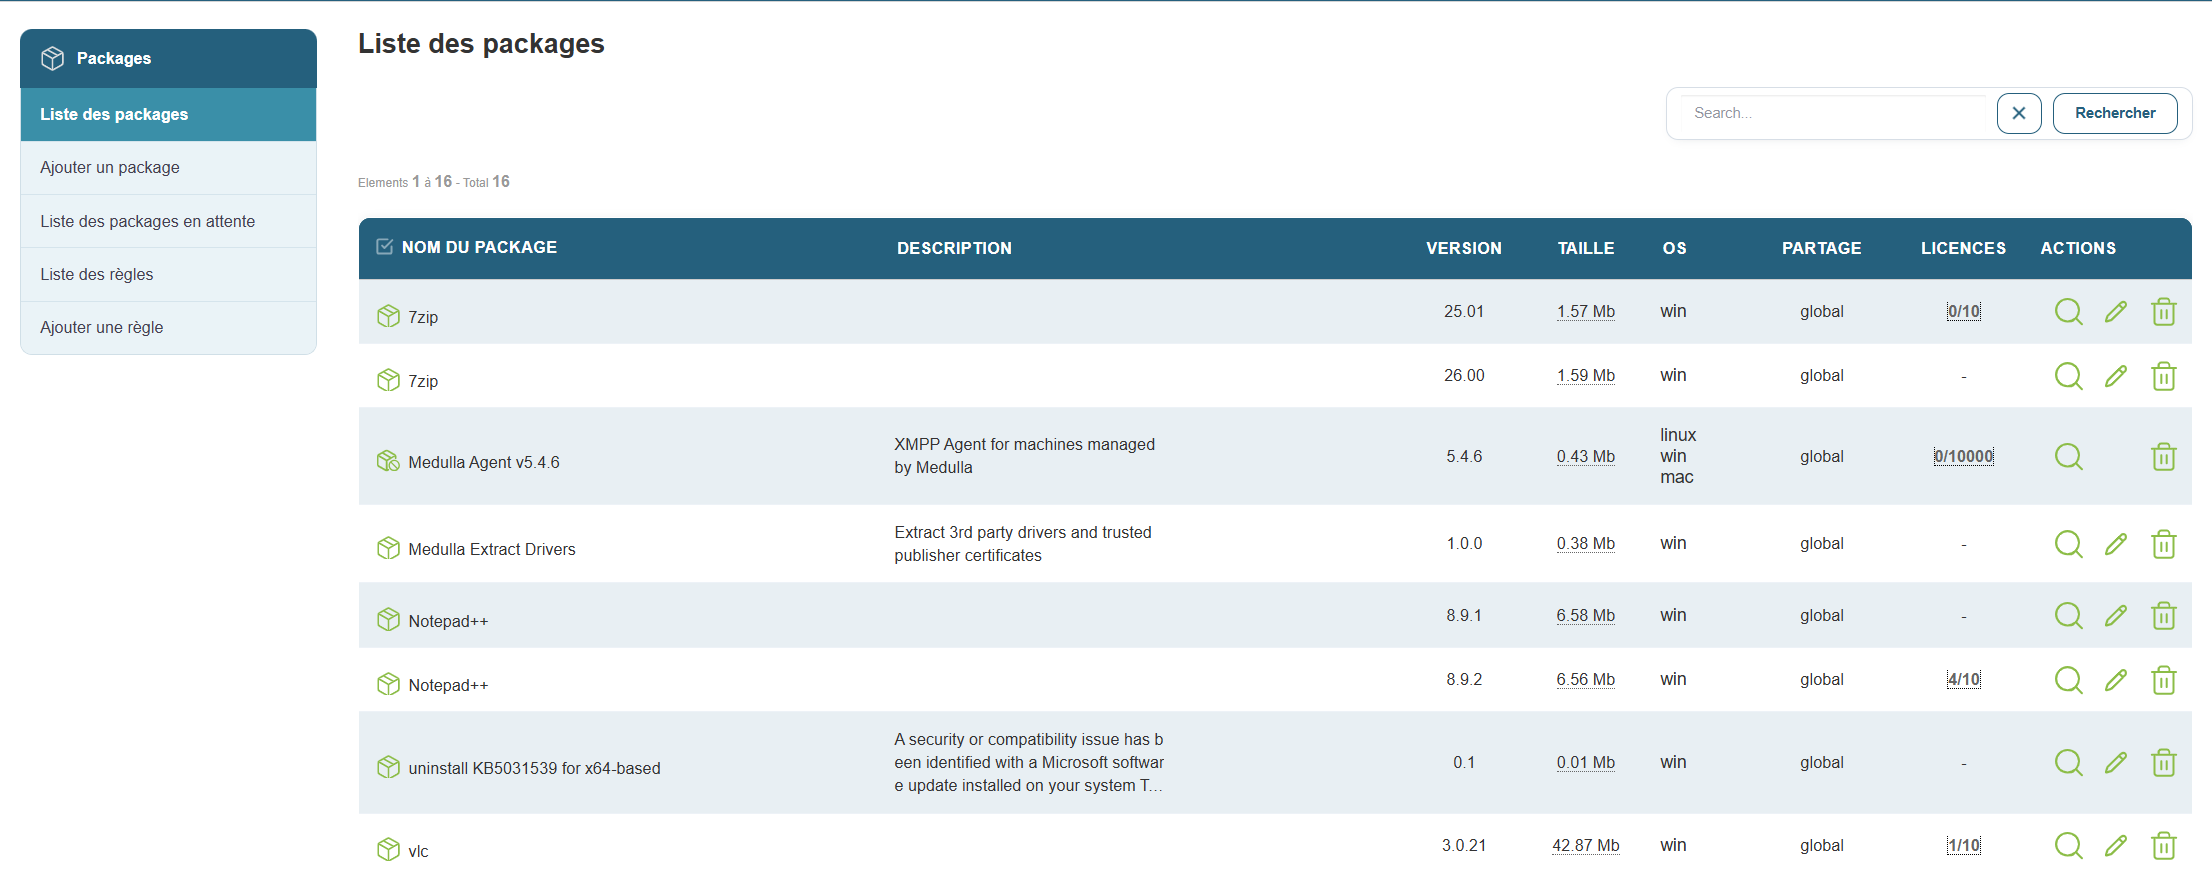
# List of available packages
[](https://docs.medulla-tech.io/uploads/images/gallery/2026-03/hPZCIkWFK2ltyalS-image.png)
Package deployment allows you to install, uninstall, or perform specific actions on multiple remote workstations in a centralized and automated manner. It is a key feature for managing an IT infrastructure, offering speed, consistency, and precise tracking.
This section displays all packages ready for use in deployments.
#### Access
Side menu **List of packages**
#### Displayed content
Each line in the list displays
- The package **name**
- A **description**
- The **type of action** (installation, uninstallation, script)
- The **version**
- The **associated permissions**
#### Available functions
- Search by keyword
- Sort the list by alphabetical order, date, or version
This allows for quick and organized browsing of available deployment tools.
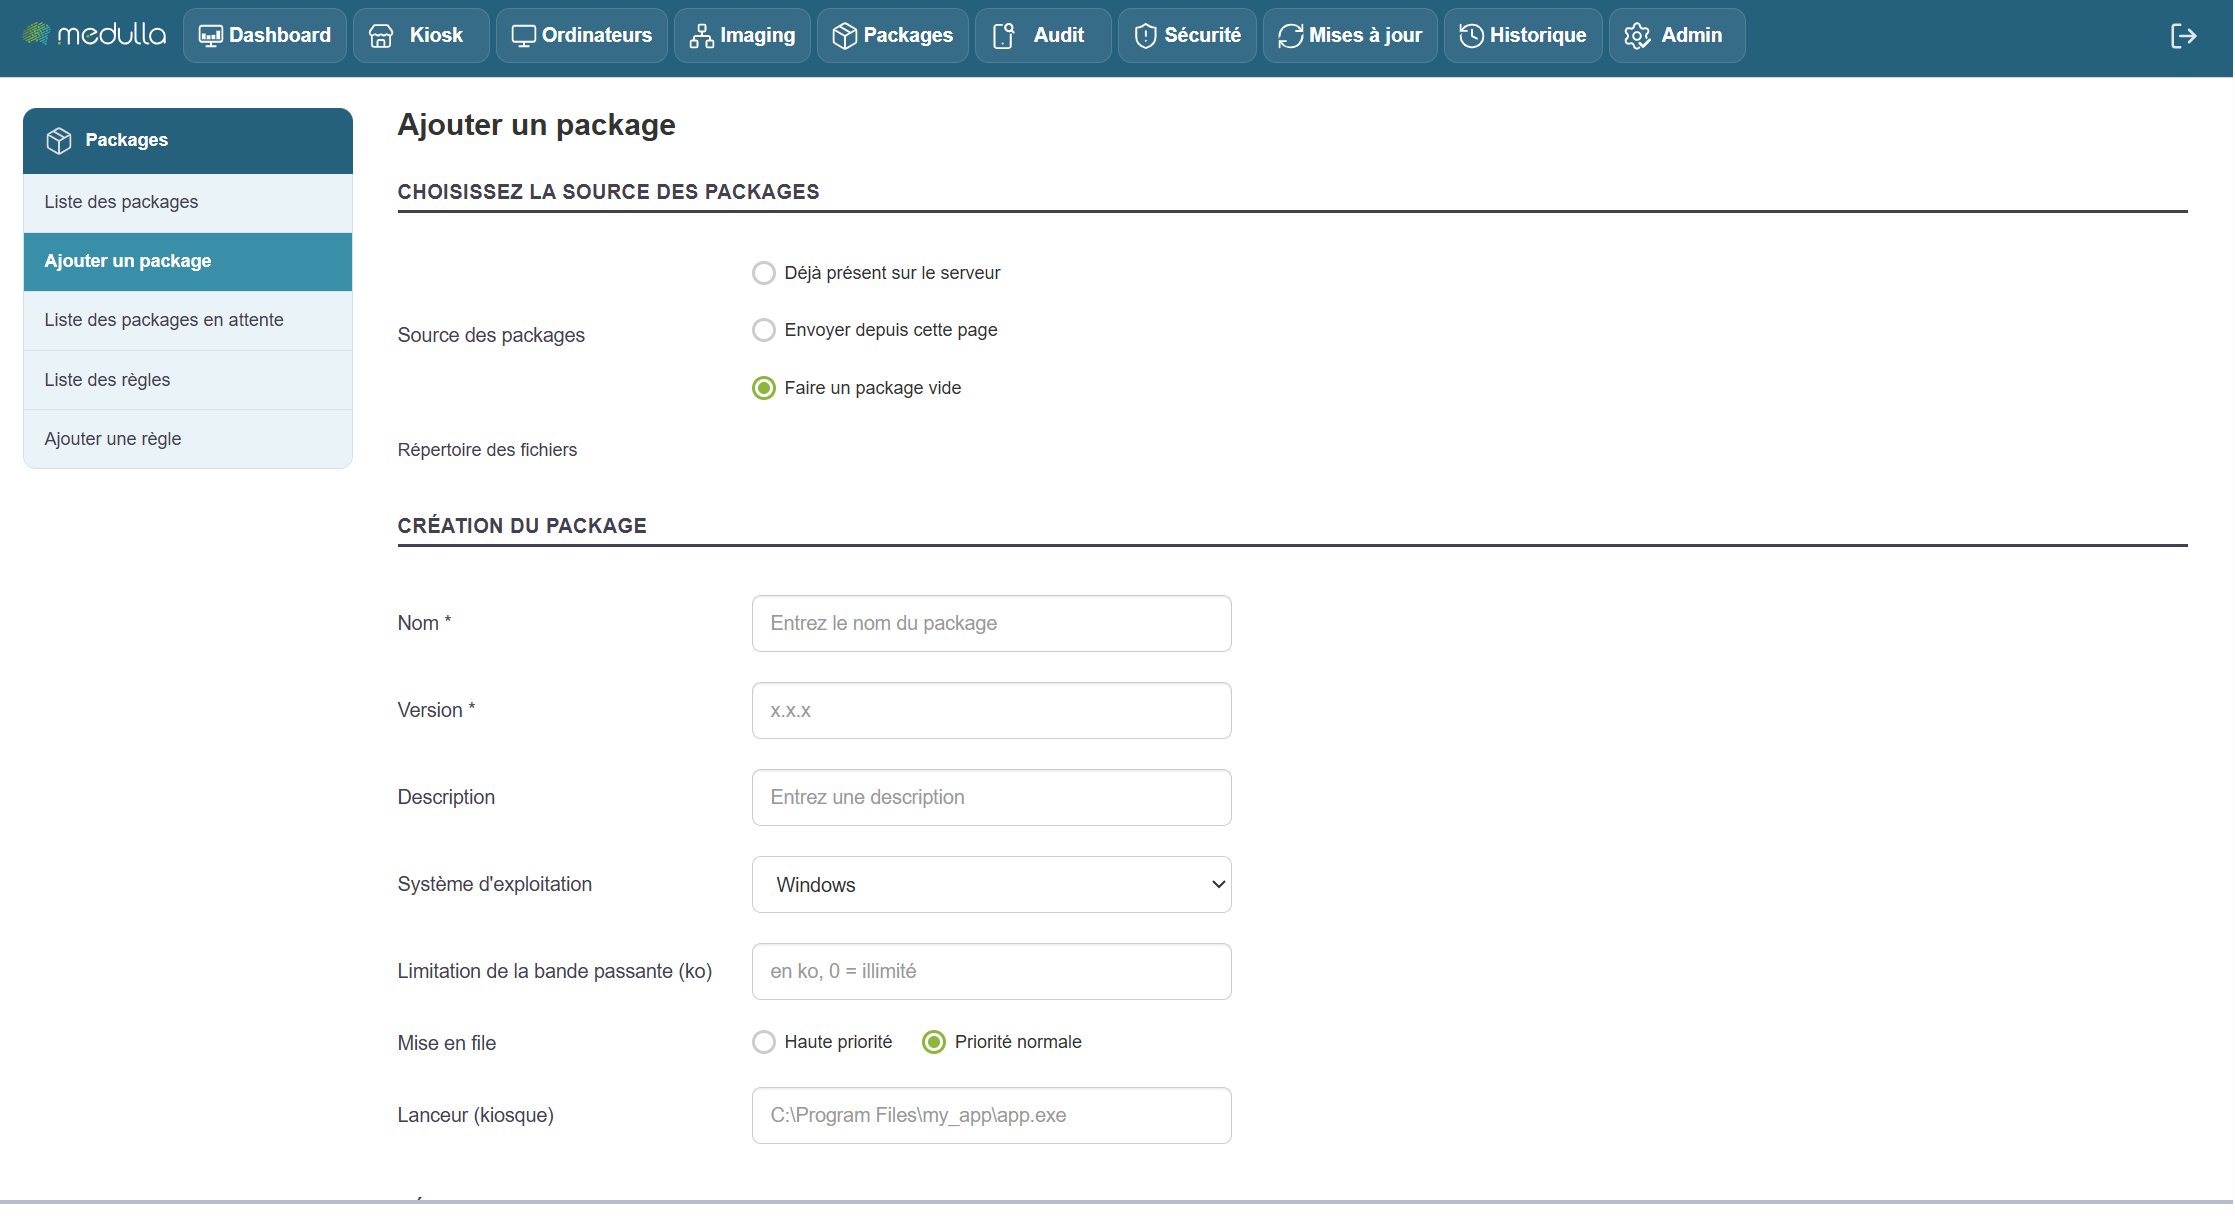
# Add a new package
[](https://docs.medulla-tech.io/uploads/images/gallery/2026-03/YrrTTNDry5hRLTsr-ajoutpackages1-3.png)
[](https://docs.medulla-tech.io/uploads/images/gallery/2026-03/psFFLeMULKzxDh1o-image.png)
[](https://docs.medulla-tech.io/uploads/images/gallery/2026-03/doIUht7HOPCu3lpR-image.png)
Creating a package involves defining an action (installation, uninstallation, script, etc.) that will be deployed to one or more workstations. The creation form allows you to precisely configure the package’s behavior and its execution options.
From the main menu, go to the "Package" view, click**"Add a package"** to open the creation wizard.
Next, select the source of the files to be used in the package. Four options are available:
- **Already present on the server**
Use files previously uploaded to the server.
- **Upload from this page**
Import the installation files directly from your computer.
- **Create an empty package**
Create a package with no initial content, to be filled in later.
- **File directory**
Use a shared directory containing the files to be deployed.
#### General information to provide
##### Sharing
Select*Global Packages* to make the package visible across the entire platform, for all Entities.
#### Name
Give the package a descriptive name, for example: Install\_Chrome
*Special characters and accented characters are not allowed.*
##### Version
Enter a version number, for example: 1.0.0.
##### Description
Briefly summarize the purpose of the package.
##### Operating System
Select the target OS, for example:*Windows*.
#### Define the technical deployment details
##### Transfer method
Generally, use pushrsync (recommended).
- pushrsync: The server pushes the package to the workstation via Rsync.
- pullrsync: The machine retrieves the package from the server via Rsync.
- pulldirect: The machine retrieves the package from the server.
##### Bandwidth Limitation
Optional value to limit the transfer speed, e.g., 500Queuing
##### Queuing
Choose between *High Priority*or*Normal Priority*, depending on the urgency of the deployment.
The execution order (from the queue) of deployments is determined based on the priority selected when the package was created.
##### Launcher (Kiosk)
Specify the path to the executable file that should be launched after installation (e.g.,`C:\Program Files\my_app\app.exe`).
Only required for Kiosk mode, to run the previously installed software via a button available on the Kiosk.
##### Dependencies
*If your application requires other components to function*
Search for and add the necessary dependencies from the available list (examples:`Extract drivers`, `Medulla Agent`).
The added dependencies will appear in the corresponding section.
##### Link to inventory
Enable this option to allow tracking of the package after installation via the GLPI inventory.
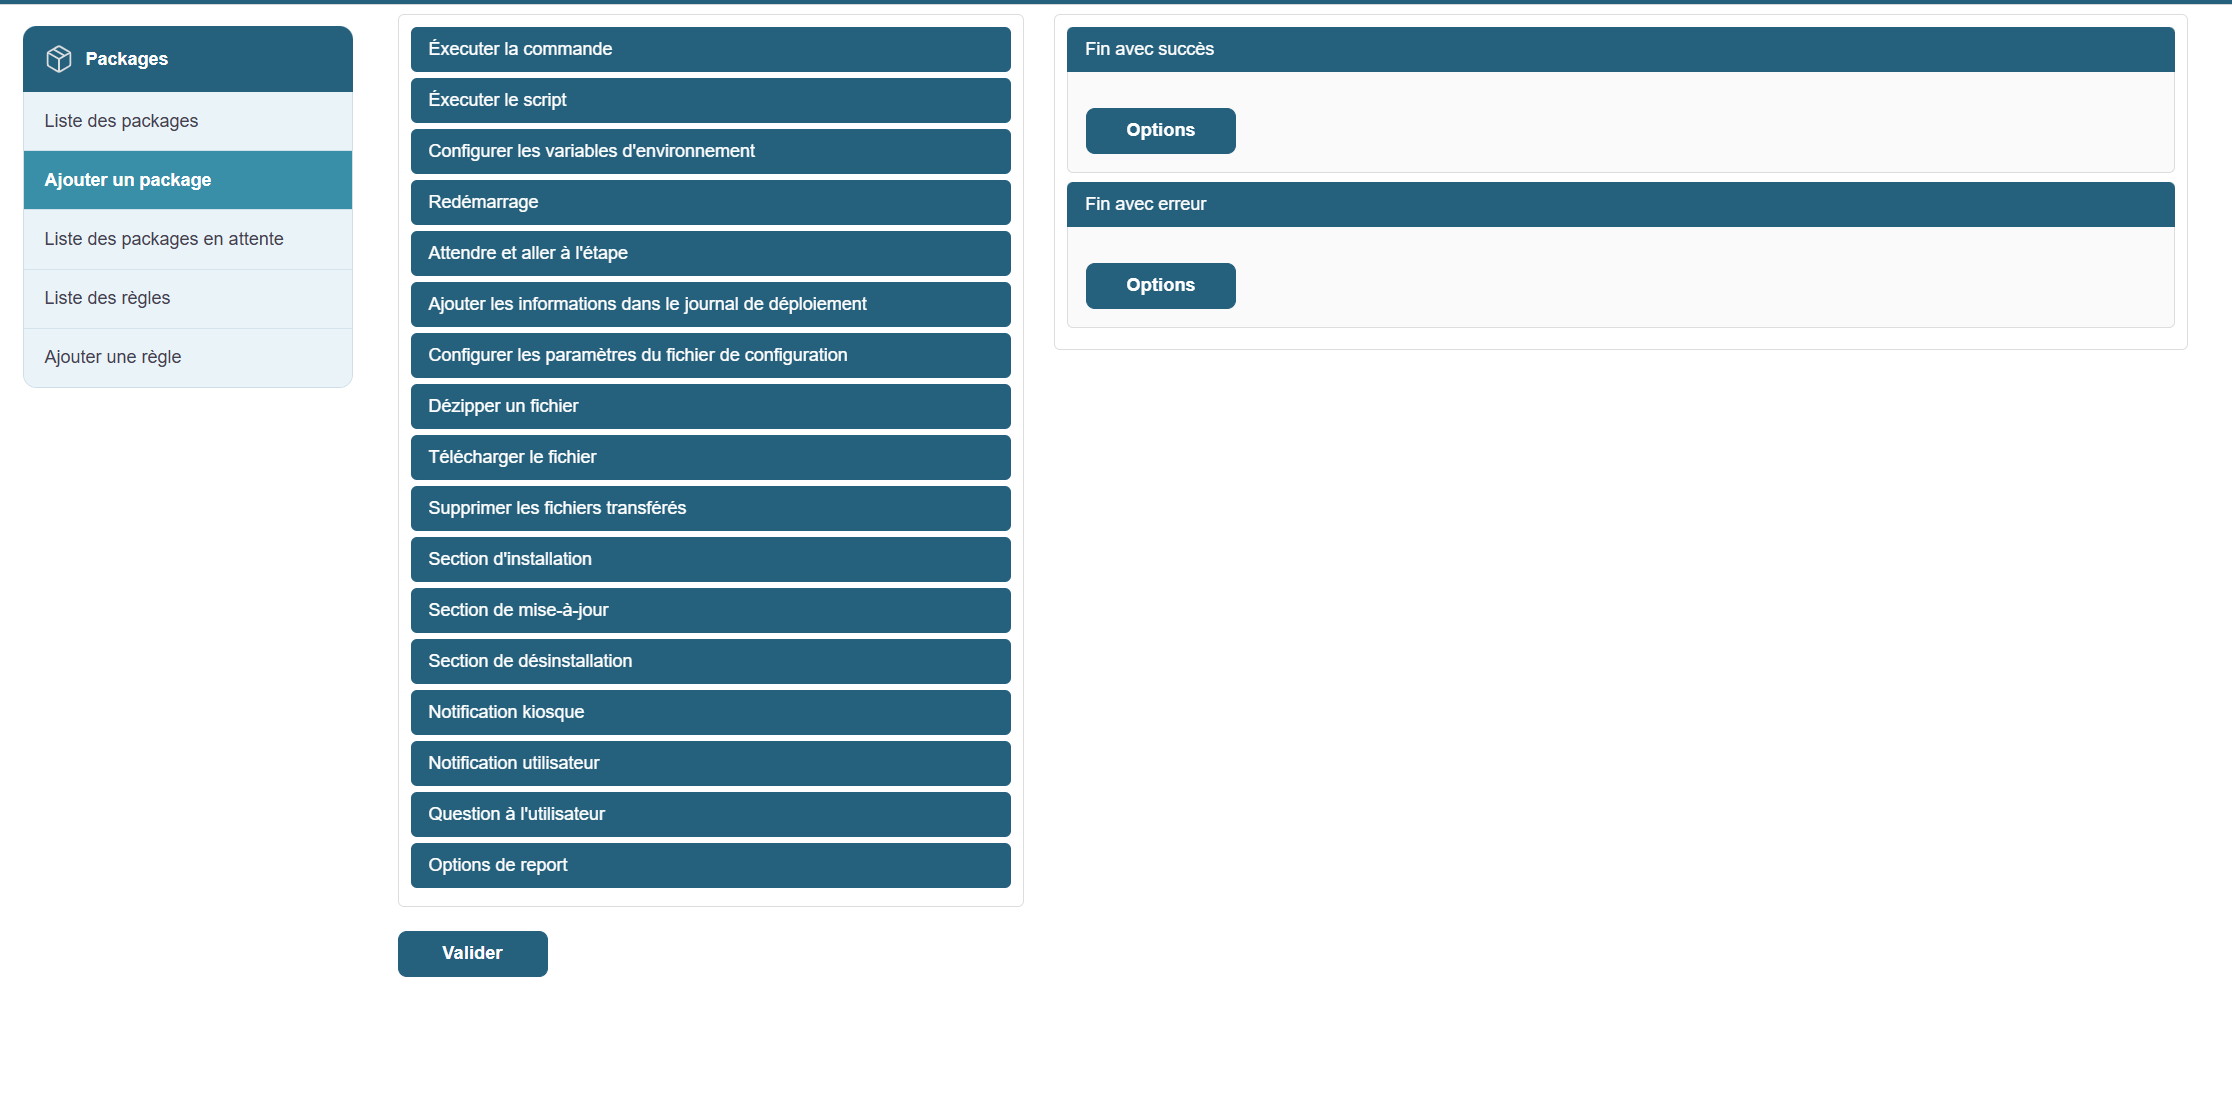
##### You can add custom actions to the package, depending on your needs:
- Run a command or script (When adding a file to the "Package Source" package, our wizard automatically adds the correct command to run the setup file, allowing for silent installation of the application)
- Configure environment variables
- Restart the workstation after installation
- Wait and proceed to the next step
- Add information to the deployment log
- Modify or configure a settings file
- Extract, download, or delete files
##### The package may include several steps depending on its lifecycle
- **Installation section**: for the initial installation
- **Update section**: when upgrading to a new version
- **Uninstallation section**: to remove the program
##### To interact with the end user
- **Kiosk notification**: Displays information in the user area
- **User notification**: Message displayed on the screen
- **User prompt**: Conditional interaction (e.g., choosing a time)
- **Postponement options**: Allows you to postpone the installation
##### Define the package’s behavior at the end of the process
- **Successfully completed**
The step can be named `END_SUCCESS`. Allows you to trigger a final action.
- **End with error**
The step can be named `END_ERROR`. Used to handle deployment errors or failures.
- **Inventory**
Option available if a change to the device is detected following deployment.
- **Delete the package**
Enable this option if the package should be deleted after execution (rarely used in standard deployments).
##### Once all sections have been configured and verified
Click **Add** to save the package.
It will then be accessible from the library for use in a deployment rule or to be triggered manually.
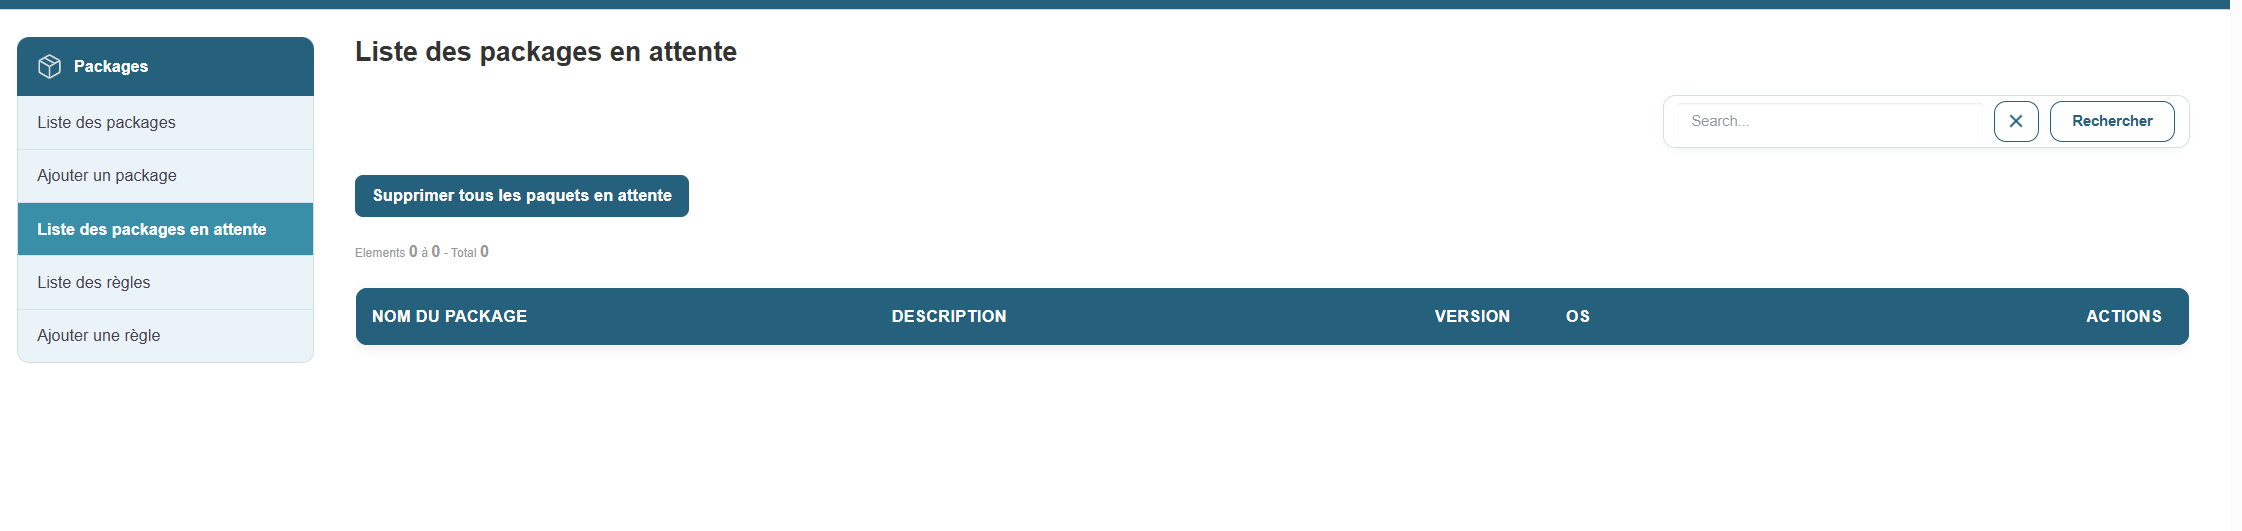
# Packages on the waiting list
This section allows you to view packages that have been created or added but have not yet been sent to the target devices. It is primarily used to organize, verify, or delete pending actions before they are executed.
[](https://docs.medulla-tech.io/uploads/images/gallery/2026-03/dLw2mmznyFC0ZFFB-image.png)
**Access:**
Side menu → **Pending packages**
**Section contents:**
Once on this page, a list of all packages in the queue is displayed with the following information for each entry:
- **Package name**
- **Description**
- **Version**
- **Target operating system**
- **Available actions** (to the right of each row)
**Available actions:**
- **View mirror status**: allows you to check the mirror servers available for the package distribution.
- **Remove pending packages**: button to remove a specific package from the list.
- **Remove all pending packages**: general button at the top of the page to clear the entire queue if necessary.
- **Search for a package**: search field to filter the list by name or version.
> Note: This page does not allow you to directly **initiate** a deployment, but it helps you monitor items still in the queue. Deployment is typically performed from a separate dedicated section or via an action triggered by a scenario or rule.
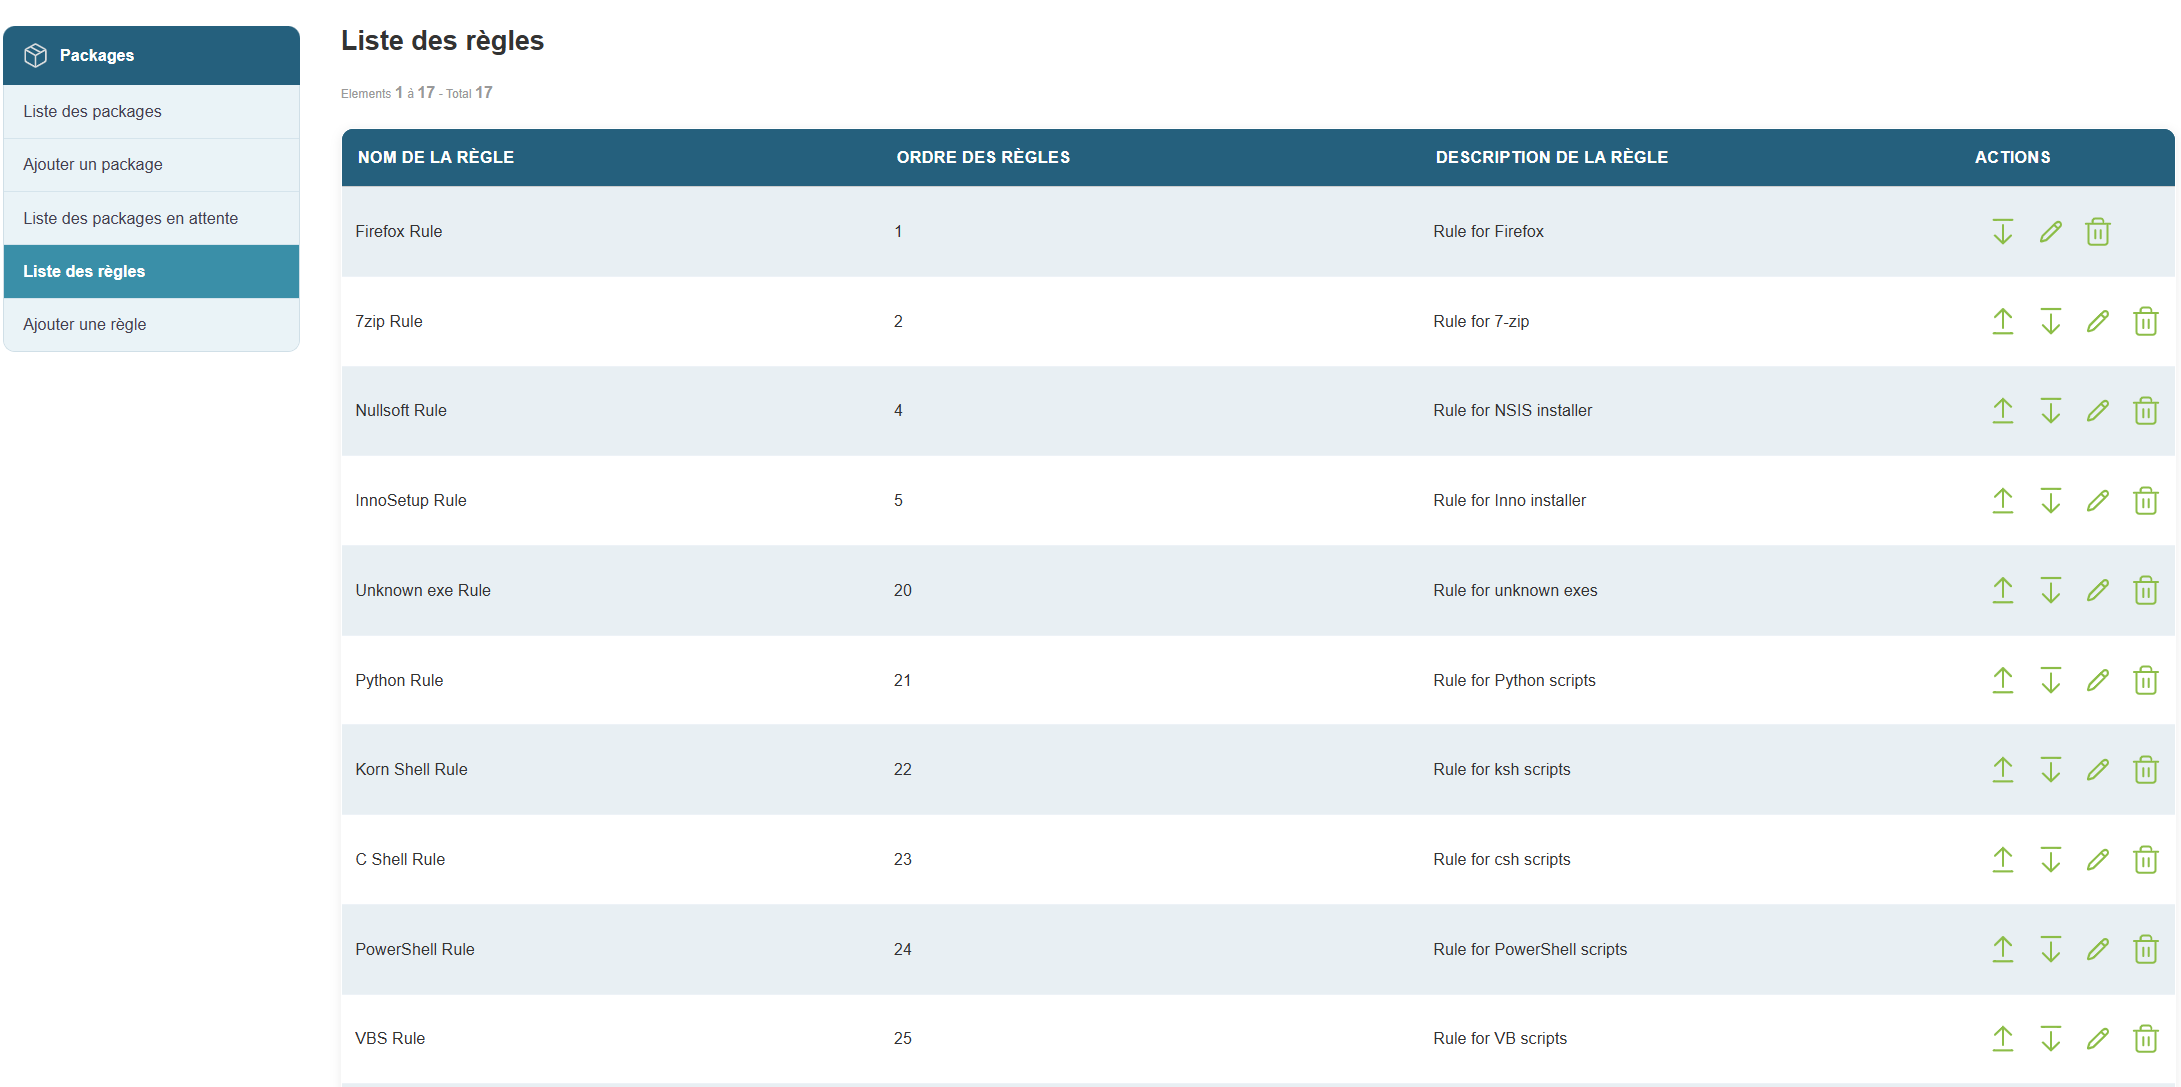
# List of deployment rules
Deployment rules allow you to schedule or restrict deployment based on specific criteria (time range, machine type, user group, etc.).
[](https://docs.medulla-tech.io/uploads/images/gallery/2026-03/0PDbehxQTqudtfH8-image.png)
**Access:**
- Side menu → **List of rules**
**Available information:**
- List of existing rules with their conditions
- Examples of criteria:
- Name
- Order
- Descriptions
- Actions:
- Increase or Decrease the rule's priority
- Edit the rule
- Delete the rule
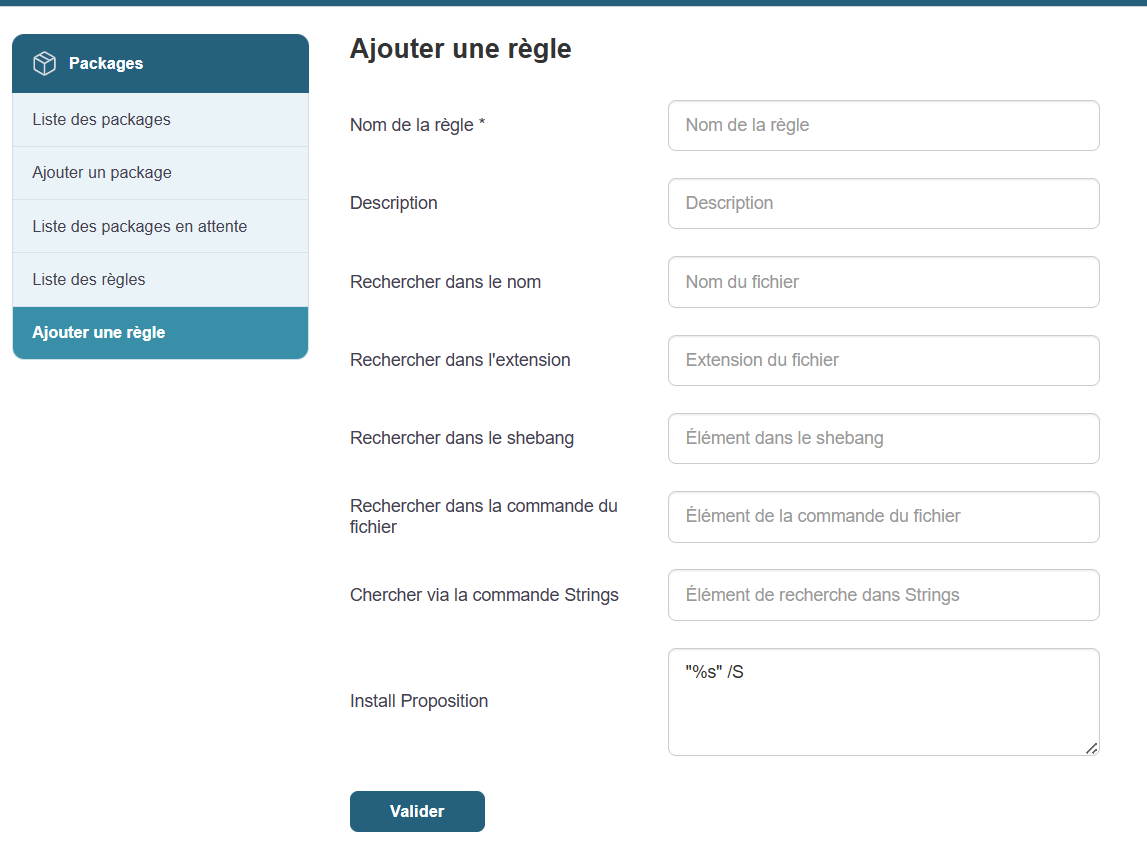
# Add a custom rule
Creating a rule allows you to precisely define when and on which machines a package will be deployed.
[](https://docs.medulla-tech.io/uploads/images/gallery/2026-03/gtzPkjpe1af98YKj-image.png)
**Steps:**
1. Side menu → **Add a rule**
2. Define the conditions:
- Example: “Run every Monday at 9 a.m. on Windows 11 workstations in Building A”
3. Associate this rule with one or more packages
4. Save
The rule is now active and is automatically applied when its conditions are met.
# Launch a deployment and monitor its execution
Once your packages and rules are ready, you can begin deployment on the target machines.
**Steps:**
1. Side menu → **Package list**
2. Select a package
3. Click on **Run Action** or **Deploy**
**Real-time tracking:**
- Progress is visible from the interface
- Machines report their status: In Progress, Success, Failure
**In case of failure:**
- Go to the **Action Tracking** section
- View the detailed error report (examples: machine turned off, permission error)
- Correct if necessary, then restart the action without having to start over
#### **Conclusion**
With this feature, you can centralize and automate all your software installations and system actions across your entire fleet. You save time, ensure consistency across workstations, and gain precise control over every deployment performed.